How to Build a Modern Water Fountain
 Updated: Feb. 28, 2023
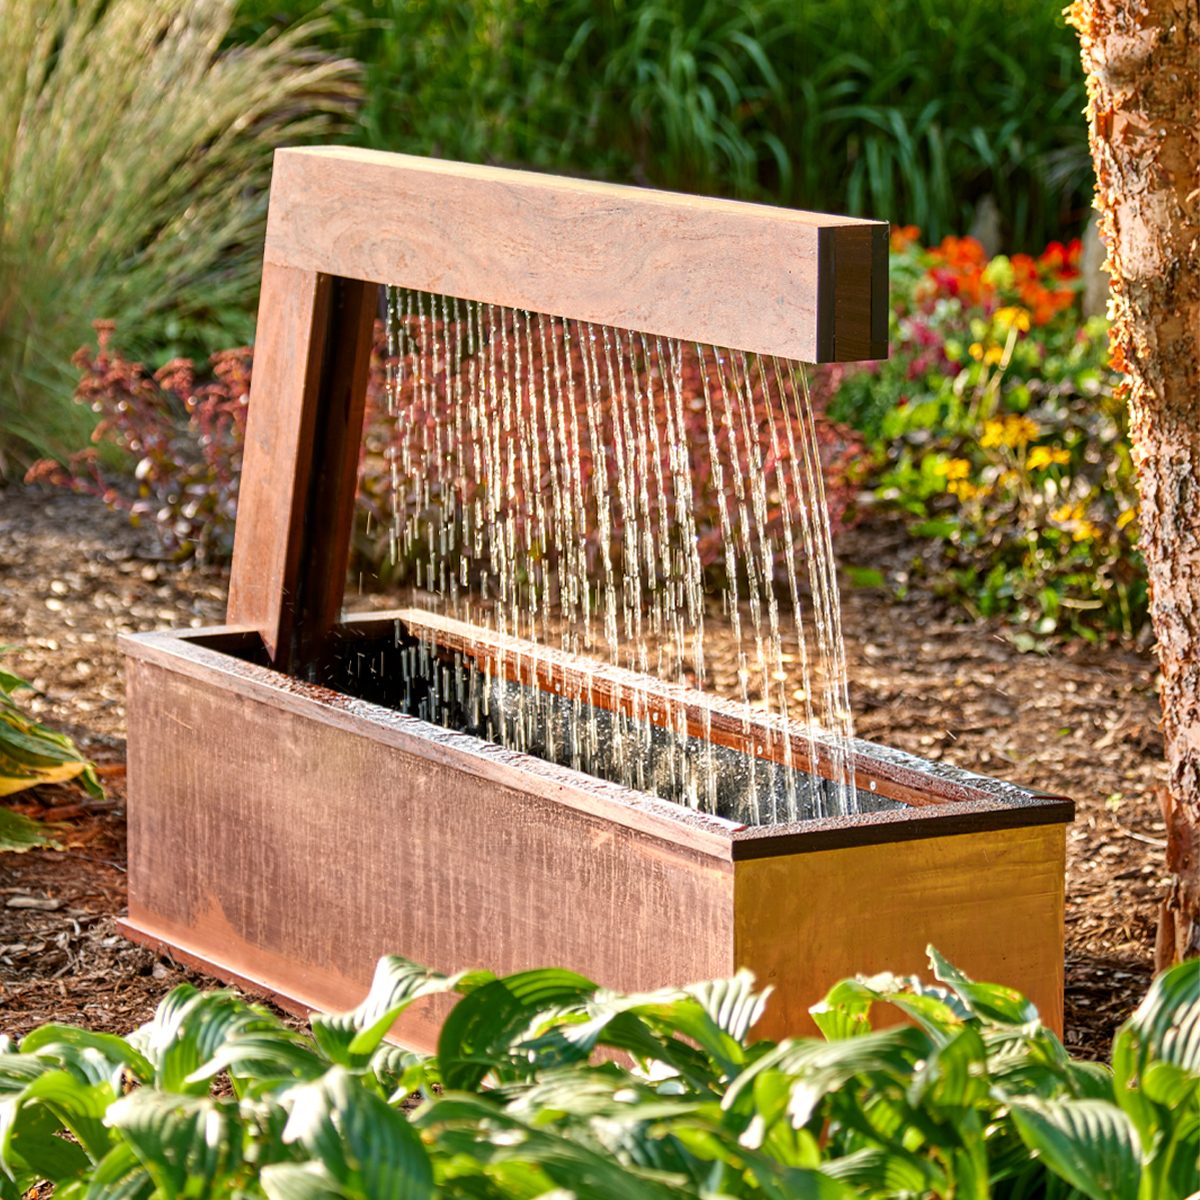
Create a calming and relaxing environment right in your backyard with this modern water curtain.
Our editors and experts handpick every product we feature. We may earn a commission from your purchases.
Two days
Intermediate
$400
Introduction
When I think of deep relaxation, the sound of water immediately comes to mind: crashing ocean waves, the trickle of a nearby brook, a cascading waterfall, light rain — you get the idea.
To bring calming sound to your backyard, I’ve designed this sleek backyard water feature using a simple box for a reservoir, a pump and basic plumbing parts to keep the water flowing. It can be disassembled easily and tucked away for the winter or moved around your patio. I dressed mine up with ipe hardwood and a sheet of copper to wrap the reservoir.
You can take these ideas and build a modified version to fit your favorite place to relax.
Tools Required
- 18-gauge nailer
- Basic woodworking tools
- Circular saw
- Jigsaw
- Miter saw
- Table saw
Materials Required
- 1 -3/4"x4'x8' marine grade plywood
- 1" vinyl tubing
- 12" copper coil
- 3 - 2x2x8'
- 3/4"CPVC pipe
- 4 - 1x6x8' ipe (or other rot-resistant or treated hardwood)
- Box of 2" constuction screws
- Fountain pump
- Plumbing fittings
- Pond liner

Figure A
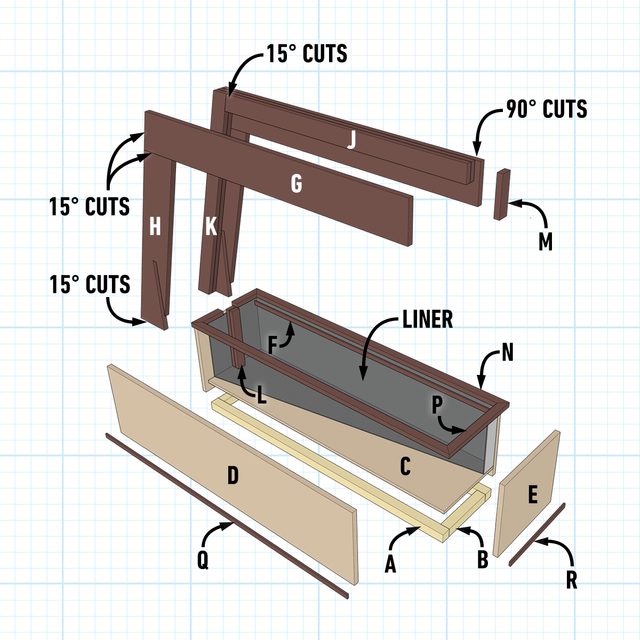
Cutting List
| KEY | QTY. | DIMENSIONS | PART |
| A | 2 | 2×2 x 48″ | Reservoir frame side |
| B | 2 | 2×2 x 9″ | Reservoir frame end |
| C | 1 | 3/4″ x 12″ x 48″ | Reservoir bottom |
| D | 2 | 3/4″ x 12-1/2″ x 48″ | Reservoir side |
| E | 2 | 3/4″ x 12-1/2″ x 13-1/2″ | Reservoir end |
| F | 2 | 1/4″ x 3/4″ x 47-1/2″ | Termination bar |
| G | 2 | 3/4″ x 5″ x 44-9/16″ | Horizontal outer arm |
| H | 2 | 3/4″ x 5 x 30-5/16″ | Vertical outer arm |
| J | 2 | 3/4″ x 2-1/2″ x 40-7/16″ | Horizontal spine |
| K | 2 | 3/4″ x 2-1/2″ x 3′ | Vertical spine |
| L | 2 | 3/4″ x 2-1/2″ x 9″ | Arm support block |
| M | 1 | 3/4″ x 1-1/2″ x 5″ | Fountain arm cap |
| N | 2 | 3/4″ x 2″ x 50″ | Top side trim |
| P | 2 | 3/4″ x 2″ x 14-3/16″ | Top end trim |
| Q | 2 | 3/4″ x 1/4″ x 49-1/2″ | Lower side trim |
| R | 2 | 3/4″ x 1/4″ x 14″ | Lower end trim |
Project step-by-step (13)
Frame the Reservoir
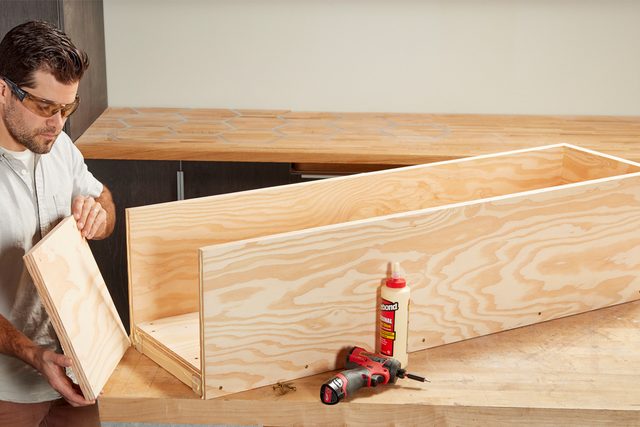
Cut the reservoir frame sides (A) and ends (B) from 2×2 lumber and fasten the bottom piece of marine plywood (C) to form the base. Align the sides (D) with the ends of the base and fasten them to the 2x2s. Fasten the ends (E) to the 2x2s at the bottom with construction screws. Drive trim screws into the edges of the plywood toward the top.
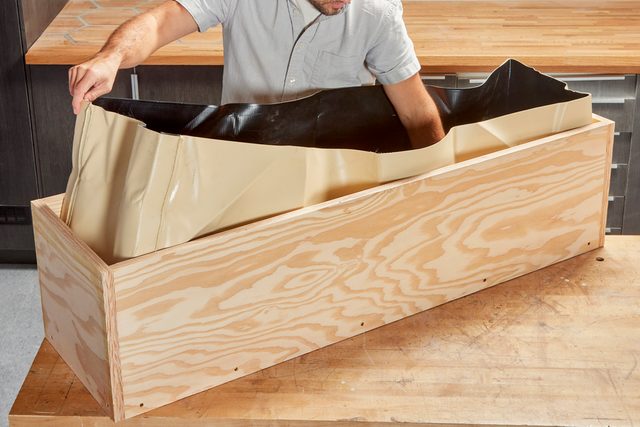
Place the Liner
You’v got two options for lining the reservoir. Flat pond liners, available at home centers, are inexpensive but require some origami to fit properly. I ordered a custom heavy-duty box welded liner from everything-ponds.com that fit the reservoir perfectly. It was more expensive than I liked, but well made, strong and easier to install.
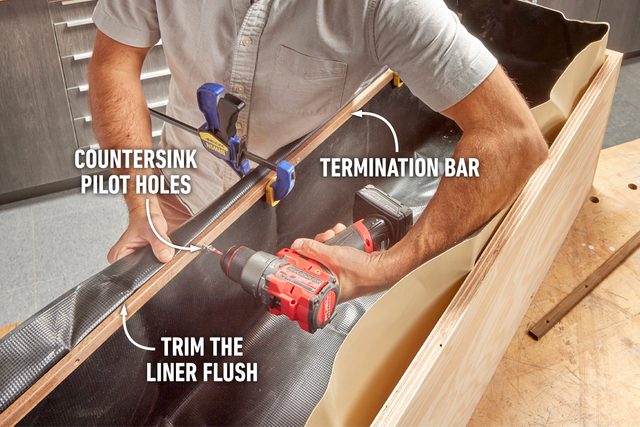
Fasten the Liner
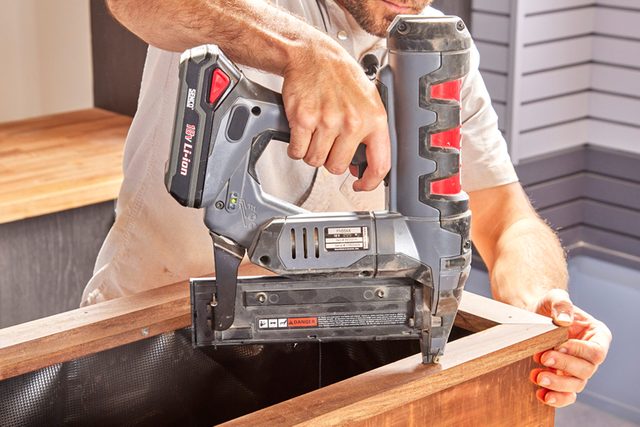
Rip the termination bar (F) down to 1/4-in., then cut it to fit inside the reservoir. Drill countersunk pilot holes every several inches, then clamp the termination bar and liner to the top of the reservoir and fasten them with one-inch screws. This prevents the liner from sliding down.
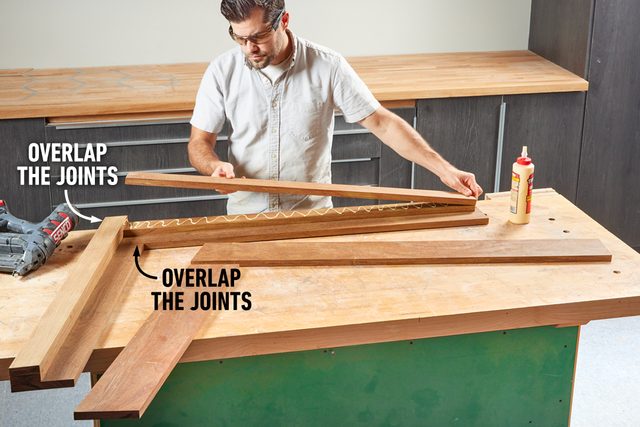
Layer the Water Curtain Arm
I constructed the water curtain arm from ipe decking. It’s a rot-resistant species that will do well outside for years with little maintenance. You may substitute another rot-resistant or treated lumber if you wish.
At the table saw, rip off the rounded edges of the ipe decking, leaving the boards about five inches wide. Then cut the horizontal (G) and vertical (H) outer arm parts to length with 15 degree angles on the ends. I cut each pair at the same time to ensure they were the same length and angle.
Rip another piece of decking in half for the spine of the arm, and cut two pieces for each of the horizontal (J) and vertical (K) spine parts with the same 15 degree angles. Lay the parts on a flat surface. Glue the pieces together, overlapping the spine.
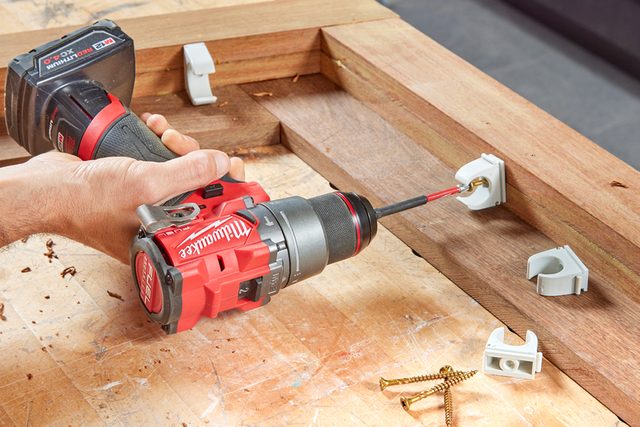
Fasten Plumbing Clips
Before gluing and nailing the final layer of the arm assembly, fasten plumbing clips to hold the CPVC and vinyl tubing along the inside of the spine. Then fasten the final pieces of ipe to complete the arm.
Notch the Arm
Using a Speed square indexed against the bottom of the arm, lay out a 12-in. tall by 7/8-in. wide vertical notch to fit over the end of the reservoir. Transfer the mark to both sides of the arm and cut the notch using a circular saw and jigsaw.

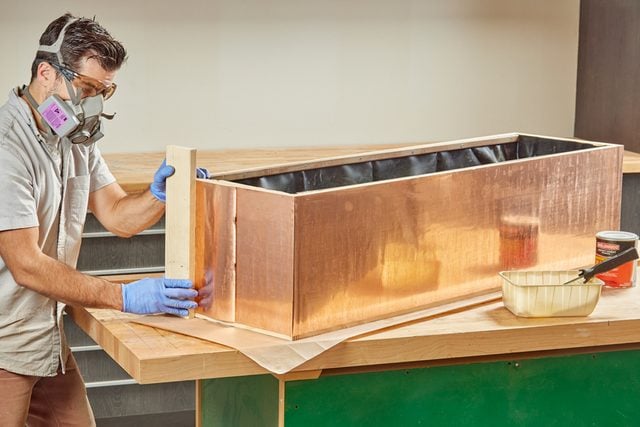
Wrap the Reservoir
I decided to wrap the plywood with copper rather than stain or paint it. To apply the copper, roll contact cement on the outside of the reservoir and onto the copper coil. Then carefully place the reservoir onto the copper.
Apply one side at a time, folding the copper around the corners with a wood block. I planned for the seam of the copper to be hidden later by the water curtain arm. Once the copper is applied, press it firmly in place with a J-roller.
Attach the Arm
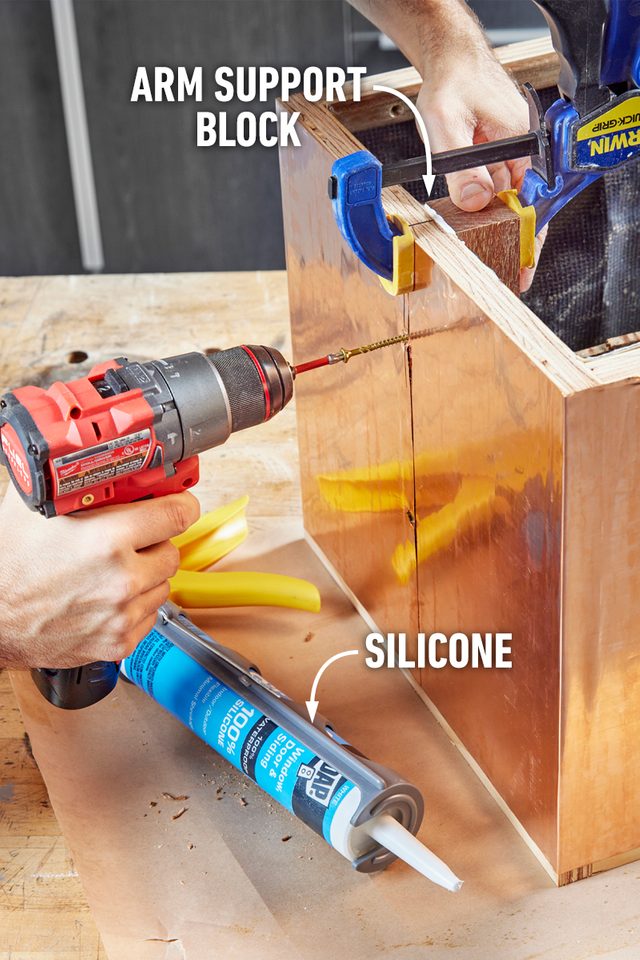
Glue two ipe offcuts together to make the arm support block (L). Position this block on the inside of the reservoir to keep the arm in place. Fasten the block with screws from the outside and seal it with silicone.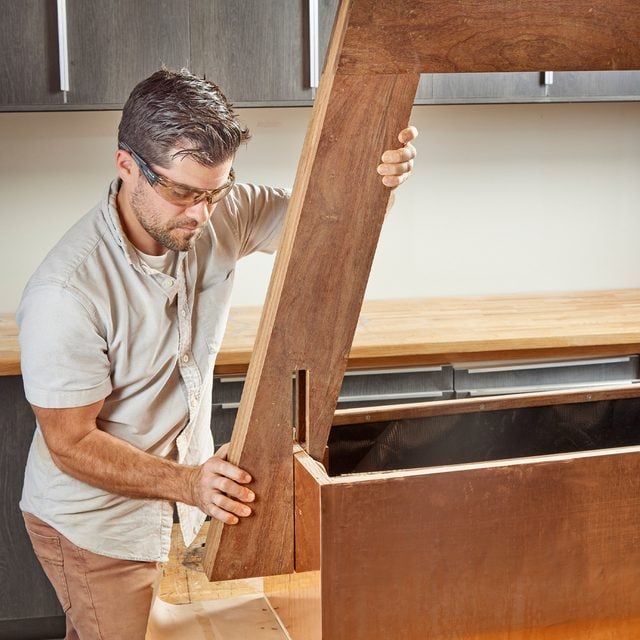
Slide the arm over the reservoir edge and fit the plumbing channel over the block.
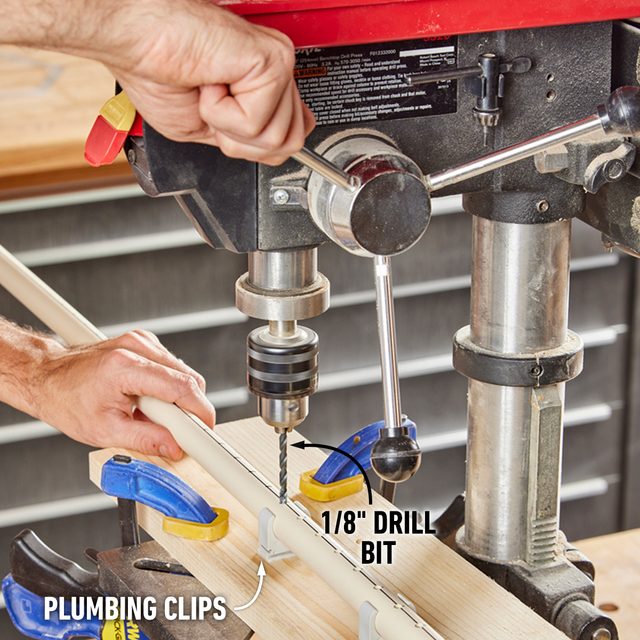
Mark a Line
The CPVC pipe that makes the water curtain needs many holes drilled in a straight line. To get them all to line up, scribe a line across the pipe by clamping it down and dragging a marker flat along your workbench surface.

Drill the Holes
Mark the hole locations along the line one inch apart. Fasten a pair of plumbing clips to a board to hold the pipe in place while you drill the holes, then clamp the board to the table to keep it in position. Slide the pipe through the clips and drill all the holes.
Connect the Fittings
I spent some time in the plumbing department at my local home center piecing together the fittings to plumb the water curtain to the pump. I ended up using a 3/4-in. PVC end cap, a 3/4-in. push-to-connect x FIP brass adapter and a 3/4-in. MIP x barb brass adapter.
After fitting these parts together, I pushed a length of one inch diameter vinyl tube over the barb fitting and held it in place with a hose clamp.


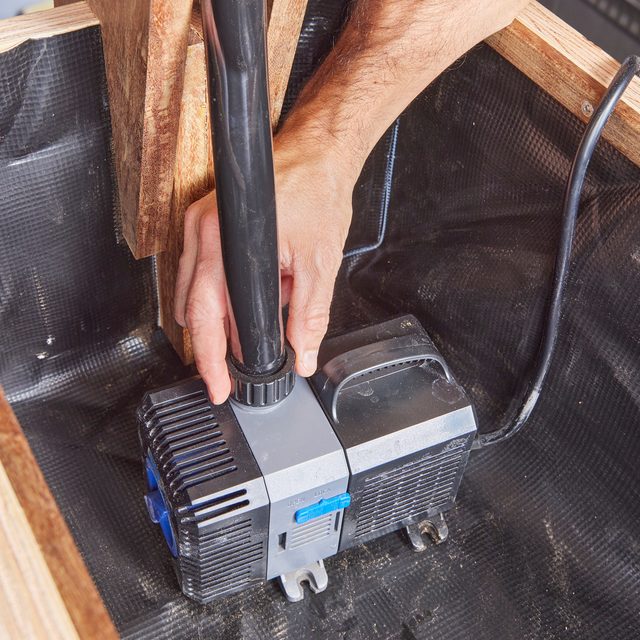
Connect the Pump
Snap the water curtain pipe into the plumbing clips, then cut the vinyl tubing long enough to connect to the pump. Slip the tubing onto a barb fitting on the pump and tighten the nut that connects the tubing to the pump.
With the plumbing in place, I used an offcut of ipe to make the fountain arm cap (M).
Trim the Bottom and Top
Measure and cut miters on two-inch-wide pieces of ipe to make the top side (N) and end (P) trim pieces. Fasten them with a bead of silicone and brad nails. Rip 1/4-in. ipe strips for the lower side (Q) and end (R) trim and fasten them around the bottom of the reservoir to cover the edge of the copper coil.