
How to Build a Compost Bin
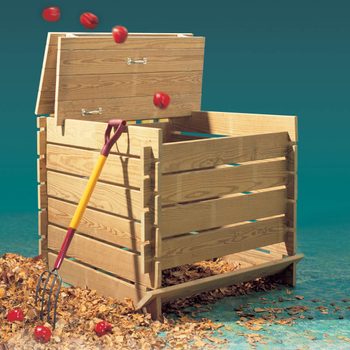
Updated: Mar. 01, 2023This 'log cabin' bin will keep your compost pile from becoming an eyesore. These compost bin plans will give you an attractive compost bin!
You’ll spend about $100 for materials and you probably already own all the tools you’ll need. Round up a circular saw, a coping saw, a tape measure, a drill/driver, 1/16-in. dia. and 3/8-in. dia. drill bits, a carpenter’s square, two pipe clamps and a wood chisel. We’ll show you how to build a compost bin that’s attractive!
The compost bin is constructed from “five-quarter” (5/4) rounded-edge decking boards. (Although the name implies that these are 1-1/4 in boards, they’re actually only about 1 in. thick.) The boards are pressure treated with chromated copper arsenate (CCA), which makes the compost bin resistant to rot and insects. There’s not much hardware because the pieces fit together like the Lincoln Logs you played with as a kid.
Living a waste-free lifestyle doesn’t happen overnight. However, small changes can add up and help you and your family produce less trash that will end up in landfills. Creating a compost bin will help with that. Here are 10 ways to cut down on the amount of trash you generate.
Cutting the Pieces
All of the 5/4 decking needs to be cut to 42 in. lengths — you’ll get four 42 in. boards from each 14 ft. board. (Hauling 14 ft. boards can be a hassle, so have the lumberyard cut each one into two 7-footers.) The 42 in. boards when assembled give you a compost bin that’s approximately a 3-ft. cube.
Two of the 42 in. boards will need to be ripped in half (cut down their length). Two of the ripped pieces (parts D) need to be cut to 2-3/8 in. wide and then notched (see Figure A in Project PDFs below). One of the pieces should be cut to 1-1/2 in. wide (part C). The remaining piece is scrap, which you’ll use later. Cutting treated lumber requires special precautions. Here’s what to do:
- Wear a dust mask to avoid inhaling the sawdust.
- Do the cutting outdoors.
- Clean up scraps and throw them in the trash. DO NOT burn treated lumber. It gives off toxic fumes!
- Wash exposed skin after cutting the lumber.
Notching the Boards
Interlocking, 1-3/16 in. deep notches hold the compost bin together. Notches cut to this depth leave about a 3/4-in. space between each pair of boards when interlocked. The exact width of the notches depends on the thickness of the lumber, but remember, 5/4 lumber is actually only about 1-in. thick. Here’s how to cut the notches:
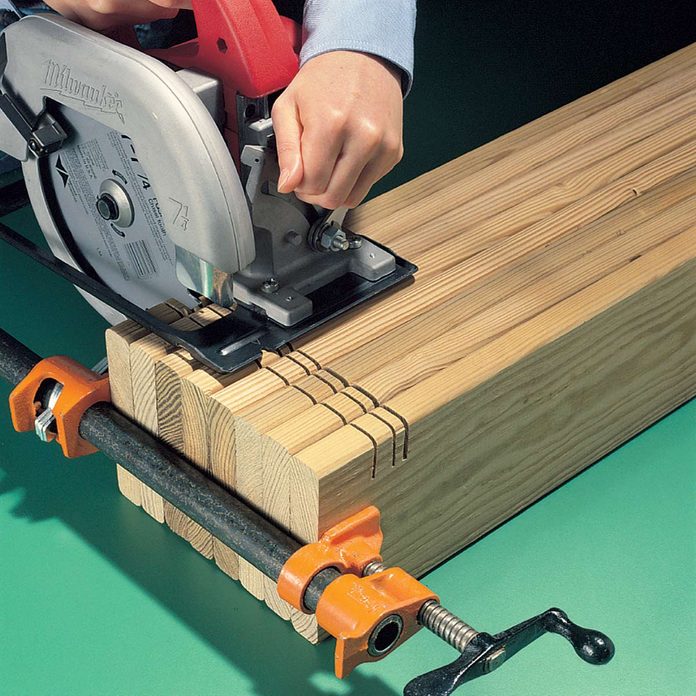
- Clamp the like components together with pipe clamps. Then stand them on edge on a solid work surface (Photo above). Not all the pieces require the same number of notches; check Figure A for the number required for each component.
- Measure in from the edge of the boards 1-3/4 in. and draw a line at this distance on all of the boards. Now, measure from this line 1 in. (or the thickness of your lumber) toward the center of the boards and draw a second line.
- Set your circular saw to cut at a depth of 1-3/16 in. and cut along the entire length of both lines. Now make a series of 1/4-in. wide cuts or slices (Photo above).
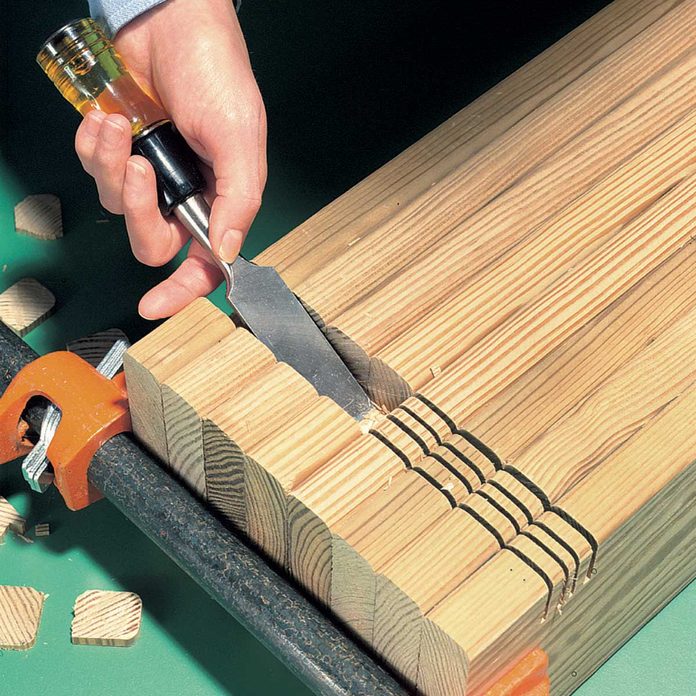
- Remove the slices with a wood chisel (Photo above). Square the bottom corners of each notch with a chisel for tight-fitting corners.
After you finish the interlocking notches, cut the 45-degree diagonal notches in the two bottom side boards (parts H). The cuts can be started with the circular saw, but finish them with a coping saw.
Next, cut two 3/4-in. thick, 3-in. long spacer blocks (parts K) from the scrap lumber. Drill a 1/16-in. dia. hole through each end of each spacer and a 3/8-in. dia. hole in the center of the spacer. Then nail the spacers to the bottom side boards (parts H).
Measure from the front edge of parts H to the center of the 3/8-in hole in the spacer. Mark this measurement on the bottom front of the part G boards and drill a 1-1/4 in. deep, 3/8-in. dia. hole for the dowel (L). Cut two, 3-in lengths of 3/8-in. dia. dowel and tap them into the holes through the spacers.
Now you’re ready to assemble the other components Lincoln Log style. First, move all of the components to the compost bin site before you start. The bin’s not easy to move once it’s fully assembled.

Constructing the Top
Building the lid is quick and easy. Here’s how:
- Lay out the seven remaining 42 in.boards, making sure they’re tight together, edge to edge.
- Measure in 3-1/2 in. from both ends and mark. This is where you’ll attach the 2 x 2 cleats (part C). Use 2-1/4 in. galvanized wood screws. Don’t put screws into the cleat board that’s directly over the center of the top’s middle board. Now rip the center board in half to form the two lid sections. Cut completely through the cleat board when you rip the center board.
- Connect the two lid sections with 4-in. strap hinges using the screws that come with the hinges.
- Mount one leaf of the 6-in strap hinges (they secure the lid to the bin) just inside the cleat boards. Mount the other leaf on the outside of the back of the compost bin.
- Finally, attach the handles as shown in Figure A.
What to Compost
- Green plant material (the nitrogen supply) with brown materials such as fall leaves (the carbon supply).
- Any plant materials (except weeds with seeds and poisonous plants such as poison ivy), straw, coffee grounds, eggshells (not the whole egg), and raw fruit and vegetable scraps. Do NOT compost meat, dairy products or pet feces.
Here are some tips for creating countertop compost.
How to Build a Compost Pile
The pile needs to be built in layers. The bottom layer should be eight to 10 in. of an even mix of grass and leaves or other plant trimmings. Water this layer so that it’s moist, but not soggy. You can add a 1-in layer of soil over the nitrogen-rich plant matter to increase the number of decomposing microorganisms. Repeat these layers until the pile fills the bin. Starting a compost pile with your leftover table scraps not only helps richen your garden soil, but it is also more sustainable for the environment.
Sustainability is more than just a buzzword. In today’s world, it’s a lifestyle. Sustainable homes reduce their impact on the environment while still meeting everyday needs. Whether you’re planning to build your dream home or just make some environmentally friendly updates, here are 10 inexpensive upgrades for a more sustainable home.
Project PDFs
Click the links below to download the materials and cutting lists for this compost bin project, as well as construction drawing Figure A.
Figure A, Cutting List and Parts List


