
How to Build an A-Frame Picnic Table
 Updated: Feb. 21, 2023
Buy PDF & Cut List Learn how to make a picnic table you can build in a day.
Introduction
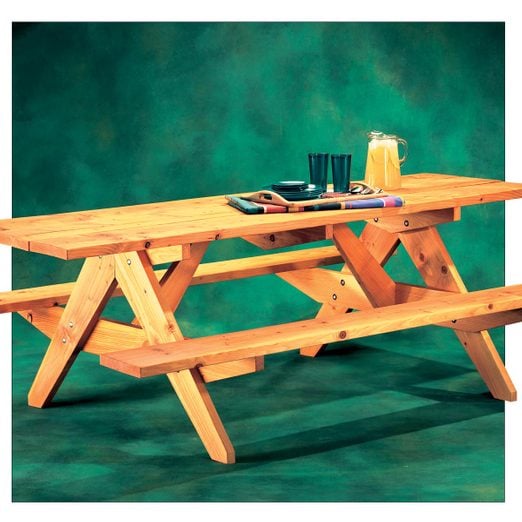
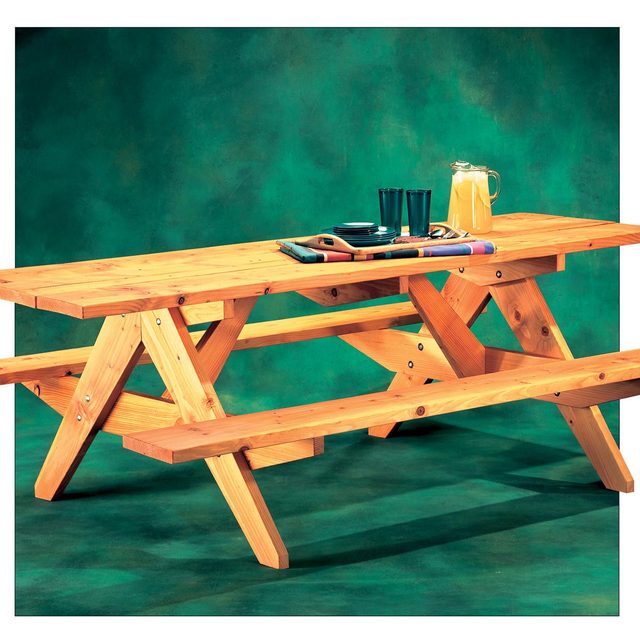
Here’s a great-looking, sturdy picnic table that’s strong enough to support eight or more bulky NFL linemen, even after a pregame feast. Learn how to make a picnic table.This A-frame picnic table is easy to build and inexpensive because it’s made from construction-grade Douglas fir lumber. And this isn’t a project that’ll take weeks to build. You can buy the lumber, build the table, and apply the finish all in one day. You can do it all yourself, but an extra pair of hands comes in handy during assembly. This picnic table comfortably seats eight people, and even 10 if no one minds close quarters.
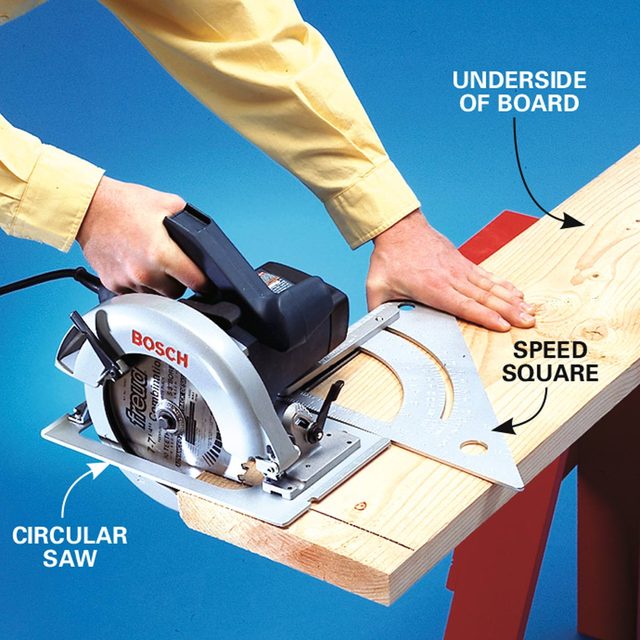
You’ll need a circular saw, belt sander, electric drill, a 1-in. diameter spade bit, a few drill bits, a ratchet with a 9/16-in. socket to tighten the nuts, a hammer, tape measure, screwdriver, four bar clamps and a pair of sawhorses to build this picnic table. If you have a Speed square, use it to guide the circular saw as you cut the ends of the top and seat boards.
The A-frame pieces (Labeled B, C and D in Cutting List in Project PDFs below) are joined with carriage bolts. A carriage bolt doesn’t look like a regular bolt. It has a round head with a short, square nub directly under it. You drive it into its hole with a hammer, and the square part locks it into the wood to keep it from turning as you tighten the nut. We used carriage bolts to give the outside ends a more decorative look.
Use galvanized deck screws to prevent rust instead of standard wood screws. The deck screws also have coarse threads for extra grip. To prevent splitting, be sure to drill pilot holes before driving the screws.
Project step-by-step (9)
Cut Seat and Top Boards
- Use a circular saw to cut the seat and top boards.
- Pro tip: Try to cut away the checks (cracks) on both ends of the boards. If you have a Speed square, use it to guide the saw as you cut the ends square.
Cut Legs and Leg Braces
- Using the dimensions in Figure A, draw the shapes of pieces B through E on your boards.
- Place one leg brace (E) and one seat support (C) on one 2×6 board.
- Put the narrow end of the leg brace at the end of the board.
- Duplicate this layout on one more 2×6, then draw the three top supports (D) on the remaining 2×6.
- Lay out the legs (B) on the 2×8 boards with the narrow ends of the legs at the ends.
- Pro tip: To make cutting the tapers a bit easier, cut the long sides of the leg braces (E) and legs (B) first, then cut the pieces to length. This way you can easily clamp the boards to your sawhorses to hold them as you make the cuts.
- Drill the holes for the screws and carriage bolts in every part except the legs and leg braces.

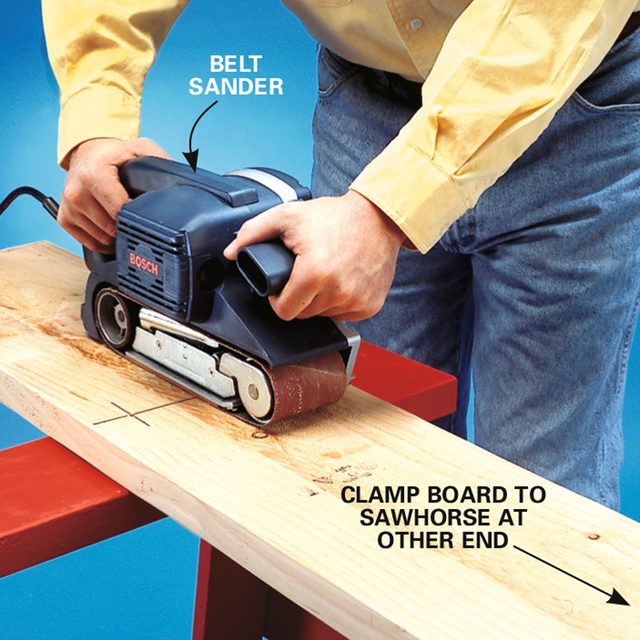
Sand the Boards Smooth
- Use a belt sander with an 80-grit belt to smooth all of the surfaces.
- Sand board edges by clamping them upright between your sawhorses, then sand them with the belt sander or by hand.
Drill Pilot Holes for A-Frame Assembly
- Make the A-frame assembly from parts B, C and D.
- Align the top edge of the seat support (C) 15-1/2 in. up from the bottoms of the legs (B), and center it.
- Align the top support (D) parallel to the seat support, and centered as well.
- Drill the carriage bolt holes through the legs using the counterbored holes in the seat support and top support as drilling guides.

Hammer the Carriage Bolts
- Keeping each A-frame assembly clamped, flip the end over and hammer in the carriage bolts.
- Insert them all the way to “seat” the square part of the bolt shafts securely in the wood.

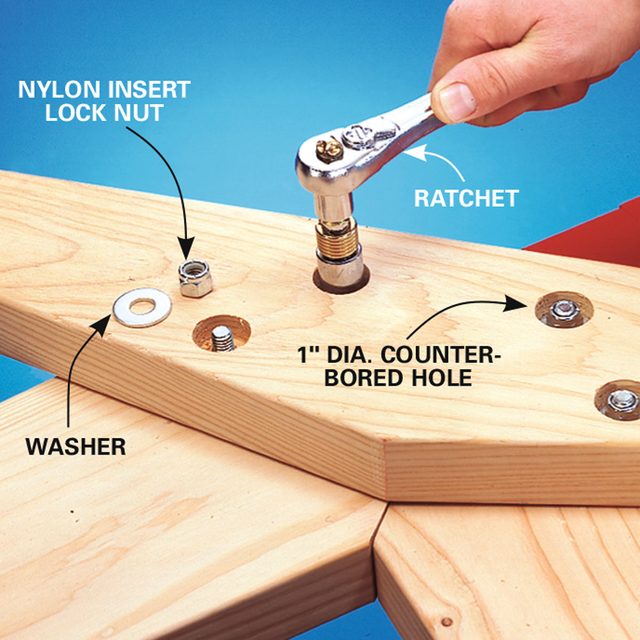
Tighten Nuts and Bolts
- Flip the assembly again and put on the washers and nuts.
- Tighten them with a ratchet and 9/16-in. socket.
- Note: Use nylon insert lock nuts to eliminate lock washers.
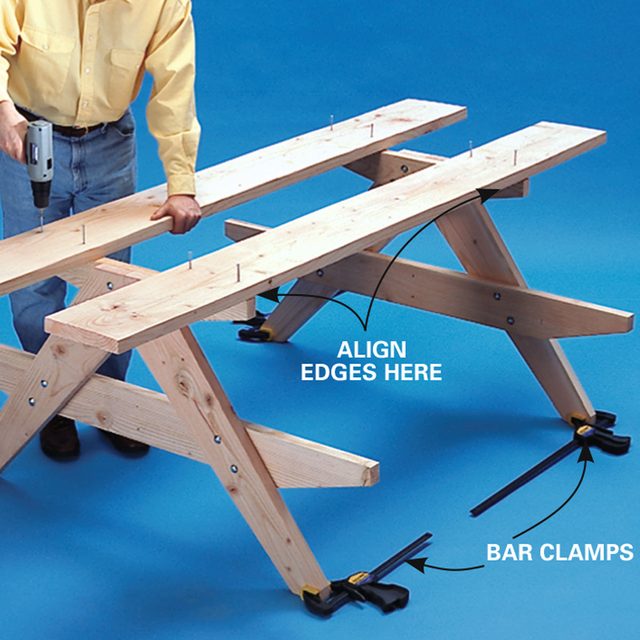
Align Picnic Table Top to Leg Supports
- Align and screw the outside top pieces (A) to the top supports.
- Screw the outside top boards to the top supports.
- Hold the assembled ends upright by placing bar clamps at the bottoms of the legs.
Put All of the Remaining Pieces Together
- Align and mark the spot where the leg braces (E) land on the center top board.
- Screw the center top board (A) so the gaps between all the boards are equal.
- Square the top of the table by measuring the diagonal dimensions of the top until they’re equal.
- Pro tip: A helper can make this step easier. But, if you’re working alone, you can do it from underneath the picnic table.
- Flip the table over and align the leg braces (E) with the top as shown in Figure A.
- Drill pilot holes, then screw the leg braces to the seat supports and center top board.
- Align and screw the center top support (D) in place, then attach the seat boards (A).

Stain the Picnic Table
- Unscrew the seat boards and the outside top boards.
- Note: Removing just these pieces lets you get into tight corners without taking apart the whole table.
- Apply the finish in a shaded area using the directions given on the can of clear wood preservative finish.
- Use a 3-in. disposable foam roller to apply the finish on the large surfaces, and a brush for the tight areas.
- Let the finish dry for two days, then reattach the seat boards and top boards, and you’re ready to picnic!
How to Make a Picnic Table Project PDFs:
Click the links below to download the materials and cutting lists for this a-frame picnic table project, as well as construction drawing Figure A.