How to Build a Garden Fountain
Updated: Jan. 24, 2022Cast this fountain in a weekend with a few bags of concrete and some hardware odds and ends.
- Time
- Complexity
- Cost
- Multiple Days
- Beginner
- $101–250
Small Garden Fountain Step 1: Overview
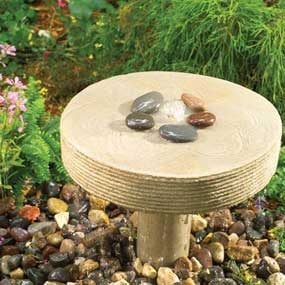
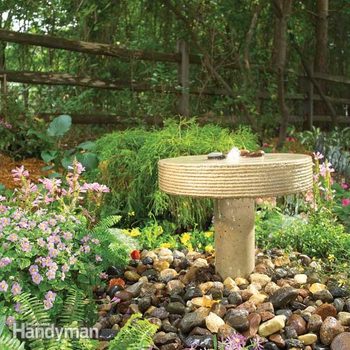
Enjoy the sound of water trickling over river stones. Watch the birds and butterflies that come to bathe and drink.
We’ll show you how to build this simple fountain using bagged concrete mix and common construction materials. You can build the sheet metal forms and pour the concrete in less than a day. The next day, you can finish up by removing the forms, burying the tub, and assembling the concrete fountain and the pump.
With the increased popularity of water gardens, most home centers now stock fountain pumps and plastic liner tubs. We purchased a pump with a flow rate of 130 gallons per hour and a maximum pumping height of 4.5 ft. Make sure the pump you buy has similar specifications. You can substitute any large plastic container for the 7-in. deep tub we used as long as it’s at least 26 in. wide. Fifteen-inch deep plastic whiskey barrel liners work well. The increased depth calls for a little extra digging, but you won’t have to refill the fountain as often. Increase the height of the concrete column to compensate for the extra depth.
In addition to basic tools, you’ll need a plastic tub or wheelbarrow and a hoe for mixing concrete, and a steel trowel to finish the top of the wheel.
Figure A: Small Garden Fountain Details
Here is a cross-section of this garden fountain.
Small Garden Fountain Step 2: Solid forms are the first step to a successful concrete pour

Photo 1: Build the round form
On 3/4-in. plywood (minimum size of 18 x 18 in.), draw an 18-in. diameter circle. Saw it out with a jigsaw. Drill a 5/8-in. hole in the center. Cut a 60-in. length of 4-in. wide galvanized metal flashing. Run a strip of double-faced carpet tape along the top and bottom edge. Then wrap the flashing around the plywood circle.

Photo 2: Line the form
Drive 1/2-in. sheet metal screws through the flashing at 8-in. intervals to secure it to the plywood. Line the flashing with a 60-in. length of foam sill sealer. To make a flush seam, cut through both thicknesses of foam with a utility knife where they overlap.

Photo 3: Insert the pipe
Insert a 4-in. length of 1/2-in. copper pipe into the hole and hold it in place with a wrap of rope caulk. Press a double-wide bead of rope caulk in a circle around the bottom of the form about 3/4 in. away from the foam liner. Trim the foam flush with the top of the metal.

Photo 4: Cut metal duct for the column form
Cut a 20-in. length of 8-in. round metal duct with a tin snips. Then cut the locking edge from the length of the duct. Drill a 5/8-in. hole in about the center of the sheet, 3-1/2 in. from the bottom edge.

Photo 5: Form the column
Coil the duct with the remaining locking edge to the outside and slip it inside the 5-in. end cap and 5-in. coupler to form a cylinder. Wrap the cylinder with three layers of duct tape to secure it. Cut 20-in. and 4-in. lengths of 1/2-in. copper pipe and join them as shown with epoxy. Slip the assembled pipe into the cylinder. Reinstall the pipe and glue a 1/2- to 3/8-in. reducer to the short pipe that exits through the side of the form. Hold the pipe in place with duct tape.
When you build the forms for the concrete, take care to cut the plywood circle accurately and wrap the metal tightly around it (Photo 1). The double-faced tape holds the band of sheet metal to the plywood disc while you screw it in place. We lined the metal with foam sill sealer to create the ridges you see on the outside of the wheel. You can customize the wheel to your liking by substituting seashells, rope or other decorative items for the sill sealer. Attach them to the metal with hot-melt glue or double-faced tape.
We made the form for the column by snipping one locking edge and the end from an 8-in. round duct and rolling it into a 5-in. diameter cylinder (Photo 4). Allow the extra sheet metal to overlap. Complete the form by assembling and installing the copper pipe and taping the whole thing together with duct tape (Photo 5).
Don’t forget to coat the inside of the forms, including the short copper pipe, with oil to prevent the concrete from sticking. We used a heavy layer of WD-40. The band of rope caulk in the bottom of the form creates a recess in the concrete that directs the water to drip from the edges, rather than run under the wheel.
Small Garden Fountain Step 3: Strong concrete mix has just the right amount of water

Photo 6: Spray the forms, then add concrete
Coat the entire inside surface of both forms with a layer of oil (spray lubricant is easy to apply). Mix 1-1/2 bags of concrete mix to form a stiff, not runny, batch. Mix with a hoe for at least five minutes. Fill the tall cylinder while holding the pipe in the center. Tap the outside with a scrap of wood to settle the concrete and release trapped air. Fill the foam-lined top half-full. Lay 12-in. lengths of 3/8-in. reinforcing bar (rebar) in a tick-tack-toe pattern on top of the concrete. Continue adding concrete until it’s flush to the top of the form.

Photo 7: Compact the concrete
Settle the concrete and remove trapped air by tapping the bottom of the form with a hammer. Add concrete if necessary to fill the form. Continue tapping and circling for about two minutes.
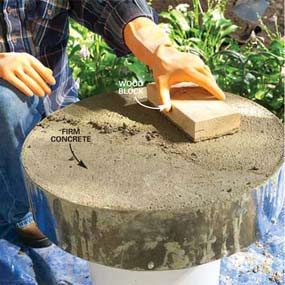
Photo 8: Float the concrete
Let the concrete harden until the water on the surface has soaked in or evaporated and your thumb pressed into the surface just barely leaves an indentation. Then rub a block of wood in a circular motion over the surface to bring a layer of soupy cement and sand to the surface.

Too little water and the concrete mix will be stiff and unworkable. Too much water results in weak concrete prone to cracking and breaking. Start by dumping 1-1/2 bags of concrete mix into a wheelbarrow or plastic mixing tub. Then measure out the amount of water recommended on the bag and add it slowly while mixing the concrete with a hoe. Check for the proper consistency by making a trench with the hoe. The concrete should stand up on both sides of the trench. If it sags and fills the trench, it’s too wet. Add more dry powder to make a stiffer mix. It should be about the consistency of potato salad.
It takes a little more effort to get this thick concrete mix to settle into the forms. The trick is to tap on the outside of the forms after they’re filled with concrete (Photo 7). Tapping eliminates air pockets that would otherwise show up as holes in the concrete surface.
After filling and tapping the forms, you have to let the concrete harden for a while before smoothing the top surface (Photos 8 and 9). The length of time will vary between 45 minutes and three or four hours depending on the weather and other factors. The concrete is ready when the surface water is gone and you can barely indent the surface with your thumb.
Smoothing the top surface requires two steps: floating and troweling. Float the surface by rubbing the concrete in a circular motion with a block of wood (Photo 8) until a thin layer of soupy, rock-free cement covers the surface. Next, flatten and smooth the surface with a steel trowel (Photo 9).
CAUTION!
Wear long rubber gloves and safety glasses when you’re working with concrete. Wet concrete can seriously burn bare skin.
Small Garden Fountain Step 4: Assemble the fountain

Photo 10: Remove the forms
Remove the sheet metal screws and unwrap the concrete wheel. Carefully place the wheel upside down on the bucket and remove the plywood. Protect the top surface by placing strips of foam between the bucket and concrete. Grab the copper pipe with a locking pliers or pipe wrench and twist and pull to remove it from the concrete. Remove the metal form from the tall cylinder.
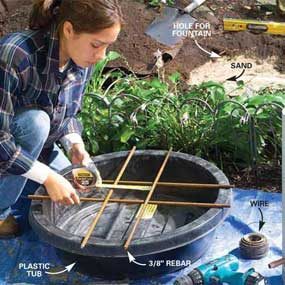
Photo 11: Place rebar supports
Lay 30-in. lengths of rebar over the plastic tub to create a 5-in. square opening in the center for the concrete column. Drill two small holes through the tub at the end of each rebar and secure the rebar with twists of wire. Leave the end of one rebar loose until the column is in position. Dig a hole deep enough to accommodate the tub plus a 2-in. deep layer of sand.


Photo 12: Set the tub
Level the sand base and set the tub in place. Pack dirt around it to the bottom of the rim. Set the column in place and use a level to make sure the sides are vertical and the flat area on top is level. Pour a 1-1/2 in. layer of concrete into the bottom of the liner to stabilize the column. Let the concrete set overnight.

Photo 13: Connect the pump
Cut a square of 1/4-in. hardware cloth 4 in. larger than the diameter of the tub and bend down a 2-in. lip all around to form a mesh cover. Leave an extra inch of mesh when you cut the opening shown and bend it around the rebar to hide the sharp edges. Cut another small rectangle of hardware cloth to cover the opening. Connect the pump to the copper pipe with 5/8-in. plastic tube and hose clamps.

Photo 14: Set the top
Place a bead of polyurethane construction adhesive around the top of the column and lower the concrete wheel over the copper pipe. Check the top with a level and shim between the column and wheel if necessary to level the top surface. Use strips cut from plastic bottles for shims.
Remove the forms after the concrete has set up for at least 12 hours. If you don’t plan to assemble the fountain immediately, cover the column and wheel with plastic and store them in a shady spot until you’re ready. Otherwise, keep the fountain running for at least a week to keep the concrete wet while it cures.
Photos 11 – 14 show how to assemble the fountain and connect the pump. Use a hacksaw to cut the rebar to length. Be very careful when you’re working with the hardware cloth—the cut edges have razor-sharp points. Wear leather gloves and bend all cut edges down before you install the cover over the tub. Don’t cover the hardware cloth with stones until you’ve filled the tub with water and tested the pump. To avoid the risk of electrical shock, make sure the circuit you plug the pump into is GFCI protected.
Fountains Require a Little Maintenance
Keep the tub full of water. If it dries up while the pump is running, it will ruin the pump. Check the intake grate or screen on the pump occasionally and remove leaves and debris. If you live in a cold climate, drain the fountain in the fall. Then clean out the liner and store the pump inside for the winter.
Required Tools for this Small Garden Fountain Project
Have the necessary tools for this DIY project lined up before you start—you’ll save time and frustration.
- Cordless drill
- Jigsaw
- Level
- Spade
- Steel
- Wheelbarrow
Required Materials for this Small Garden Fountain Project
Avoid last-minute shopping trips by having all your materials ready ahead of time. Here’s a list.
- 1-1/2 to 2-1/2 in. dia. river rock to cover hardware cloth
- 1/2 in. copper elbow
- 1/2- to 3/8-in. copper reducer
- 16 ft. of 3/8-in. steel rebar
- 2-ft. length of 1/2-in. copper pipe
- 2-ft. length of 8-in. round metal duct
- 3 ft. of 5/8-in. outside diameter (O.D.) plastic tubing
- 3/4-in. plywood
- 36 x 36-in. square of 1/4-in. galvanized hardware cloth
- 4 ft. of 14- or 16-gauge wire
- 5-ft. length of 4-in. wide sheet metal flashing
- 5-ft. length of ribbed foam sill sealer (cut from roll)
- 5-in. round duct cap
- 5-in. round duct coupling
- Duct tape
- Plastic tub
- Pump
- Roll of double-faced carpet tape
- Rope caulk
- Twenty 1/2-in. sheet metal screws
- Two 60-lb. or 80-lb. bags of concrete mix
- Two hose clamps for above tubing
- Two-part epoxy (five-minute type)