How to Build a Timber Frame Garden Arbor
Updated: Mar. 24, 2022You can cut perfect, old-style joints with standard tools...and keep all the fasteners out of sight
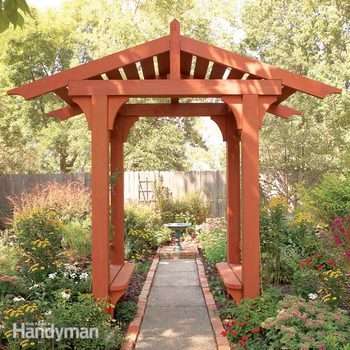
This timber garden arbor can be your place to get away for a quiet retreat or a delightful lawn sculpture that you gaze at through your kitchen window.
Building it is enjoyable too. The main structure goes together like an old-fashioned timber frame with tenons and notches you cut into wooden 6x6s with your circular saw and handsaw. The main posts are anchored in the ground with concrete, and the roof and sides are made of dimensional treated lumber screwed to the treated 6x6s. Our project took about three days to build with plenty of break time. After waiting about three weeks to give the wood ample time to dry out, we applied an exterior oil stain.
- Time
- Complexity
- Cost
- Multiple Days
- Intermediate
- $101–250
Shopping for treated lumber
A garden arbor is often made of wood, and since it’s a permanent outdoor structure, it’s often treated wood. When you’re looking for lumber at the home center, make sure to pick out 6x6s that are fairly dry and free of twists and large cracks. The same goes for the other treated dimensional lumber you’ll need for this project. However, don’t be disturbed by the ‘green’ color of the wood at this stage. A quality semi-transparent oil stain will give you a nice, warm wood tone.
Step 1: Cut the 6x6s to length and then cut the notches in the tops with your circular saw
You may want to rent a 10-in. circular saw
You can cut the notches into the 6x6s with a standard 7-1/4 in. circular saw and a sharp handsaw, but a 10-in. circular saw will make quick work of it. Be aware, however, that these saws are heavy and a bit awkward to handle. If you decide to use the smaller circular saw and handsaw, use the handsaw to get the extra depth you can’t get with the circular saw and to clean up the notches.
Step 2: Screw temporary 59-in. long 2×4 crossties to the posts
Screw temporary 59-in. long 2×4 crossties to the posts near the top and 16 in. up from the bottom.
Join the front posts as a pair, then do the same with the rear. Stand the rear assembly (get a friend to help) and stick the bottoms of the posts into the rear holes. Now drive some stakes into the ground while one person holds the assembly. Plumb the posts with temporary braces fastened to the stakes and posts, then level the horizontal ties at the bottom with shims. Once this assembly is secured, insert the front post assembly into the front post holes and fasten it to the rear assembly with the 2×2 horizontal side supports as shown in Step 3 .With the front secured to the rear assembly ,make sure the front posts are at right angles to the rear posts and the diagonal measurements between the posts are equal. Add additional braces if necessary.
Step 3: Tip and drop the rear assembly into the 16-in. deep x 12-in. diameter holes
Tip and drop the rear assembly into the 16-in. deep x 12-in. diameter holes. Screw temporary supports to stakes and then to the assembly to plumb it. Once the rear assembly is level and plumb, drop the front assembly into the holes and screw it to the back assembly with temporary 2×2 horizontal supports top and bottom. Square the legs by measuring and making the diagonals equal between opposite legs.
Step 4: Mix concrete and pour it into each hole around the post
Stand the two end assemblies and fill in the concrete
To get this structure to behave and end up square,measure the holes carefully and dig each one about 16 in. deep and 12 in. wide with a posthole digger. Tip: What do you do with the extra dirt? I always lay a tarp right next to where I’m digging and dump the soil right onto it. Then I can drag it around to any location on the lot that needs a bit of fill.
Mix the concrete for your posts in a tub or wheelbarrow. Mix no more than two bags at once and then mix more as needed. We used about three 80-lb. bags, but the amount depends on the hole diameter and depth. Dump the concrete into each hole and then pack it around the posts with a scrap 2×2. Bring the concrete up to grade level and then berm it slightly to keep water from collecting at the bottom of the post every time it rains.
Step 5: Remove the braces, cut the side lintel tenons with your circular saw and handsaw
Remove the braces, cut the side lintel tenons with your circular saw and handsaw, and lower each into the front and back post notches. Screw the joints together with 3-in. deck screws.
Step 6: Cut the notches in the front and back lintels with a 10-in. circular saw
It’s easier to cut the notches in the front and back lintels with a 10-in. circular saw. You can rent one for a day to make quick work of the post cutting.
Step 7: Break out the chips and clean the bottom of the notch with a sharp chisel
Break out the chips and clean the bottom of the notch with a sharp chisel. Finish smoothing it with a coarse file.
Step 8: Lift the front and back lintels onto the tops of the posts and push them back until they’re flush with the posts
Lift the front and back lintels onto the tops of the posts and push them back until they’re flush with the posts. You may need to persuade it a bit with a hammer and a block of wood. Screw the lintels into place with 3-in. screws angled in from the top.
Step 9: Cut the post brackets with a jigsaw
Cut the post brackets with a jigsaw and then smooth the curves with your belt sander (80-grit works best).
Step 10: Screw the brackets to the posts with 3-in. deck screws
Lock the lintels together with 3-in. screws
The tenons and mortises are traditionally held together with dowel pins, but because this structure is exposed to the weather, it’s best to lock them into place with 3-in. galvanized screws driven at angles from above. As you place each lintel, you may find that you’ll need to either squeeze or separate the top ends of the posts a bit to get them to fall into place. This is because one or more of the posts may be slightly out of plumb. Screw in the brackets (D) as shown.
Step 11: Cut and assemble the parts for the center beam
Make the center beam from 2x4s and a 2×8
Screw the 2×4 parts (E) to the center 2×8 (F) to create an I-beam that’ll run from front to back and support the roof members .Get the beam positioned 1-1/2 in. from the outer edge of both front and rear lintels. Screw it into place with 3-in. screws. Next cut the ridge supports and the ridge and fasten them as shown in Step 12. The top ridge has a 45-degree bevel on each top edge. Make a mark 7/8 in. down from the top edge of the 2×4 ridge board on each side. Temporarily nail the ridge to the sawhorse tops, set your circular saw at a 45-degree bevel and cut along the line on one side. Then pull the nails and reposition it to cut the other side. Screw the ridge to the ridge supports, making sure it rests 3/4 in. down from the top of the ridge supports.
Cut the remaining roof parts and assemble them as shown in Steps 13 – 15.
Step 12: Screw the ridge support (G) to the center beam
Screw the ridge support (G) to the center beam and then fasten the ridge to the support with 3-in. deck screws.
Step 13: Cut the rafters
Cut the rafters (J) as shown in Figure A using your jigsaw and circular saw. Complete one, then use it as a pattern for the rest.
Step 14: Measure down 4 in. from the top of the ridge support, make a horizontal mark with your square and align the top edges of the rafters
Measure down 4 in. from the top of the ridge support, make a horizontal mark with your square and align the top edges of the rafters with your mark. Screw the rafters to the support and then use Simpson A-23 angles on the backside of the bird’s-mouth notch to connect the rafter to the beam.
Step 15: Clamp a temporary support 1 in. down from the top of the rafter to guide the roof lattice board
Clamp a temporary support 1 in. down from the top of the rafter to guide the roof lattice board. Tap in nails every 7-1/4 in. to space the boards. Nail into the edge of the rafters with 10d casing nails.
Step 16: Predrill and screw the seat braces to the inside face of the posts
Predrill and screw the seat braces to the inside face of the posts using 1/4-in. x 3-1/2 in. lag screws.
Step 17: Fasten the 2×6 seat slats to the braces with 3-in. deck screws
Fasten the 2×6 seat slats to the braces with 3-in. deck screws. Leave a 1/2-in. space between the boards and round over the outside edge of the inner slat with a 3-in. radius cut.
Step 18: Rip 5/4×6 decking in half and round over the edge with a block plane and sandpaper
Rip 5/4×6 decking in half and round over the edge with a block plane and sandpaper. Screw the vertical lattice to the side lintels and the back of the seat. Finish the lattice by screwing the horizontal lattice pieces to the inside face of the vertical pieces with 1-5/8 in. deck screws.
Sand the arbor to get rid of rough edges
‘Sand it?’ you say? Well, this isn’t a fine piece of furniture, but you will have a few rough edges and corners that could give you splinters. Just go around and examine the corners and edges and sand them smooth with 100-grit sandpaper. You may have to wait a week or more to sand if your treated wood is still moist because it will just gum up your paper. Once the project is dry to the touch, find an oil stain that suits your taste and brush it on. Have a rag or two handy to catch the drips and runs, and use dropcloths if you’re staining over a walkway. One coat should be sufficient, and you’ll need to recoat your arbor in about three years.