How to Replace a Toilet
Updated: Dec. 06, 2022Tips for a trouble-free, leak-free installation
Measure before buying
If you’re buying a new toilet, you need to know the “rough-in” measurement of the old one. For the vast majority of toilets, the waste pipe is centered about 12 in. from the wall. But with a few models, that measurement is 10 in. or 14 in. To check the rough-in, just measure from the wall to the toilet’s hold-down bolts. If that measurement (plus the thickness of the baseboard) isn’t approximately 12 in., toilet shopping will be a bit harder. Most home centers carry only one or two 10-in. models and no 14-in. models. If you have to special-order a toilet, be prepared to spend much more. If there’s a door near the toilet, also measure how far the bowl protrudes from the wall. If you are replacing a toilet with a standard bowl with an “elongated” model, the door may not close. Read on to learn how to install a toilet.
Brass bolts are best
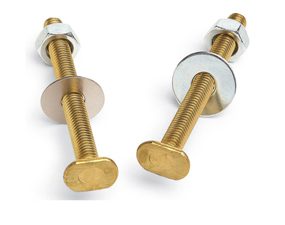
Solid brass resists corrosion
Some metal toilet bolts have a yellowish zinc coating that makes them look like brass. So check the label and make sure you’re getting brass bolts and nuts. They won’t rust away and they’re easier to cut off later. If you need to reanchor the toilet flange, buy stainless steel screws. They won’t corrode like steel or break off like brass while you’re driving them.
Cut hold-down bolts
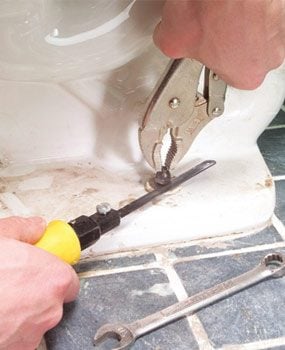
Frozen bolt fix
Don’t be surprised if the old nuts that hold the toilet in place won’t budge. Years of corrosion can weld them to their bolts. In that case, a hacksaw blade is the solution. You can buy a “close quarters” blade holder at home centers and hardware stores, or just wrap a bare blade with a rag or duct tape. Most toilet bolts and nuts are brass, so they’re easy to cut. If the bolt spins, grab it with locking pliers as you cut.
How to Install a Toilet: Lock down the bolts
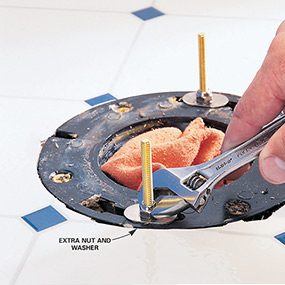
Toilet-setting solution
Setting a toilet onto the new bolts can be the most frustrating part of the whole installing a toilet job. The bolts slip and tip as you’re straining to align them with the holes in the toilet. And each time you miss, you risk crushing or shifting the wax ring. The plastic slip-on washers sometimes included with bolts help, but they still allow the bolts to move. The best approach for how to install toilet is to buy a second set of nuts and washers so you can lock the bolts in place before you set the toilet. To make sure they’re in the correct position, set the toilet and check its height and position. Then lift it off and add the wax ring. To make the bolts easier to find, mark their locations with masking tape.
Flange fixes
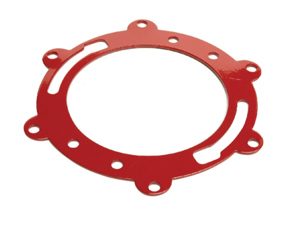
Ear-type ring
Loose flanges are usually the result of wood rot. The flange screws simply won’t hold in the soft, decayed subfloor. The best solution depends on the extent of the rot. If the rot is only under the flange, use an ear-type repair ring. The ears let you drive screws into firm wood farther away from the flange. Before you install this kind of ring, hold it up to the drain horn on the underside of the toilet. You may have to cut off a couple of ears to make it work with your toilet. If the rot extends well beyond the flange, you’ll have to replace a section of the subfloor.
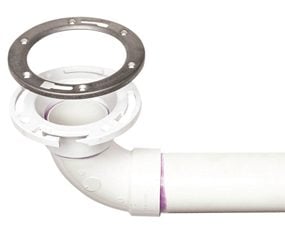
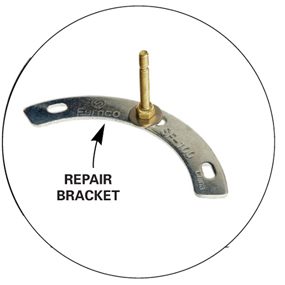
Repair ring
Plastic flanges often bend or break, but that’s an easy fix. Just screw a stainless steel repair ring over the plastic flange with at least four 1-1/2-in. stainless steel screws. Consider doing this even if the plastic flange is in good shape—it’s cheap insurance against future trouble. The repair ring raises the flange by about 1/4 in. So before you install the ring, set it on the flange and set your toilet over it to make sure it fits.
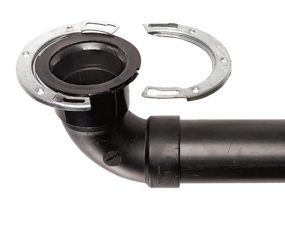
Two-part repair ring
Steel flanges attached to plastic hubs can rust away. The easiest solution for how to install toilet is a two-part ring that locks onto the plastic just like the old one. To cut away the old flange, use a hacksaw blade or an angle grinder with a metal-cutting wheel. The repair flange is available at some home centers, at plumbing supply stores or online (search for “bay flange”).
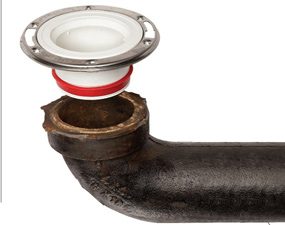
Repair flange
Cast iron flanges can break or corrode. If the flange is in bad shape, you can add a brass repair ring similar to the stainless steel ring shown above or install a plastic flange that slips inside. If necessary, break away the cast iron flange with a cold chisel. Home centers carry one or two slip-in flanges. For a wider variety, search online for “replacement toilet flange.”
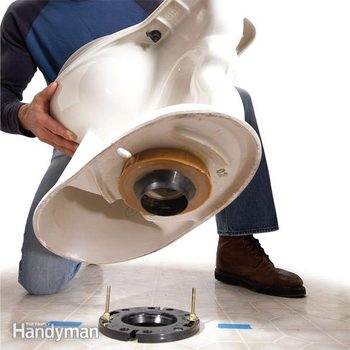
A rock-solid toilet flange is the key to a leak-free toilet. The flange is the only thing anchoring the toilet to the floor. If the flange is loose or damaged, the toilet will rock. And a rocking toilet will distort the wax ring and cause leaks. So be sure to scrape off the old wax ring and inspect the flange. Here are some solutions for broken, corroded or loose flanges.
Eliminate rocking with shims

Rot-proof shims
A toilet that rocks on an uneven floor will eventually break the wax ring seal and leak. So check for wobbles after you’ve set the toilet in place and loosely tightened the nuts. For slight wobbles, slip coins or stainless steel washers into the gaps under the toilet. Don’t use regular steel washers, which might rust and stain the floor. For larger gaps, use shims. There are plastic shims made especially for toilets, but plastic construction shims like the ones shown here work just as well. When you’ve eliminated the wobble, tighten the nuts, cut off the shims and caulk around the toilet base. A toilet set on thick vinyl flooring can loosen as the vinyl compresses. In that case, just retighten the nuts a few days after installation.
Sit on the toilet to squish the wax ring
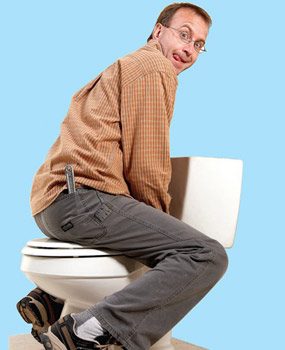
“Seat” the toilet firmly
When you set the toilet in place, you have to squish the wax ring until the toilet settles to the floor. DON’T force the toilet down by tightening the nuts on the toilet bolts—that might crack the porcelain base. Instead, sit on the toilet backward with your weight centered over the wax ring. Then wiggle around a bit until the toilet reaches the floor. But don’t go crazy. You want to drive the toilet straight down with minimal twisting or shifting of it from side to side. When the toilet reaches the floor, snug down the toilet bolt nuts.
Don’t overtighten the water connections
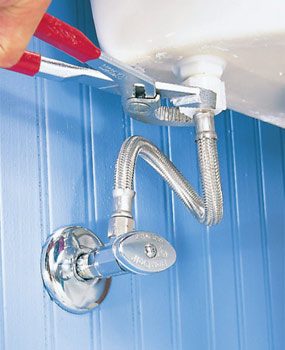
Hand-tight plus a quarter-turn
Do yourself a favor and buy a flexible water supply line. They’re a lot easier to install than stiff metal or plastic tubing. Be sure to get one that’s covered with stainless steel mesh. For a good seal, hold the hose so it aims straight into the shutoff or fill valve while you’re screwing on the connectors. Make them handtight, then add another quarter turn with pliers. Connections that are too tight can actually cause leaks or spin the fill valve inside the tank. Check for leaks and tighten them a bit more if needed.
Cut the bolts last
To make positioning a toilet easier, new toilet bolts are extra long. That means you have to cut off the protruding ends later with a hacksaw. But first connect the water line, flush the toilet a couple of times and check for leaks. Leaving the bolts uncut until you’ve done these final checks lets you easily remove and reset the toilet if you find any problems.
After cutting, double-check the bolts for tightness. Cutting often loosens the nuts a bit. Now you know how to install a toilet.
Required Tools for this how to install toilet Project
Have the necessary tools for this DIY how to install a toilet project lined up before you start—you’ll save time and frustration.
- 4-in-1 screwdriver
- Adjustable wrench
- Caulk gun
- Cordless drill
- Hacksaw
- Level
- Locking pliers
- Pliers
- Rags
- Shop vacuum
- Slip joint pliers
- Tape measure
- Utility knife
Required Materials for this how to change a toilet Project
Avoid last-minute shopping trips by having all your materials ready ahead of time. Here’s a list.
- Brass toilet bolts
- Caulk
- Flexible water supply
- Plastic shims
- Toilet flange
- Wax ring