How to Repair a Leaking Toilet
Updated: Dec. 06, 2022How to fix the 4 most common causes of leaks under the toilet.
- Time
- Complexity
- Cost
- A full day
- Beginner
- Less than $20
3 signs of a toilet leaking at the flange
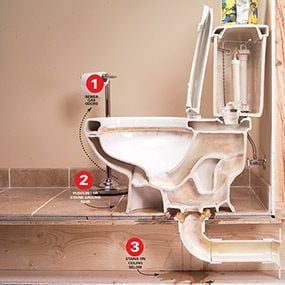
Do you notice a small pool of water where your toilet meets the floor? Does the floor around the toilet feel spongy? Is the finished flooring coming up? If so, you probably have a bad seal between the toilet horn (where the waste exits) and the drain line. Don’t procrastinate any longer. Small leaks trapped beneath the toilet will eventually rot floor surfaces, and even the underlying framing. Wait too long and repair costs rise, especially when you figure in replacing finished flooring and sometimes underlayments, subfloors or even the framing.
In this article, we’ll show you some tips for pulling the toilet (Photos 1 – 3) and then how to diagnose and fix the common causes of leaks. Finally, we’ll show you how to reset the toilet. After pulling the toilet and examining the evidence, you may get lucky and just have to replace the wax ring and remount the toilet. If that’s the case, you’ll have the stool back on-line in under an hour. You’ll find the products we suggest for making repairs at any home center or well-stocked hardware store.
Before You Pull the Toilet, Pick Up:
- A new wax ring
- Two sets of 5/16-in. diameter water closet bolts
- A tube of silicone-based caulk, in a color to match the toilet
- A package of plastic toilet shims if your toilet was rocking
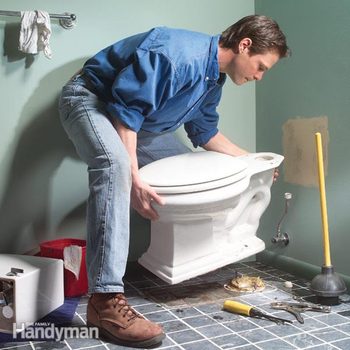
Pulling the toilet
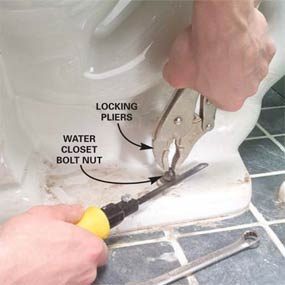
Photo 1: Loosen the bolts
Unscrew the water closet nut with a wrench. If the bolt spins along with the nut, grab the exposed bolt above the nut with locking pliers. Loosen the nut just enough to squeeze in a hacksaw blade below the nut and saw through the bolt. TIP: Use a close-quarters hacksaw like the one shown or wrap a rag around a bare blade.
Pulling a toilet is usually simple, but two problems frequently crop up. First, old water supply valves may not shut off entirely, and second, getting old, corroded water closet nuts loose can be a struggle.
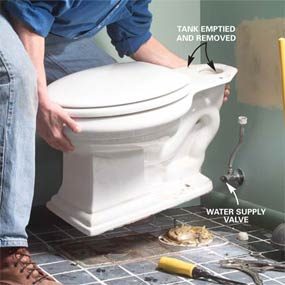
Before pulling the stool, you’ll have to shut off the water supply valve and remove the water line leading to the tank (Photo 2). After turning off the valve and flushing the toilet, look in the tank and listen for trickling water. If the water is still running, you’ll have to shut off the main water valve in the house and replace the valve with a new one. Sponge out the excess water from the tank and stool.
Then it’s time to loosen the water closet nuts. If the water closet nuts and bolts are corroded or the bolt spins along with the nuts, it’s easiest to just cut them off with a hacksaw (Photo 1).
OK, the toilet’s off—what do I look for?
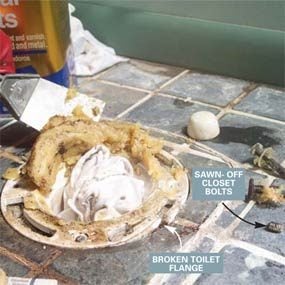
Photo 3: Clean up around drain hole
Stuff a rag into the drain line to keep sewer gases out of the house and chunks of wax from entering the piping while you clean. Scrape all the old wax from around the toilet horn and toilet flange with a putty knife. Clean the floor under and around the toilet of old caulk and debris to find out if you need to replace toilet flange.
You may have one or more problems to solve, which may require more than one fix. So before you decide on a plan of action, check for:
- A broken flange, usually on the outside of the slot that holds the toilet flange bolt (Photos 3 – 6).
- A flange that’s too low. That includes any flange that’s more than 1/4 in. below the finished floor (Photos 7 and 8).
- Rot around the toilet flange (Photos 9 and 10).
- Simple wax ring failure. If nothing appears to be wrong, resetting the toilet with a new wax ring might be the only thing you need to do (Photos 11 – 14).
Broken toilet flanges: How to replace toilet flange
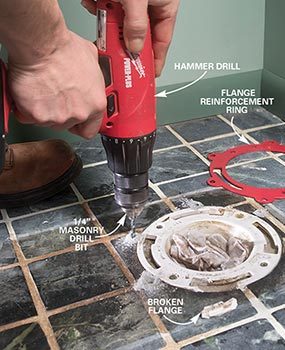
Photo 4: Prep for the new parts
Thoroughly clean off wax residue with mineral spirits. You may not need to completely replace toilet flange. Instead, set a reinforcement ring over the flange so the water closet bolt slots line up and mark screw locations on the floor. Drill a clearance hole through tile or masonry with a hammer drill and a 1/4-in. masonry bit. Stop when you reach the subfloor.
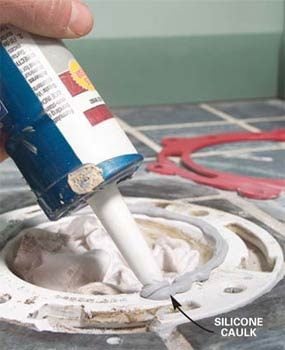
Photo 5: Apply caulk before you replace toilet flange
Lay a bead of silicone caulk around the perimeter of the toilet flange.
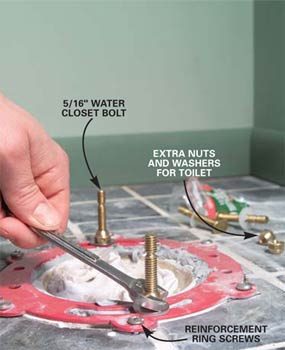
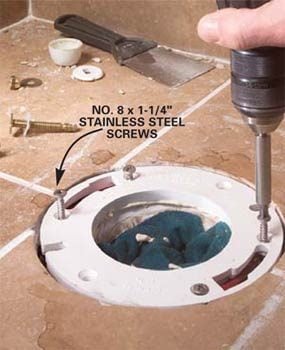
Photo 6: Screw on the ring
Screw the ring into the floor, slide the water closet bolts into the slots, and snug down the water closet nuts using the nuts and washers from an extra set of toilet flange bolts. That’ll keep bolts from tipping or wobbling while you’re resetting the toilet. Scrape away the excess caulk and let the caulk cure overnight before setting the toilet (Photos 11 – 14).
Old cast iron and all-plastic toilet flanges are the most likely to break. The problem is usually caused by rocking toilets or overtightened toilet flange nuts. Look for a cracked or broken rim on the outside of the slots that hold in the bolts (Photos 3 and 4). If you have a broken flange, pick up a reinforcement ring along with six 1-1/2 in. No. 8 oval-head stainless steel screws. If the flange is on concrete, use 1-1/4 in. long flathead concrete screws (and the recommended masonry drill bit) for drilling the pilot holes. Follow Photos 4–6 for installation techniques.
Flange Reinforcement Rings
Flange reinforcement rings are essentially bandages that fit over the broken flange and screw to the floor. They provide a new slot that receives the toilet flange bolts so the toilet can be secured. You may find several styles at the store. The “eared” type shown above is best if screws won’t hold well in the old flange holes. But make sure the eared type clears any porcelain castings on your toilet. Look at the underside of the toilet and see if there’s a raised porcelain circle around the toilet horn. If it has one, shop for the non-eared brass or stainless steel style shown on the right.
Fixing flanges that are too low
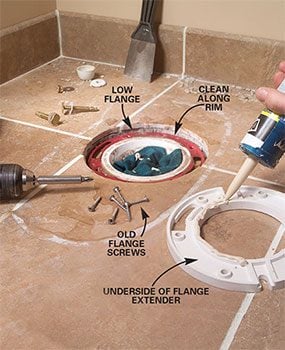
Photo 7: Prep for the extender ring
Clean the toilet flange with mineral spirits to remove all the excess wax. Fit the extender ring over the flange and remove any original flange screws that line up with the ones in the extender ring. Apply a bead of silicone caulk around the inside edge of the extender ring.
Often a new bathroom floor is laid on top of the old one, leaving the toilet flange too low to seal with an ordinary wax ring. The new floor can be upward of 1 in. above the existing flange. Doubling up the wax ring isn’t a good solution because excess wax can squeeze into the pipe and restrict flow. The taller stack of soft wax also has a higher probability of failure. If your toilet flange is more than 1/4 in. below the finished floor, add plastic toilet flange extenders. Extend the flange until it falls between 1/4 in. below the finished floor and 1/4 in. above it.
Minimal rot around the flange
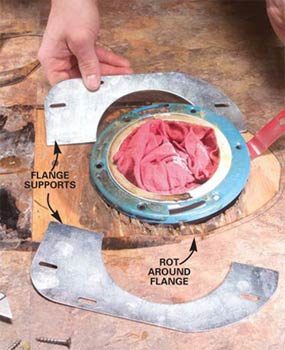
A toilet flange that’s been leaking can cause the floor to rot, the flange to loosen and the leak to get worse. You’ll have to track down the cause of the leak, fix it and then provide a solid surface that supports the flange.
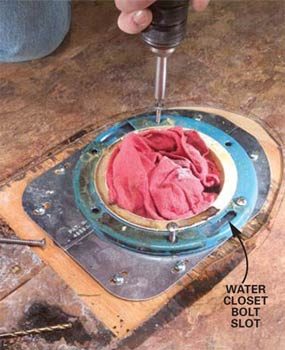
The easiest way to stiffen the floor and reanchor the flange is to buy a flange support bracket to transfer the load past the rotted areas of the subfloor. The kit comes with all the necessary screws for securing the bracket to the floor and the flange to the bracket. Keep in mind that it will work only if most of the support bracket rests on solid flooring. If a toilet has been leaking for years, the rot may be too severe for this fix. In that case, you’ll have to cut out the flooring, replace the subfloor and possibly framing and then replace the finished flooring. To determine the extent of the damage, probe the floor around the flange with a screwdriver to find where solid wood begins. If the support rests on solid wood, go ahead with the repair. If the wood is soft more than a couple of inches out from the flange, it needs replacing.
Reset and fix a rocking toilet
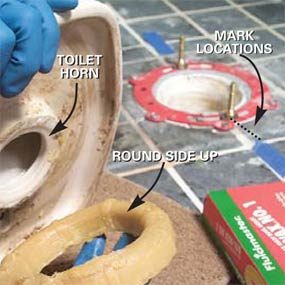
Photo 11: Install the new wax ring
Push the new wax ring onto the toilet horn with the rounded side toward the toilet. Mark the water closet bolt positions on the floor with masking tape.
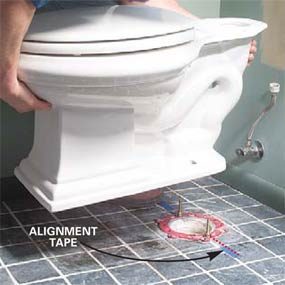
Photo 12: Reset the toilet
Align the bolt holes with the masking tape and lower the toilet bowl straight over the bolts. Push down on the rim of the toilet to seat the wax ring, then close the lid and sit on the toilet for a few minutes to force the toilet all the way to the floor. Stop when the porcelain surface rests on the finished floor.
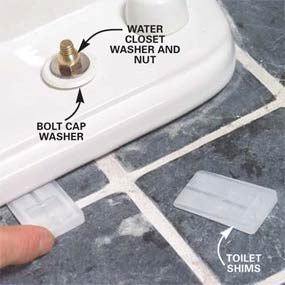
Photo 13: Install shims
Slip the bolt cap washers over the bolts, then snug down the water closet washers and nuts with a wrench. Be careful not to overtighten the nuts, especially over gaps between the toilet and the floor. Slip toilet shims under any toilet edge gaps and cut off the excess length. Some shims are pretty tough. If a utility knife won’t cut through the plastic, you may have to chop them off with a sharp wood chisel.

Frequently a toilet leaks simply because the wax ring has lost its seal. By far the most common reason for a broken seal is a toilet that rocks when you sit on it. A toilet that rocks even slightly will eventually compromise the wax ring. If you find no evidence of other problems after you pull the toilet, simply replacing the wax ring and resetting the toilet should fix the problem. Usually toilets rock because of an uneven floor. After you set the toilet, shim gaps between the toilet and the floor before caulking around the toilet (Photo 13). That’ll prevent the toilet from rocking and ruining another seal later.
Before you mount the toilet, push and wiggle the wax ring to help it stick to the porcelain around the horn. That’ll keep it from falling off as you lower the bowl. When you reset the toilet, it’s important to drop it directly into place. If it’s not aligned directly over the bolts when the wax ring meets the toilet flange, you risk distorting the wax ring and ruining the seal. Marking bolt locations with masking tape will help you see their position (Photo 12) as you lower the bowl.
Required Tools for this Project
Have the necessary tools for this DIY project lined up before you start—you’ll save time and frustration.
- Drill/driver - cordless
- Hacksaw
- Hammer drill
- Locking pliers
Required Materials for this Project
Avoid last-minute shopping trips by having all your materials ready ahead of time. Here’s a list.
- Silicone caulk
- Toilet shims
- Two sets of 5/16-in. diameter water closet bolts
- Wax ring