Finish Carpentry Tips
Updated: Jul. 01, 2019Great results, even in bad situations. We'll walk you through the best tips for DIY finish carpentry.
What is finish carpentry?
Finish carpentry is the final step in your carpentry project that involves installing trim around windows, doors and stairs as well as baseboards, crown molding, chair rail and and more. The following are some of our top tips for getting the best results with your DIY finish carpentry.
Tighten up open miters

Problem: An open miter
This doorjamb protrudes a bit beyond the wall, and the result is that the finish trim can’t lie flat and the front of the miter joint can’t close.

Solution: Cut a “back bevel”
You could tilt the saw blade to back-bevel the miters, but tilting the trim is faster and easier. Slip a pencil or shim under the molding, just behind where the cut will be. Cut both sides of the miter with shims in the same position. Then test the fit and make adjustments as needed.
Uneven walls or misaligned jambs make it hard to get tight-fitting miters. If your miter has a consistent gap at the front, there’s a good chance that putting a slight back bevel on both moldings will fix the problem. If you own a compound miter saw, you could tilt the saw about a half-degree, but that requires fussy adjustments.
The quickest and easiest way to cut a slight back bevel is to shim the molding so it’s resting at an angle to the saw blade. A pencil makes a handy shim and is just about the right thickness. You can adjust the position or thickness of the shim to compensate for all kinds of wall variations. You can even shim just the back or the front to mimic how the trim rests on uneven drywall.
Cut steep angles on your miter saw


It’s not common, but occasionally you’ll run into a situation that requires miters greater than the 45- or 50-degree angle available on miter saws. The second photo shows one solution.
Scribe trim to fit uneven walls

Problem: The trim won’t fit
This casing is wider than the space between the door and the wall, so the casing needs to be cut. That cut will need to fit tightly against an uneven wall.


Learning how to scribe moldings to fit tightly to uneven surfaces is a vital trim carpentry skill. And once you get the hang of scribing, you’ll find all kinds of situations where it’ll come in handy. Here we’re showing how to fit a casing against an out-of- plumb wall. You can also scribe door bottoms, inside corners of wainscoting, and even shelving or cabinets that abut crooked walls.
There are several types of scribing tools, but the simple compass with a wing-nut lock shown is a favorite with many trim carpenters. The second photo shows how to use the compass to scribe a line. Then finish up by cutting and trimming to the line for a perfectly fitting piece (photo below).
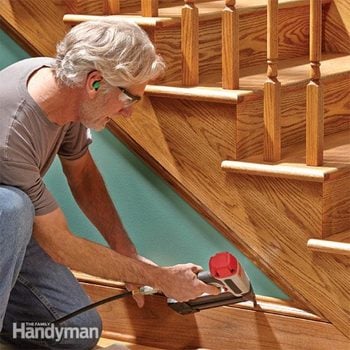
Angle a nail to close baseboard gaps

Sometimes you can’t force baseboard tight against the wall because there’s no stud behind the gap. This is especially common at outside corners if there’s a buildup of joint compound. But there is a bottom plate that you can reach with a well-placed nail. For the best control and maximum hold, set aside your nail gun for a minute and reach for a hammer and an 8d finish nail. The cutaway photo below shows how the angled nail catches the plate.
Make blocks for tough transitions

Used tastefully, transition blocks can be a real problem solver for finish carpenters. Rather than struggling to align moldings or fudging to match profiles, you can make a nice transition with a decorative block. You can buy ready-made blocks, but it’s easy to make your own. Cut the block to the height and width you think look good. Then cut or rout the top or add a small molding to complement your trim style. Use transition blocks where stair skirts intersect baseboards, where floor levels change, or at the bottom of door casings where the baseboard is thicker than the casing.
Big humps require surgery


Careful framing is the key to easy trim installation. But in the rush to get the walls put up, framing carpenters sometimes get a little sloppy. A stud that’s not lined up with the plate causes a big hump in the wall, making it difficult to get the baseboard tight. But if you’re courageous enough to cut into your wall, the fix is simple. Start by cutting out a little chunk of drywall right at the hump to see what the problem is. There could just be a chunk of drywall or other debris trapped between the drywall and the bottom plate. Or the stud could be misaligned. If this is the case, see the second photo for the solution.
Clean out corners before you start


Even careful drywall tapers can end up with an accumulation of joint compound near the bottom of inside corners. The problem is that all that extra mud prevents the baseboard from fitting well. The trick is to scrape off the buildup before you start installing the base. You can use a small pry bar with a sharp edge, a dull chisel or a stiff putty knife scraper. Before you start scraping, mark the top of the baseboard on the wall. Then scrape below the line where it won’t show.
Keep an oscillating multi-tool handy


On every trim job, there’s at least one situation where an oscillating multi-tool can save the day. Whether it’s trimming the bottom of an installed casing or notching a transition piece, an oscillating tool with a woodcutting blade is the perfect choice. Prices have come way down, so it’s a tool every finish carpenter can afford. For more information, see “Oscillating Tool Uses.”
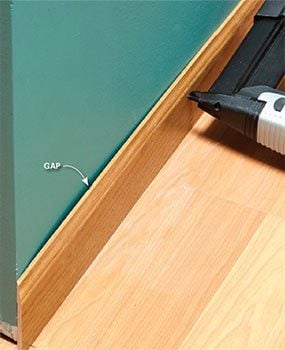
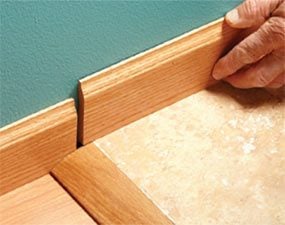
Keep baseboard from tipping


Most drywall is installed with the tapered edge parallel to the floor and with at least 1/2 in. between the drywall and the floor. The combination of the space along the floor and the drywall taper can allow the baseboard to tip in at the bottom. This isn’t a big problem along the length of walls, but at inside corners, the tilt can make fitting coped corners difficult. The second photo shows a simple fix.
Join moldings with biscuits

Problem: Joints open when nailed
Perfect-fitting miters can become misaligned as you nail them to the wall.


Strengthening trim joints with biscuits may seem like overkill, but it’s a great way to keep miters tight and prevent misalignment when you nail moldings to the wall. This tip is especially useful for larger casings, which are harder to hold in alignment. But you can add biscuits to just about any joint that’s wide enough to accommodate them. The photos show how.
You’ll need a biscuit joiner and some biscuits. If you’re not familiar with this tool, see How to Make a Biscuit Joint.
Cut and fit the miters first, then cut the biscuit slots. The second photo shows how to cut biscuits on a profiled molding. On new doors and windows that are perfectly square, some carpenters cut and assemble the casings with biscuits and nail the assembly to the wall after the glue dries. Or you can use the technique we show here and add the biscuits as you go.
Required Tools for this Project
Have the necessary tools for this DIY project lined up before you start—you’ll save time and frustration.
- Air compressor
- Air hose
- Belt sander
- Biscuit joiner
- Brad nail gun
- Circular saw
- Coping saw
- Cordless drill
- Hammer
- Hearing protection
- Miter saw
- Nail set
- Pry bar
- Putty knife
- Reciprocating saw
- Safety glasses
- Scribing tool
- Utility knife
- Wood chisel
Required Materials for this Project
Avoid last-minute shopping trips by having all your materials ready ahead of time. Here’s a list.
- 8d finish nails
- Baseboard
- Biscuits
- Casing
- Scrap wood
- Wood glue