Decorative Painting Tips
Updated: Jun. 25, 2019Even a novice can create designer effects with these easy-to-use painting tools.
- Time
- Complexity
- Cost
- A full day
- Beginner
- $51–100
Overview

The trouble with many do-it-yourself decorative painting systems is that they require more artistic skill than most of us care to develop for the occasional paint job. But some do-it-yourself painting systems now sold at home centers and paint stores can get you darn close to the high-priced expert effects.
These kits come with everything you need to achieve beautiful painted walls that will look like they were painted by a pro.
The systems generally include a dual roller, a single roller, a split paint tray, edging sponges and a variety of roller covers with unique patterns (the system shown here is made by Wagner). Instructions are provided to get you comfortable with how each tool works and to show you what effects to expect.
Using one of these decorative painting systems is relatively fast. I found that it takes only about twice as long as conventional painting. An average-size room can be painted in about four or five hours. Your only costs are for paint and the kit, plus masking tape and a dropcloth to protect against splatters. If you compare it with wallpapering a room, you’ll find it will be a fraction of the cost and will require about half the time and effort. And best of all, if you’re unhappy with the results, you can paint right over it. Try doing that with wallpaper!
How the system works

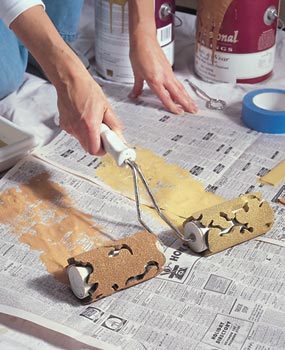
Photo 1: Saturate the rollers
Mask all your woodwork and the ceiling, lay a dropcloth on the floor and have some newspaper on hand before painting. Pour equal amounts of ordinary flat latex paint into the sections of the split roller pan provided in your painting kit. Evenly saturate the rollers with paint.

Photo 2: Blot off the excess
Roll the dual roller onto newspaper to get rid of the excess paint. This will prevent smears or runs on the wall.
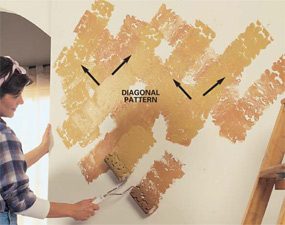
Photo 3: Begin rolling
Roll the paint onto the wall in a diagonal crisscross pattern. You’ll immediately see the colors overlap each other and the textured pattern emerge.

Photo 4: Blend the colors
Work the roller back and forth until you start to hide the original base coat. Flip the roller over to get the colors to blend near a wall end or corner. Continue to dip the rollers and blend the paint until you start to see the effects you want. Too much blending will blot out the mottled effect.

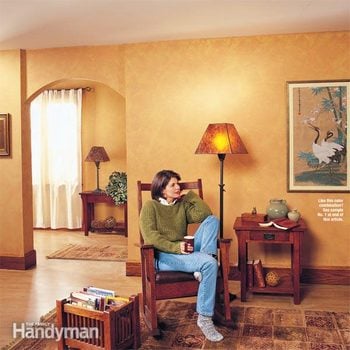
It may seem like a crazy concept, but the pattern-cut dual roller (Photo 1) lets you blend the two shades of paint over a base paint and leave the appearance of texture on the walls. The base paint can be an off-white flat or eggshell latex (we went over our existing white paint), or you can choose a complementary color for the base coat and allow it to show through the two colors used for the finished coat. A single application of the two topcoat colors gave us the beautiful blended results you see in our photos and hid our base coat completely.
It’s a whole different concept from using a traditional roller. You don’t try to hide the marks left by the roller edges; you want them to show, so the process is less tedious. I found the system pretty easy to use.
It’s up to you how much to blend the two topcoat colors. Back-and-forth diagonal strokes like those shown in Photos 3 and 4 blend the colors by “weaving” one color with the other. Less rolling will give you the highest contrast between the colors; more overlapping will blend the colors further, lessening the contrast. Of course, you can overdo the weaving process, but that takes considerable effort. The whole process is forgiving, relatively mess-free and fun. You can even go back once it’s dry and rework areas you’re not satisfied with.
To get the hang of the tools and build your confidence, practice a bit on a primed scrap of drywall or a section of wall about 6 ft. wide. You’ll see how well your color choices blend. Don’t worry; you can always repaint the wall once you’ve finished practicing.
Remember that the effect should be free and random, so don’t fuss over a small area. Work large areas at a time and enjoy the process. Just follow the instructions in Photos 1 – 9 to get great-looking results.
Dealing with edges, archways and other tight spots

Photo 6: Cut in edges with a brush
Paint the edges close to door and window trim with a brush. Dab the brush into each color to keep the tones consistent with your walls.

Photo 7: Fill in small areas by hand
Fill in spaces where your roller can’t reach with special edging sponges provided in your kit. You can use one sponge saturated with both colors or two sponges (each with one color) to blend areas in tight spaces.

Photo 8: Use edging sponges at the ceiling
Blend the paint with edging sponges to match your surrounding pattern near the ceiling after you’ve brushed the inside corners. Feel free to overlap this sponged area with your dual roller to further blend.


Work the dual roller as close as possible to the window and door trim and to the ceiling so these areas match the rest of the wall texture. Then cut in along the edges with a trim brush dipped in both colors, keeping the paint line as narrow as possible (Photo 6). Finish with edging sponges (provided in the kits), blending the two paint colors by hand until the area looks like the rest of the wall (Photo 7, 8).
Also use the dual roller as much as possible at archways and other narrow areas (Photo 9).
How do I choose attractive color combinations?

Unless you’ve got a great eye for color, choosing combinations can be tricky. Bring home latex paint swatches from the paint store to see how the colors look in your room. The kit manufacturers suggest you choose your colors from the same swatch. You can mix a light shade with a dark for high contrast, or two closer shades for a more consistent tone. I found that experimenting with colors on different swatches but within the same color family gave the richest results.
Begin the color selection process by considering the fabrics, prints, carpeting, area rugs and furniture you’re working with. Find paint swatches that coordinate with these and give the colors a test. Before I painted the room, I purchased quart cans of chosen colors and tested them on a section of wall. If you don’t trust your judgment, ask your paint store professional for suggestions.
We provided the samples on this page to help you see the effect of certain colors when they’re blended. (The room shown was painted using the colors in sample No. 1 and the Tuscany roller cover.) Nos. 2 and 4 were also done with the Tuscany; the Fresco cover was used for No. 3. Note: The paint we used isn’t available nationwide, so if you like our choices, match them from the magazine to your own color swatches.
Required Tools for this Project
Have the necessary tools for this DIY project lined up before you start—you’ll save time and frustration.
- Paintbrush
Required Materials for this Project
Avoid last-minute shopping trips by having all your materials ready ahead of time. Here’s a list.
- Latex wall paint
- Masking tape
- Old newspapers for rolling excess paint