DIY Decorating: Frame Your Mirror With Glass Tile
Updated: Oct. 14, 2019A tile framed mirror that's a work of art

- Time
- Complexity
- Cost
- Multiple Days
- Beginner
- $51–100
Tile Framed Mirror: Design and layout
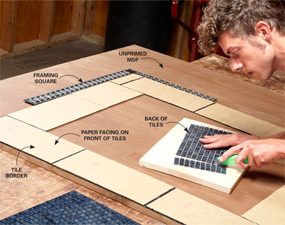
Tile Framed Mirror Photo 1: Dry-set the tile on a flat surface
We used paper-faced glass mosaic tiles. They’re a little harder to work with than mesh-backed glass tiles, but they’re typically cheaper and you can’t see the mesh backing through the glass. Working on a slab of 3/4-in. MDF, I fit together the tile border. This meant cutting the tile sheets to fit. Remember to leave grout spaces between the sections of tile. The MDF later became the base of the mirror.

Tile Framed Mirror Photo 2: Make sure the mirror fits
Center the mirror on the tile and make sure it overlaps the tile by at least 1 in. Then mark the outer edges of the tile border so you can cut the MDF base to size. After it’s cut, prime both sides.

Tile Framed Mirror Photo 3: Label the tile sections
This was a stroke of genius and saved us a ton of trial-and-error later on when setting the tile.

Tile Framed Mirror Photo 4: Make the frame parts
We ripped the 3/4-in. oak frame parts to a width of 2-1/2 in. The top and bottom frame parts overhang the sides by 3/4 in. We rounded the edges of the frame parts with a 1/16-in. roundover bit—but this step is optional.


Vern Johnson, TFH art director extraordinaire, is a hands-on fellow who’s addicted to glass tile. He was itching for a new tile project that wouldn’t break the bank. So he came up with this glass tile border and frame that transforms a plain mirror into a stunning work of art. Big impact—small price. Here’s how he did it.
Set and grout the tile

Photo 7: Lay the tile mat
If you use a tile mat, make sure to peel the paper facing off the tiles slowly so the tiles don’t move around or come off.

Photo 8: Set the tile
Having the frame already in place was another brilliant idea (man, I’m good). It made setting the tile a piece of cake because the frame automatically aligns the tile.

Photo 9: Press it into place
Make sure all sections are positioned right; adjust them if needed. Then press them hard against the mat with a scrap of plywood.


For this project, I used a tile adhesive mat—a mat that’s sticky on both sides (sold at home centers and tile stores). You stick one side to the frame and then stick the tiles to the face. It’s easy to use, you can grout it right away and there’s less mess than with mastic. But mastic would definitely be cheaper and it would work fine too.
Attach the mirror

Photo 13: Apply adhesive
Cut wood strips the same height as the tile and glue them to the base. Then apply mirror adhesive. Also run mirror adhesive around the inner edge of the tile—just a thin bead so it won’t squeeze out around the mirror.
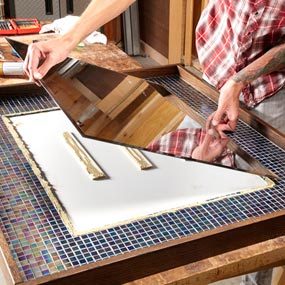
Photo 14: Set the mirror
I jiggled the mirror back and forth a few times to spread the mirror adhesive and then pressed it down. I let the whole thing cure for a day before attaching the hardware.

Photo 15: Mark the outline on the wall
I measured from the edge of the frame to the center of the studs to determine where to place the two hanger straps on the mirror. That guaranteed that both straps would land on studs. But it would have been easier to use heavy-duty drywall anchors.


Use special mirror adhesive (available at home centers) to bond the mirror to the MDF backer. Carefully set the mirror in place, then let the adhesive set overnight.
After the glue has dried, turn the mirror over and mark locations for two hanger straps at the top of the mirror. If possible, match these hanger locations to the studs on the wall, but if the spacing doesn’t work out where you want to place the mirror, use heavy duty drywall anchors.
Rout channels for the hanger straps with a dado bit set to the depth of the hanger. Screw the straps to the MDF backer, then hang the mirror.
Required Tools for this Project
Have the necessary tools for this DIY project lined up before you start—you’ll save time and frustration.
- 4-in-1 screwdriver
- Caulk gun
- Circular saw
- Cordless drill
- Dust mask
- Framing square
- Grout float
- Level
- Miter saw
- Rags
- Router
- Safety glasses
- Stud finder
- Utility knife
Required Materials for this Project
Avoid last-minute shopping trips by having all your materials ready ahead of time. Here’s a list.
- 2-in. screws
- 3/4-in. MDF
- 3/4" x 2 1/2" oak trim
- Beveled mirror
- Clear finish
- Glass tile
- Heavy duty drywall anchor
- Masking tape
- Metal straps
- Tile mat
- Unsanded grout
- Wood glue