Tips for Buying a Used Car
Updated: May 11, 2022Follow these four simple steps to find a dependable used car

Tips for Buying a Used Car Step 1: Check the vehicle’s reliability on the internet
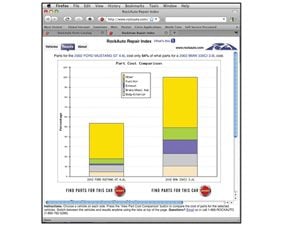
Photo 1: Compare repair costs
It’s a great vehicle, but only if you can afford the repair parts. Don’t be surprised by sky-high parts costs after you’ve bought the vehicle. Get all that information up front at rockauto.com.
Family and friends used to ask me if a certain vehicle was “a good one” only after they’d bought it. Hello? What am I supposed to say then?
Buying a dependable used car takes a little bit of homework. Here’s a four-step plan that you can follow to have the best shot at getting a car that won’t turn into a money pit. This step-by-step inspection program works whether you’re buying from a car lot or a private party. It’s not rocket science, just simple logic when you need tips for buying a used car.
This story on tips for buying a used car isn’t about cosmetic issues like rust, body dents or dirty carpets. Plus, I’m assuming you’re buying a vehicle that’s out of the factory warranty period.
Once you decide on a few vehicle models you’re interested in, it’s time to begin your research in online forums such as edmunds.com and automotiveforums.com. These are two websites where you can read comments and ask questions of a pool of thousands of people who actually own that vehicle. Review the owners’ comments and ask about their ownership experience. Find out if there are any recurring problems with that year, make and model and how much the owners have shelled out in repairs. Then ask whether they’d buy the same vehicle again. They’ll give you the straight dope. Some forum members respond immediately, but be patient; it might take a few days to get plenty of responses. Someone will always have a good tip on buying a used car.
Meanwhile, check out rockauto.com’s “Repair Index” to compare repair parts costs (Photo 1). You may find, for example, that a certain European sedan’s alternator replacement could cost upward of $800, whereas the same item for a similar domestic model is relatively cheap at $150. When you’re buying a used vehicle, parts cost is a major concern.
Tips for Buying a Used Car Step 2: Inspect before taking a test drive

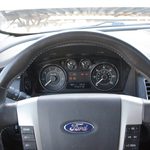
Photo 1: Check the dash lights
System lights should come on, then turn off, when starting the engine.

Photo 2: Don’t kick the tires—measure them
Measure the remaining tread depth to determine how much tread is left. New tread depth (for cars) is usually 11/32 in., and tires must be replaced when they’re at 2/32 in.

Photo 3: Check the rubber CV boots
Turn the wheels fully left or right and crawl under the fender. Shine your flashlight on the pleats of the rubber CV boots. Look for tears or grease.


- Check the dash lights (Photo 1). Turn the key to the “run” position. The Check Engine (Service Engine Soon), Airbag (SRS), Antilock brakes (ABS), Antitheft (Security), and traction control, lights must come on. After you start the engine, all those lights should go off.
- Check the tires. If you see cracks in the tread or sidewall areas, or notice any steel wires sticking out, you’ll need new tires immediately. So deduct at least $450 from the seller’s asking price (more for truck or SUV tires).Next, use a tread depth gauge (less than $5 at any auto parts store) to check the tread at the edges and center of the tire (Photo 2).Tread wear that’s worse on one edge of the tire indicates an alignment problem (minimum $100). Irregular tread depth around the tire (cupping) indicates worn struts or worn suspension components (strut replacement runs about $450 for parts and labor).
- Check the constant velocity (CV) boots (Photo 3). If they’re cracked, you’re looking at big money, at least $400 per side (parts and labor) for rebuilt axle assemblies.
- Check for engine sludge or severe varnish buildup. Both are signs of neglected maintenance. Remove the oil filler cap and check the engine internals (Photo 4).
- A cold engine should start right away, without having to “give it some gas.” Then it should settle down to a smooth idle. If the idle is rough when the engine is warm, it’s a sign of a fuel, ignition or vacuum-related problem. That’s going to cost a minimum of $250 to diagnose and fix.
- Check the fluids. Fresh brake fluid is honey-colored. But dark brown brake fluid may still be good. Your best bet is to buy brake fluid test strips at an auto parts store. Count on $65 for a brake fluid flush.Engine coolant comes in many different colors, but one color is the kiss of death—rust. If you see that, run, don’t walk, away from this vehicle. You’ll have nothing but costly repairs (radiator, heater core, water pump, etc.) down the road. Flushing the coolant at this point won’t help because the damage has already been done.Fresh transmission fluid is bright red (Photo 5). If it’s light brown, it’s due for a change (figure about $175 for a complete change-out with the manufacturer’s fluid). If the vehicle doesn’t have a dipstick, have your mechanic check it at final inspection.
- If the owner has maintenance records, great. It probably means that they took good care of their car. Then check the maintenance schedule in the glove box to see if any major repairs are looming. A timing belt change-out can easily cost $500, and a tune-up can cost $250 on some engines. If the owner already did those repairs, great. But if they didn’t, you’ll get stuck with a large bill right away.
Video: How to Measure Tire Tread
Rick Muscoplat, an automotive expert at The Family Handyman, will show you how to measure tire tread on your vehicle so you will know when you need to replace your tires.
Tips for Buying a Used Car Step 3: Take a test drive


This isn’t a “once around the block,” 10-minute drive. You need to really put the vehicle through its paces on city streets and on the highway. Here’s what to look for.
- As you start the test drive, check for brake pedal pulsation (Photo 1). Pulsation is caused by brake rotor runout (warpage), and the fix is usually a brake job ($250 to $500). Pulsation shouldn’t kill the deal, but it should reduce your offering price.
- Check for steering wheel wobble and wander (Photo 2). If the wheel vibrates, the cause could be an out-of-balance tire (about $25). But if the vehicle “wanders” and the steering wheel requires constant correction, it’s a sign of serious steering or suspension-related problems (minimum $400 for parts and labor).
- Check transmission shift speeds. Every transmission is different, but as a general rule, the first (1–2) shift should occur at 8 to 12 mph. The next shift (2–3) should happen at about 18 to 25 mph. If the vehicle has overdrive, the last shift should occur at about 40 mph. If you have any doubts about the shifting, ask your mechanic to check it out.
- Check overall engine performance. Accelerate from a stop without letting up. You shouldn’t feel any hesitation, chugging or hiccups. Then put it under a heavy load by driving it up a steep hill or punching it hard on the highway. You shouldn’t feel any miss or lag. If you do, it’s got “driveability” issues, and that’ll cost you a minimum of $100 just to get a scan tool check.
Tips for Buying a Used Car Step 4: Negotiate the price first, then take it to a mechanic for a final inspection

Most mechanics charge about $100 for a used-vehicle inspection, and it’s the best money you’ll ever spend. But before you commit to the inspection, negotiate the best price based on any problems you’ve already discovered (Photo 1). Then make the final purchase contingent on a clean bill of health from your mechanic. Make sure the final inspection includes a scan tool check for “readiness monitors” and “pending codes.” I’m warning you—don’t skip the final inspection step just to save $100.
Required Tools for this Project
Have the necessary tools for this DIY project lined up before you start—you’ll save time and frustration.
- Flashlight
- Safety glasses
Required Materials for this Project
Avoid last-minute shopping trips by having all your materials ready ahead of time. Here’s a list.
- Brake fluid test strips