Remodel Your Kitchen with a Custom Range Hood Kit That’s Easy to DIY
 Updated: Jan. 30, 2023
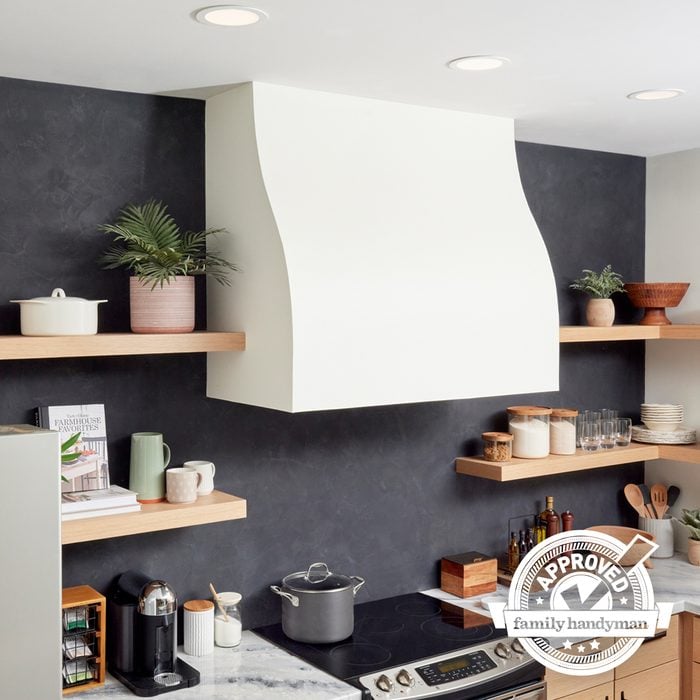
If you're looking for a creative focal point in your upcoming kitchen remodel, try building your own range hood with this Family Handyman Approved kit.
Our editors and experts handpick every product we feature. We may earn a commission from your purchases.
With every era in remodeling, new styles and trends come to light. At the moment, nearly every kitchen remodel I see has a stylish accent wall and a stunning custom-made range hood.
If you’re contemplating a kitchen remodel yourself, don’t like the looks of store-bought range hoods yet lack the tools and know-how to build one from scratch, don’t sweat it. Archways & Ceilings has your back.
On This Page
Who Are Archways & Ceilings?
Archways & Ceilings is a custom manufacturer of kits for all sorts of architectural products, from range hoods to vaulted ceilings.
Once you pick the style that suits your liking from their pre-designed templates, simply enter your project dimensions on their webpage. Within a couple of weeks, you’ll receive a crate filled with perfectly cut components for your custom range hood.
The kit with its prelabeled parts is especially DIY friendly. It only requires a drill/driver, level and some construction screws to put together and install. Once complete, it’s up to you to choose whichever exterior finish you wish. Whether it’s drywall, plaster, wood veneer, brick veneer, trim or tile, the Archways & Ceilings Range Hood Kit works with them all.
How We Tested It
For our most recent kitchen remodel project, we decided to give the Archways & Ceilings Bella Range Hood kit a try. After figuring out our necessary measurements and putting in our order, the small tightly packed crate arrived. Then it was time to get to work.
Assembling The Kit
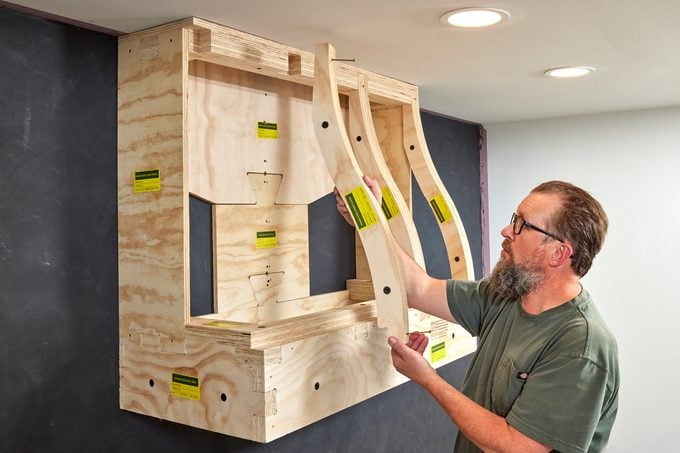
The user-friendly kit with its pre-cut CNC joinery is easy to put together. After gathering the clearly labeled parts, we constructed the bottom box of the hood using a drill and standard construction screws. We then dug out and assembled the range hood top and hung it above the range.
It’s possible to assemble the entire range hood and hang it as one piece. However, we decided to do it piece by piece. It’s crucial the top of the range hood is level, since this serves as the building block to construct the remainder of the kit.
After we installed the top to our liking, we slipped the dovetail back panel into its corresponding slot on the top assembly and secured it to the studs. Then we lifted the pre-assembled bottom box into position and connected it to the back panel via the pre-cut dovetail.
We fastened it to the wall studs using the drill and construction screws. Finally, we slipped the sides and curved front ribs into their indexed slots and fastened them into place.
Install The Fan
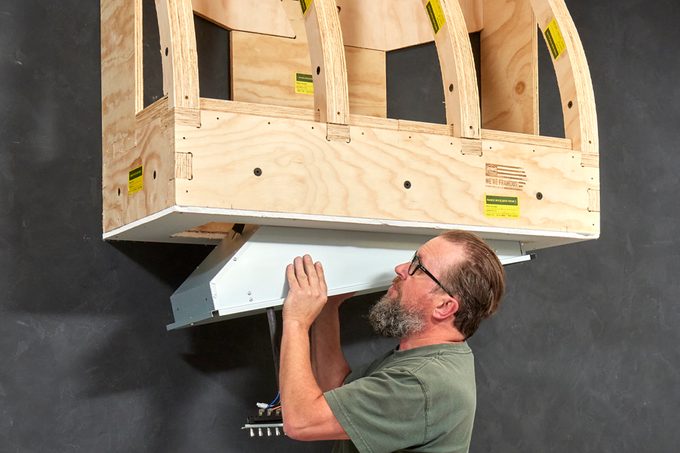
With the framework placed and secured to the wall, it was time to install the fan, which we purchased from a local home center. When we ordered the kit, we gave Archways & Ceilings the fan’s make and model number to insure compatibility. In turn, the cleats, shims and filler pieces needed to install our fan model came with the kit.
We connected the ductwork and electricity after we installed the fan according to the instructions.
Finish The Exterior
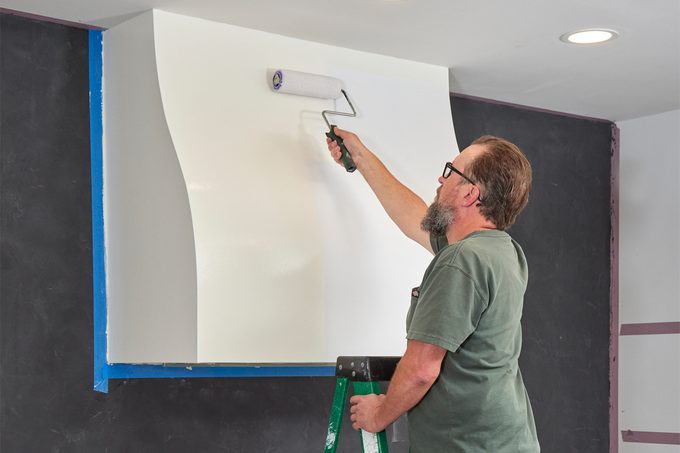
Though there are many options for a sleek and modern range hood finish, we chose to cover it with drywall for painting. For the front curved part of The Bella Kit, we carefully bent quarter-inch-thick drywall to the form, fastening it as we worked. This works best if you dampen both sides of the drywall to help bend to the contoured front.
To meet fire code, you’ll need two layers of quarter-inch drywall on the face. Then use half-inch drywall for the flat sides and bottom.
The messy part was now upon us — time to tape, mud and sand.
To achieve a smooth, rounded front edge, we applied a flexible corner bead and joint compound. For all other seams we used tape and mud as usual. Once dry, we sanded the joint compound smooth and repeated as necessary. Pro tip: Take your time and be methodical.
If you’re installing the range hood on a finished wall, mask off and cover the surrounding surfaces. And don’t forget to wear a mask since drywall dust is likely to spread everywhere.
After we sanded the final coat of joint compound smooth, we applied a coat of drywall primer. Once the primer dried, we rolled on the paint to complete our custom range hood.
Why You Should Try This
If you’re thinking about leaping into a kitchen remodel, or maybe just refreshing your kitchen with a stylish new range hood, give the Archways & Ceilings Range Hood Kits a try. They’re affordable, easy to build and available in whatever size or finish your kitchen requires.
Best of all, when your friends ask where you got your new custom range hood, you can boast and say you made it yourself.
Where To Buy
The Bella Range Hood Kit, as well as many other DIY kits, are available at archwaysandceilings.com.
Additional Options for Custom Range Hoods
You might feel intimidated by constructing your own range hood kit, and that’s fine. It’s still possible to have a unique, custom-made range hood centerpiece even if you cannot build your own. We suggest checking out the options at Coppersmith or Kitchensource.com.