How to Build a Simple Dresser
 Updated: Feb. 10, 2023
Looking for a weekend project? Build this simple and durable dresser that will last for years to come.
Our editors and experts handpick every product we feature. We may earn a commission from your purchases.
Two days
Intermediate
$200 - $600
Introduction
If you're in the market for a small bedroom dresser for a nursery or guest room, why not make it yourself? It only takes a few sheets of plywood, a few feet of solid wood and a free weekend to build this simple modern dresser design.
By using solid wood for the face and edging, this dresser will not only look and feel great, but also last longer than particle board substitutes from big box stores. Now, let's get started.
Tools Required
- Brad nail gun (or hammer and nails)
- Clamps
- Drill/driver
- Orbital sander w/ sandpaper
- Pencil
- Pocket hole jig
- Router w/ straight cutting bit or Dado set
- Safety glasses / hearing protection / dust mask
- Table saw
- Tape measure
Materials Required
- #8 x 1-1/4" wood screws
- #8 x 1” wood screws
- 1 - 4’x8’ Sheet of ½-inch plywood
- 1 - 4’x8’ Sheet of ¼-inch plywood
- 1 - 4’x8’ Sheet of ¾-inch plywood
- 1-1/4" pocket hole screws
- 2 - 1”x10”x10’ of your chosen hardwood
- Painter's tape
- Two-sided tape
- Wood finish of your choice
- Wood glue
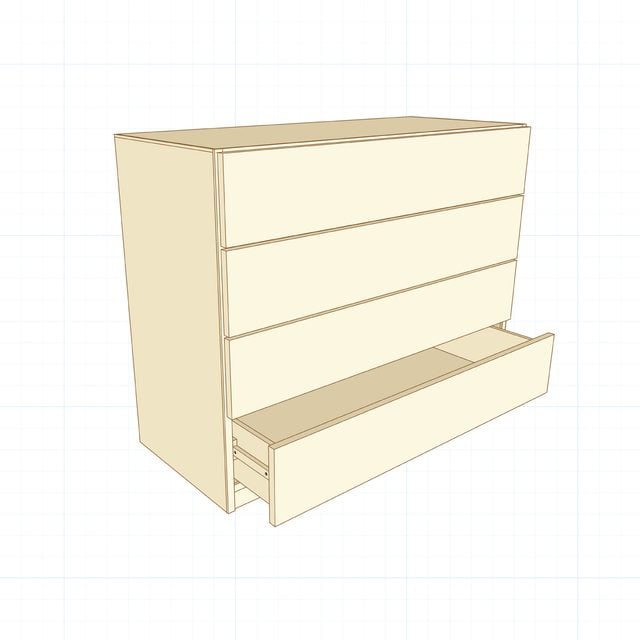
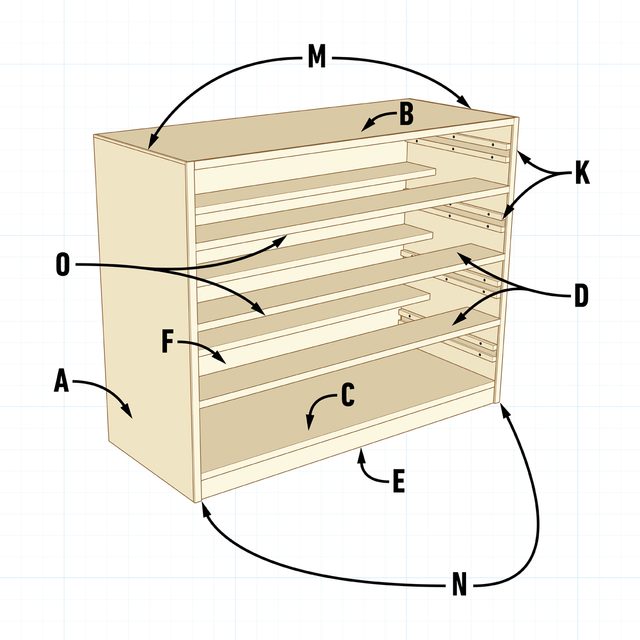
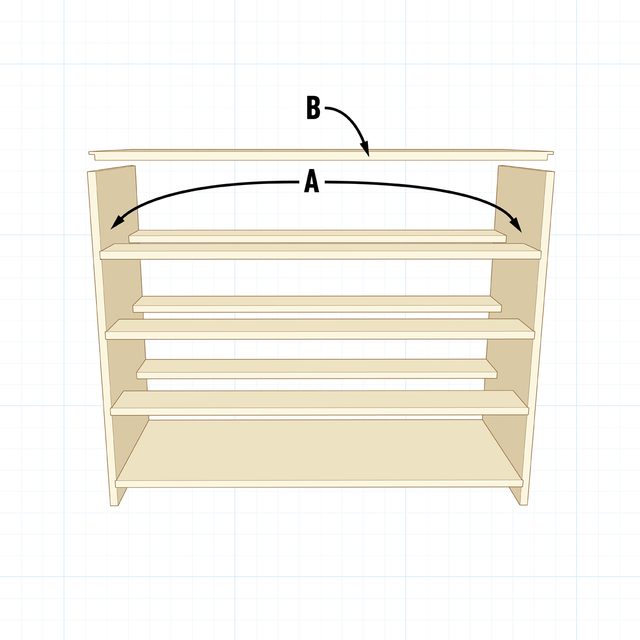
Casework Overview
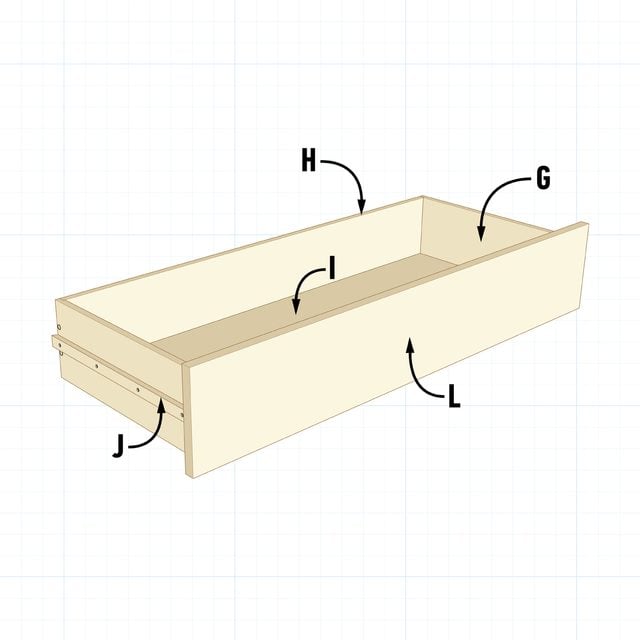
Drawer Box Overview
Cut List
3/4-inch plywood
| PART | QTY. | LENGTH | WIDTH |
| A – Sides | 2 | 32-3/4″ | 17″ |
| B – Top | 1 | 41-1/4″ | 17″ |
| C – Bottom | 1 | 40-1/2″ | 16-1/4″ |
| D – Stretchers | 6 | 40-1/2″ | 5″ |
| E – Toe | 1 | 40-1/4″ | 2″ |
1/2-inch plywood
| PART | QTY. | LENGTH | WIDTH |
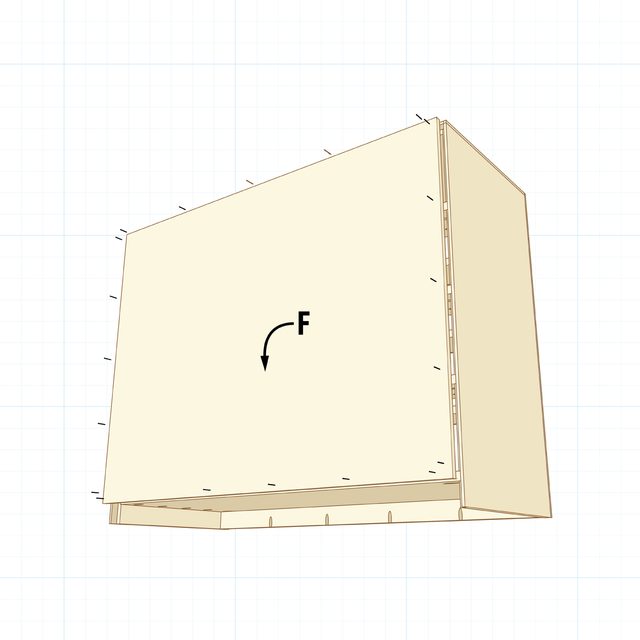
| F – Back | 1 | 41-1/4″ | 30-3/4″ |
| G – Drawer Sides | 8 | 16″ | 6″ |
| H – Drawer Front/Back** | 8 | 38-1/4″ | 6″ |
1/4-inch plywood
| PART | QTY. | LENGTH | WIDTH |
| I – Drawer Bottoms | 4 | 38-1/2″ | 15-1/2″ |
Solid wood
| PART | QTY. | LENGTH | WIDTH | THICKNESS |
| J – Drawer Slide** | 8 | 16″ | 7/8″ | 1/2″ |
| K – Drawer Mount** | 8 | 16″ | 2″ | 5/8″ |
| L – Drawer Fronts | 4 | 41-1/4″ | 7-7/16″ | 3/4″ |
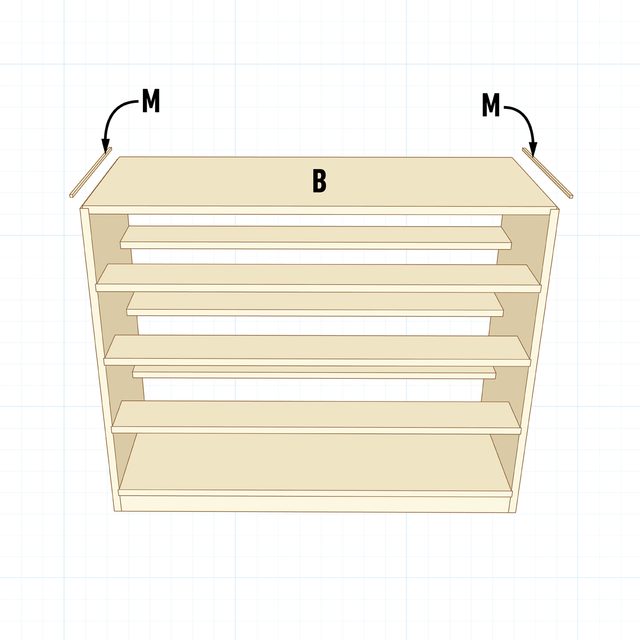
| M – Top Edges | 2 | 17″ | 9/32″ | 9/32″ |
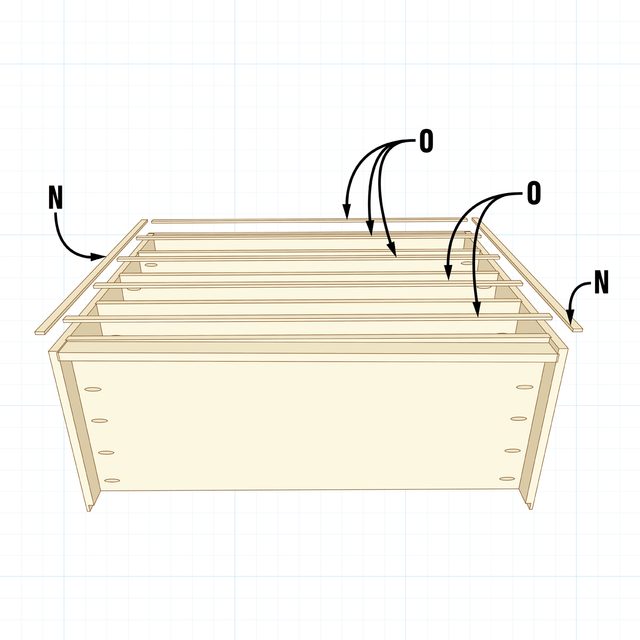
| N – Vertical Face Piece | 2 | 33″ | 3/4″ | 1/4″ |
| O – Horizontal Face Piece | 4 | 40-1/4″ | 3/4″ | 1/4″ |
| **Only if using the same drawer slides | ||||
Project step-by-step (12)
Cut the Components
Cut all your parts from the list above. In choosing a wood species for your dresser, select 3/4-inch plywood and solid wood of the same species, since that’s all you’ll see on the exterior.
As for the 1/2-inch and 1/4-inch plywood, I prefer to use apple ply or Baltic birch plywood. The thinner ply configuration is stronger and offers an aesthetically pleasing edge that’s visible on the top of the drawer boxes.
Note: You may need to adjust your drawer widths and cut list layout if you can only obtain traditional 5/8-thick Baltic Birch plywood in 5-ft. by 5-ft. sheets.
Cut the Rabbets and Dados
After cutting the parts, you’ll need to add dados and rabbets to some of the pieces.
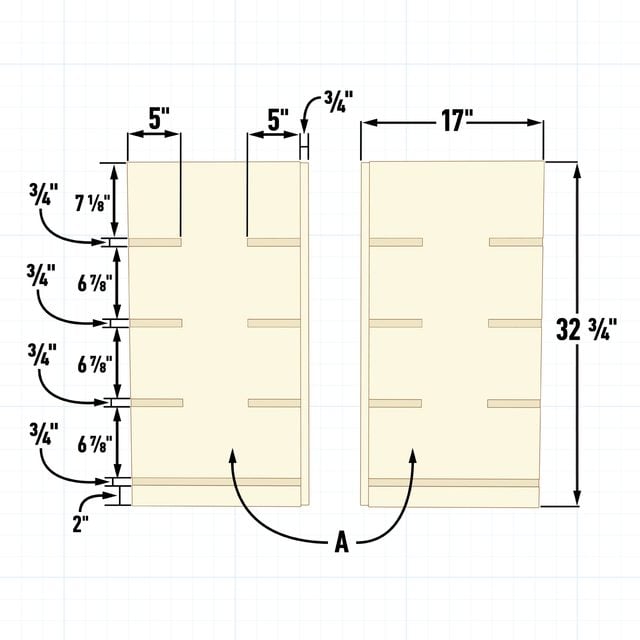
Start by cutting 1/8-in. deep dados into the sides (A) to accept the bottom and stretchers as pictured above. This can be accomplished with a router and straight cutting bit, or with stacked dado blades on a table saw.
Note: If the five-inch-long stopped dados seem like too much trouble, it’s OK to carry them through the entire width of the side, since they’ll only be visible on the inside of the dresser.
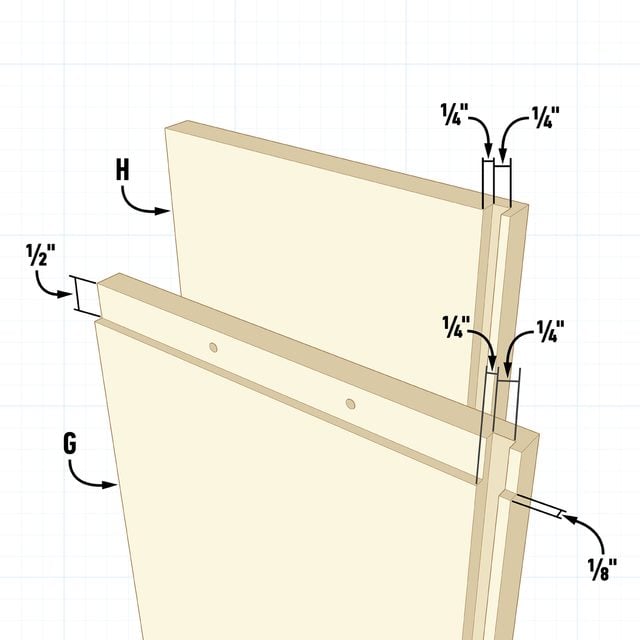
With your dadoing tool set to cut 1/8-in. deep, rabbet both ends of all your drawer box sides (G). Once completing these passes, set up your tool to cut the 1/4-in. by 1/4-in. dadoes for the drawer bottoms on all the drawer sides (G) and front/backs (H).
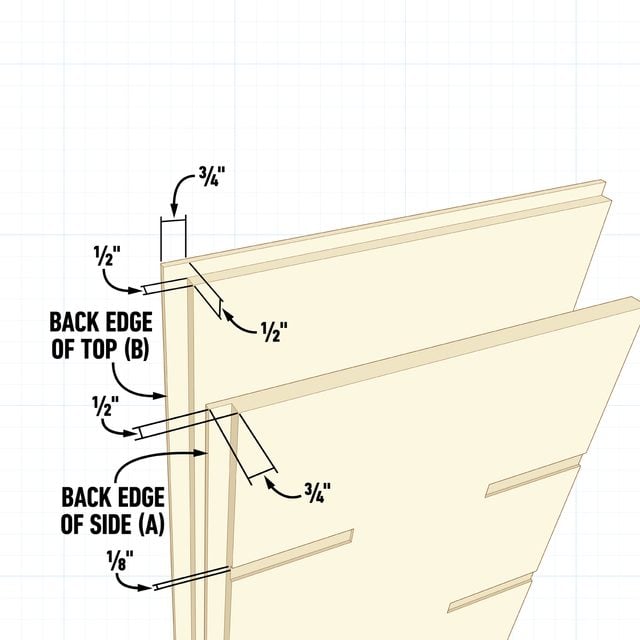
Lastly, since the rabbets on both side pieces (A) and the top (B) are the same depth, mill all three pieces together. Consider the width of the rabbits and their relation to the piece. Ensure your two side pieces (A) are mirrored rather than identical.
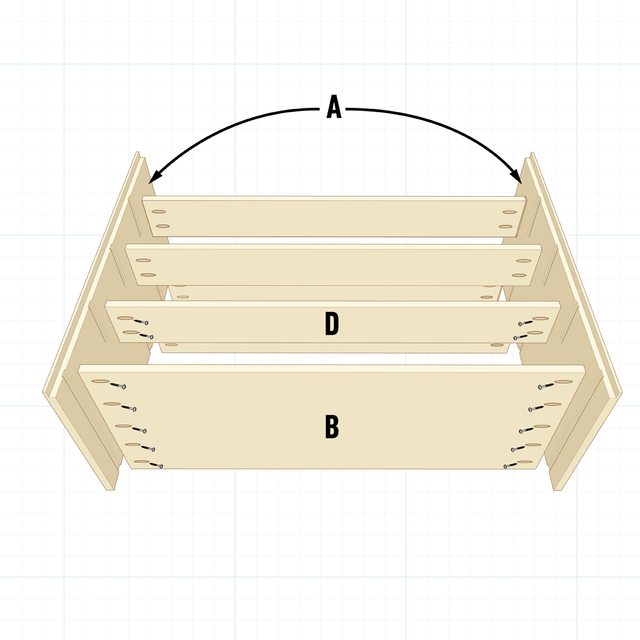
Assemble the Casework
To adhere the six stretchers and the cabinet bottom to each other, drill pocket holes in the bottoms of the stretchers (D) and the cabinet bottom (C). Glue and pocket screw these pieces together into their corresponding dadoes with 1-1/4-in. pocket hole screws.
You’ll need to cut two stretchers with the plywood grain running across the width rather than the length to get all the 3/4-in. dresser components out of a single sheet of 4-ft. by 8-ft. plywood. Hide these two stretchers along the back side of the cabinet so they won’t be noticed.
Furthermore, to prevent the screws from protruding or bulging the outside of the dresser, make sure to adjust your pocket hole jig for 5/8-inch-thick material.
Attach the Top
Once the stretchers, bottom and sides are together, glue and clamp the top (B) to the sides (A). If you happen to have a 23-gauge pin nailer, you can use inconspicuous 23-gauge nails for this, too. Maintain a flush front edge between the three pieces.
Attach the Toe Kick
Drill pocket holes in the toe kick (E). Attach it flush to the front edges of the sides (A) and bottom (C) using 1-1/4-in. pocket hole screws and glue.

Nail on the Back
Nail on the back (F) to the casework so that it remains square. Use a pneumatic nail gun with 1-1/4-in. or 1-1/2-in. finish nails, or nail by hand using 4d finish nails. If you plan on spraying a finish like lacquer or paint on this dresser, make sure the back is only temporarily attached so it can be removed later for easier finishing.
Apply the Top Edges
Apply the two solid wood top edges (M) to the case. Attach them with wood glue and hold them in place with clamps and/or painter’s tape until the glue cures. These pieces are intentionally 1/32-in. wider than required to compensate for differences in plywood thickness or rabbet depth.
Remove any excess by sanding or routing with a flush cutting router bit.
Apply the Solid Wood Face
Place the casework face up on your bench. Sand the plywood edges to ensure all the front faces are flush with each other. Next, apply the two vertical face pieces (N) by gluing them in place and holding them down with tape until the glue dries. Or go with 23-gauge nails, which work nicely for this, too.
Flush the side of the vertical face piece (N) up with the inside edge of the case side (A). In this manner, any excess will hang over the outside. Once the glue dries, sand or route off the excess flush to the casework side. Follow the same procedure for installing the horizontal face pieces (O) once the vertical face pieces (N) have been secured.
Fine-tune the width of these four pieces on the table saw beforehand to ensure they’re the exact same thickness as the stretchers (D) before installing them.
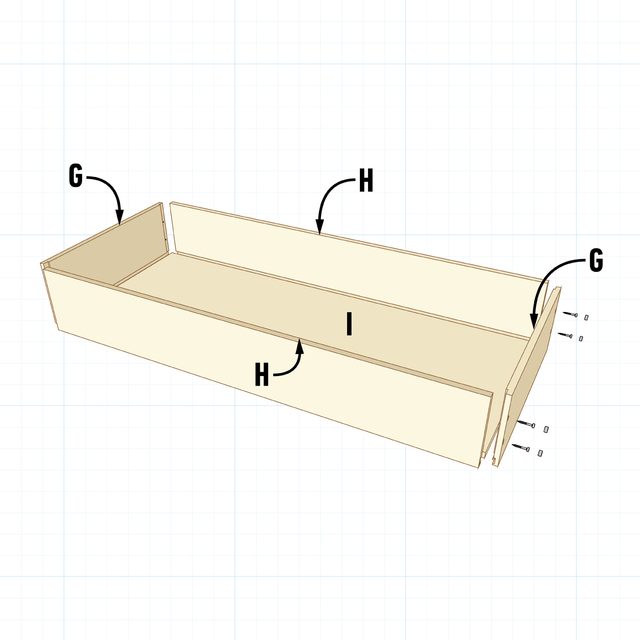
Build the Drawer Boxes
Assemble the drawer box by gluing the sides (G), the front/back (H) pieces and the bottom (I) together. Secure these pieces with two screws in each corner. By recessing and plugging your screws with a plug cut from your chosen hardwood, you add a wonderful touch to the finished dresser.
Get the Drawers Functioning
Use these drawer slide project plans to mill the slides from your drawer slide (I) and mount (K) pieces. After you’ve milled the slide (I) and the mount (K), fasten them to the outside of your drawer box and the inside of your casework with wood screws. The bottom of the drawer box should sit roughly 1/4-in. off the stretcher below it.
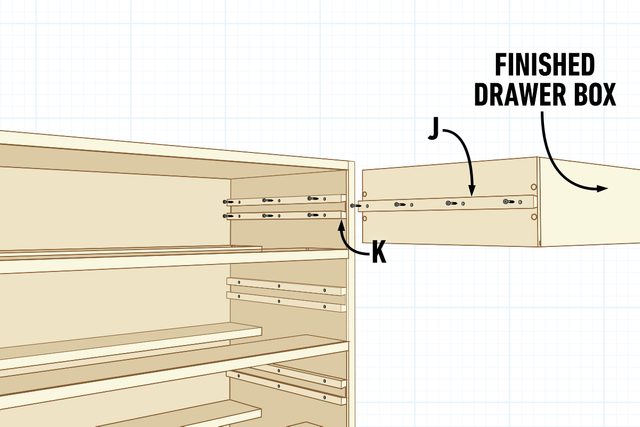
Expect a certain amount of fiddly work in this process. It’s imperative all four drawer box slide pieces are in perfect horizontal alignment.

Attach the Drawer Fronts
When all the drawers are installed and sliding smoothly, attach the fronts (L) to the completed drawer boxes. Do this by marking the 1/4-in. reveals on the top and sides of the casework with a pencil, then using double-sided tape to hold the drawer front (L) in place until you can insert 1-in. wood screws into it from inside the drawer box.

Start by screwing the front to the top drawer and work your way downward. Make sure not to over tighten these screws, since the unit must be disassembled before it’s finished.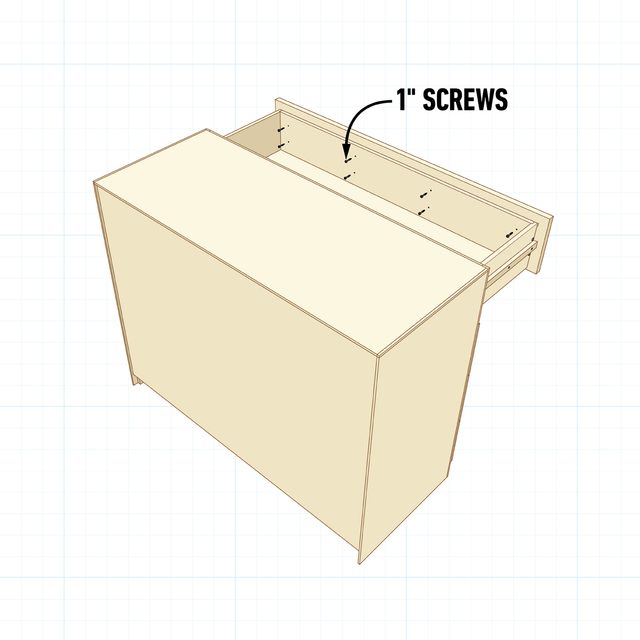
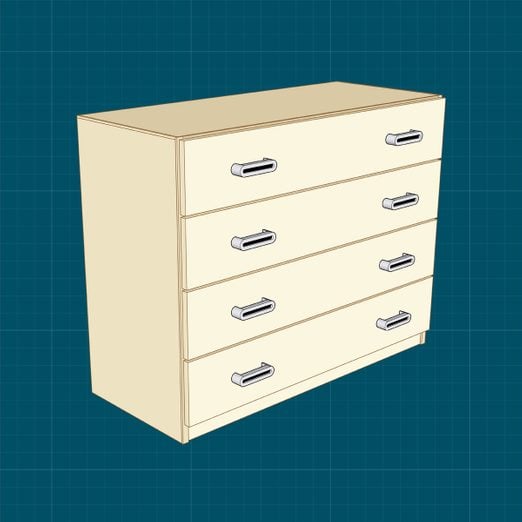
Finishing Touches
Disassemble everything and sand all the components to the smoothness you prefer, breaking sharp edges as necessary. Apply any stain and/or finish you wish and reassemble. Purchase and install drawer pulls that suit your style, and you’re done!
Pro tip: Rub some Gulf wax along the drawer slides. This will keep them gliding smoothly for quite some time. Reapply if they begin to stick or drag.