
How to Build a Storage Coffee Table
 Updated: Feb. 27, 2023
With a bit of undertable storage for books and magazines, this timeless modern coffee table is sure to last for years to come.
Our editors and experts handpick every product we feature. We may earn a commission from your purchases.
Two days
Intermediate
$150 - $400
Introduction
With a bit of undertable storage for books and magazines, this timeless modern coffee table is sure to last for years to come.Tools Required
- Bar clamps
- Biscuit / Plate joiner
- Drill bits
- Drill/driver
- Framing square
- Jigsaw or band saw
- Miter saw or miter box and hand saw
- Pocket hole jig
- Random orbital sander with sandpaper
- Router w/ straight cutting bit or Dado set
- Safety glasses / hearing protection / dust mask
- Sawhorses
- Table saw
Materials Required
- #8 x 1-1/4" wood screws
- 1 - 2 x 2 x 2' Hardwood
- 1 - 4’x8’ Sheet of ¾-inch plywood
- 2 - 1 x 8 x 8' Hardwood
- Pocket screws
- Wood glue
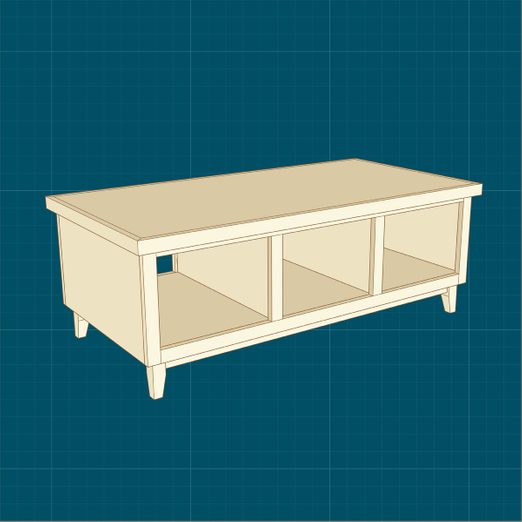
Coffee tables are as integral to any comfortable living room as chairs and lamps. Their flat surfaces easily hold food and beverages during movie nights or sporting events, as well as board games to play with the family. And, of course, they’re a comfortable place for your cup of Joe in the morning as you welcome the new day.
This project focuses on creating a simple yet elegant coffee table with storage space to get stuff out of the way.
Cutting List
3/4″ Plywood
| KEY | QTY. | DIMENSIONS |
| A – Top | 1 | 48″ x 24″ |
| B – Casework Sides | 2 | 22-1/8″ x 13″ |
| C – Casework Top / Bottom | 2 | 46-3/4″ x 22-1/8″ |
| D – Casework Dividers | 2 | 22-1/8″ x 11-1/4″ |
Solid Wood
| KEY | QTY. | DIMENSIONS | THICKNESS | |
| E – Top Edge (Short)** | 2 | 25-1/2″ x 1-1/2″ | 3/4″ | |
| F – Top Edge (Long)** | 2 | 49-1/2″ x 1-1/2″ | 3/4″ | |
| G – Face Frame Stiles | 4 | 13″ x 1-1/2″ | 3/4″ | |
| H – Face Frame Rails | 4 | 43-3/4″ x 1-1/2″ | 3/4″ | |
| J – Face Frame Mullions | 4 | 10″ x 1-1/2″ | 3/4″ | |
| K – Base Sides (Short) | 2 | 19″ x 2″ | 3/4″ | |
| L – Base Sides (Long) | 2 | 43″ x 2″ | 3/4″ | |
| M – Braces** | 4 | 13-1/2″ x 1-1/2″ | 3/4″ | |
| N – Legs | 4 | 5″ x 1-1/2″ | 1-1/2″ | |
| ** – Miters Required | ||||
Project step-by-step (9)
Cut the Parts
Once you’ve selected a wood species, cut the parts above from a sheet of 3/4-inch plywood and solid lumber. Notice that parts E, F, and M require mitered ends, which I suggest cutting while dry-fitting them to their surrounding components.
For this project, the base, casework and top should be constructed separately, then assembled. Let’s start from the base and work our way up.
Build the Base
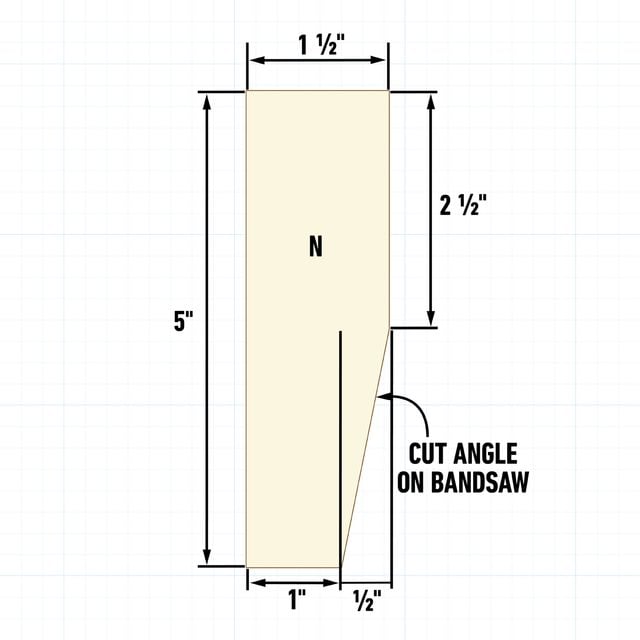
Form the legs
To form the legs for the base, make a pair of cuts to each of the four leg pieces (N) using the band saw or jigsaw. Cut the angle above from the midpoint of the leg to the 1/2-inch mark on the bottom on two conjoining sides and sand any milling marks smooth.
Assemble the base
- Drill pocket holes into both ends of the side pieces, short (K) and long (L).
- Center the short (K) and long (L) base sides on the legs (N) so that the top edge of the base side is flush with the top edge of the leg (N). Secure them with wood glue and pocket screws.
- Miter both ends of all four braces (M) to 45 degrees.
- Pre-drill holes in the brace (M) ends using a 3/16-inch drill bit. Glue and toe screw them in place flush to the top of the base sides (K/L) so that they hold the base assembly square.

Build the Casework
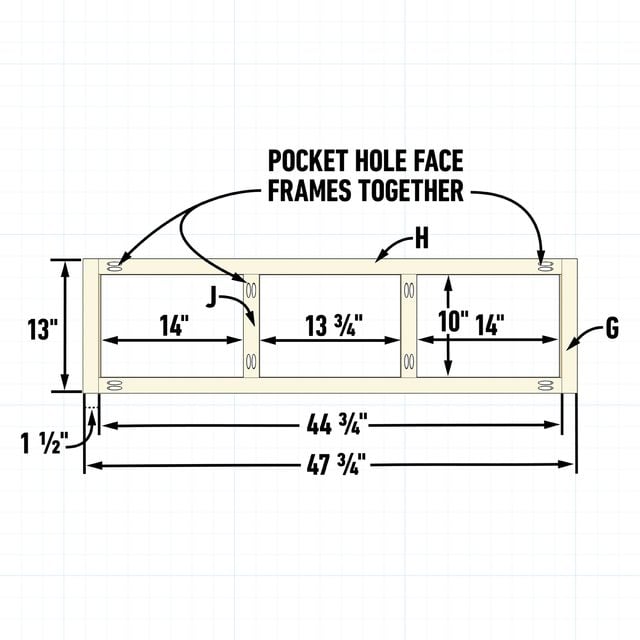
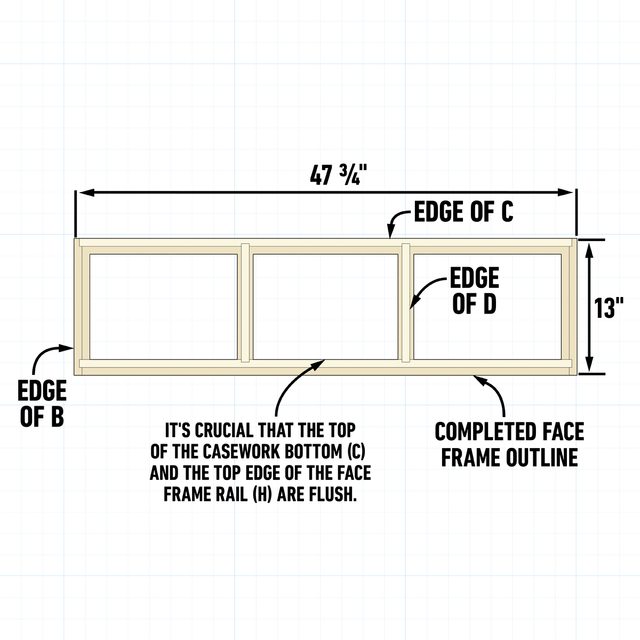
Assemble the face frames
- Drill pocket holes in both ends of all of the face frame rails (H) and mullions (J).
- Glue and pocket screw the two face frames together as shown in the drawing. Put them together on a flat surface so that their faces are flush with each other. It’s particularly important that the face frames are perfectly square and identical since they will be responsible for holding the casework part of the project square.
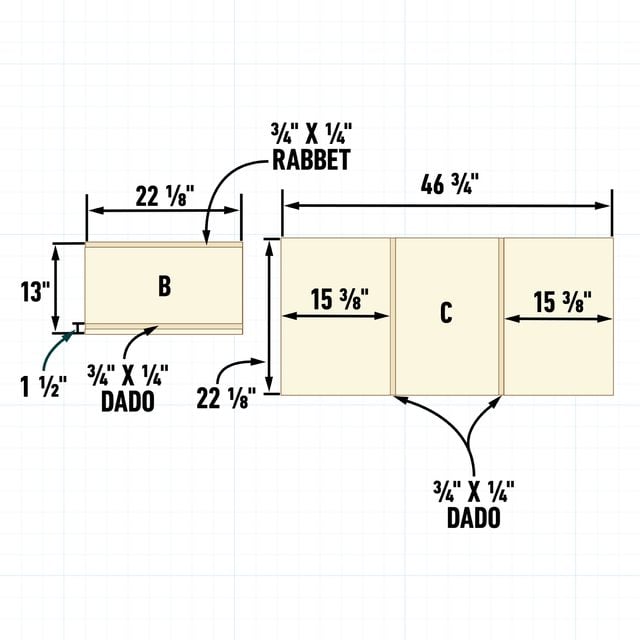
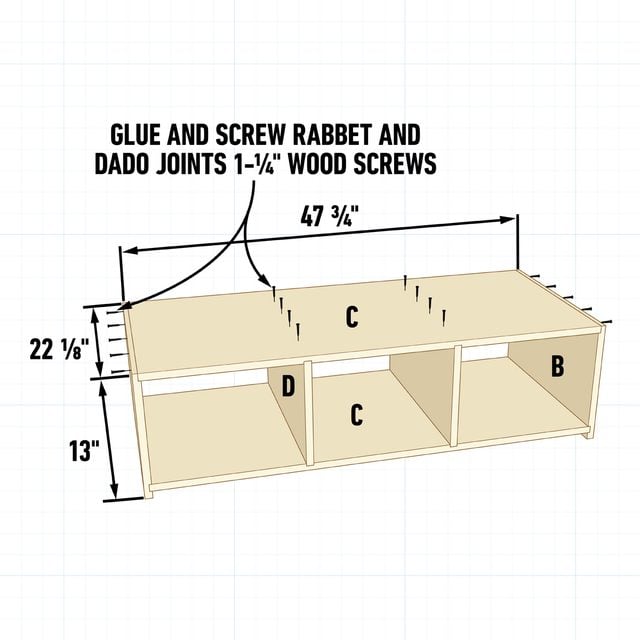
Cut the rabbets/dadoes
In accordance with the drawing above, cut 3/4-inch wide by 1/4-inch deep rabbets and dadoes into the plywood sides (B) and top and bottom pieces (C) using a router or table saw with a dado set.
Assemble the casework
- Glue and screw the rabbited and dadoed sides (B), top and bottom (C), and dividers (D) together as pictured above.
- Only clamp and glue together the lower dado between the sides (B) and bottom (C) piece.
- Countersink the #8 wood screws so their heads are slightly below the plywood surface.
Glue the face frames to the plywood case
- Place the plywood case face up on a set of sawhorses and glue and clamp the face frame to the plywood edges as shown in the picture above.
- Ensure that the top edge of the bottom rail (H) and the top of the plywood bottom (C) are flush.
- Use a framing square and ample bar clamps to ensure the casework and face frame end up square and the glue has enough clamping pressure to properly cure.
- When the glue has dried, remove the clamps, flip the case over, then repeat these steps to attach the second face frame.
Note: Because 3/4-inch plywood is actually 23/32-inch thick, your plywood case will be slightly shorter than your face frame. Once the glue dries, simply sand or rout away any excess material.
Pro tip: Given the compact size of the undertable storage in this coffee table, I recommend pre-finishing the plywood case interior before gluing it together.
Build the Top
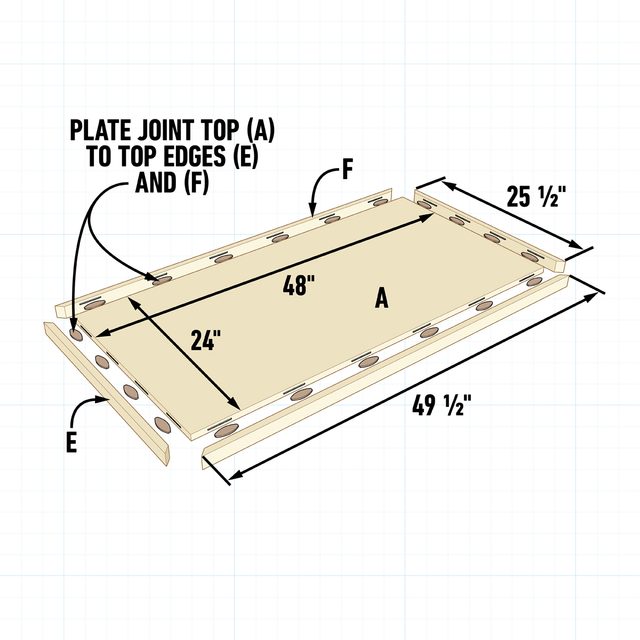
Biscuit and miter the top
The top of the coffee table is its focal point, so take extra care to ensure your mitered corners are tight and you select the prettiest side of the plywood top (A).
- Using some scrap blocks, prop up the top (A) so that it is approximately 1-1/2-inches off the surface of your workbench.
- Cut corner miters on the short (E) and long (F) top edge pieces and clamp them around the sides of the top (A) to ensure they’re satisfactory. Make adjustments to miters as necessary.
- Using a biscuit joiner (also know as a plate joiner), lay out and cut the biscuit joints so the top edge of the short (E) and long (F) top edge pieces are flush with the top surface of the top plywood (A).
- With biscuits, glue and clamp the top (A), short (E) and (F) long edges together.
Final Assembly
When you’ve completed all three pieces of the coffee table, sand each and apply the top coat of your choice.
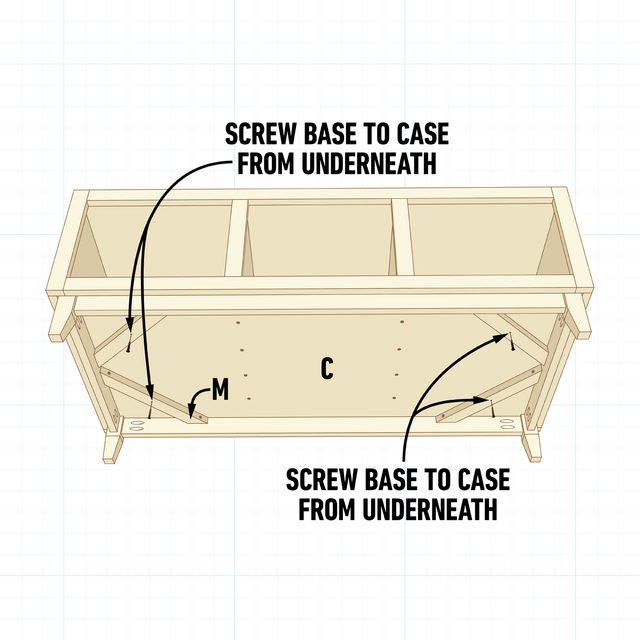
After the finish dries, attach the completed base to the completed casework by drilling a hole through each base brace (M) and screwing through to the bottom of the casework (C).

Complete the piece by screwing through the top of the casework (C) into the underside of the top (A).