DIY Furniture
Updated: Jun. 10, 2020The secret to inexpensive DIY furniture is to start with kitchen cabinets!

- Time
- Complexity
- Cost
- Multiple Days
- Beginner
- $101–250
Cheapskate’s DIY furniture
As a world-class penny pincher, I’ve found that stock cabinets are the key to low-cost, good-quality DIY furniture. I get handsome, sturdy, real-wood furniture for the cost of assemble-it-yourself pieces sold at discount stores. And the advantages go way beyond saving money. Cabinets make furniture building incredibly quick and easy by eliminating the difficult, fussy process of building and hanging doors.
In the following pages, I’ll show you how to build three weekend furniture projects. Along the way, you’ll see different methods of covering the sides and tops of cabinets and adding legs, feet or a base. You can mix and match these various approaches to build your own furniture with the look and function you want.
Finding cabinets
Used cabinets from remodeling jobs are my first choice for furniture projects (they’re free!). I also like damaged cabinets from the local salvage store (cheap!). The trouble with these tightwad options is that the cabinets are already finished, and finishing raw wood to match the factory finish is tough. To get around this, I’ve painted the furniture or stained the new wood surrounding the cabinets a contrasting color for a two-tone look.
When neither paint nor a two-tone look is suitable, I buy unfinished stock cabinets like the ones shown in this article. Home centers usually carry one style only and one wood species only (typically oak). For the projects shown here, I used 12-in.-deep “upper” cabinets. The cabinets you find may not be exactly like mine, so you may have to alter the measurements given in my plans.
DIY TV stand

Ebony TV stand
With technology changing so fast, it didn’t seem smart to sink a lot of money into a TV stand. But inexpensive stands didn’t have the features I wanted: enclosed storage and lots of shelves for electronic components. This stand gives me those things, plus it’s rock solid. Some inexpensive stands are rated to support 75 lbs. or less. This thing would hold a V-8 engine block. It’s sized for a 42-in. TV, but you could easily make it bigger by spacing the cabinets farther apart or choosing wider cabinets. It’s taller than most stands, which may be good or bad, depending on your situation.

Photo 1: Extend the depth and cover the sides
“Skin” the sides with plywood after you screw extension frames to the cabinets. The frames give the TV stand extra shelf depth for electronic components and create a cavity for wires behind the cabinets. Also glue fillers into the recesses at the top and bottom of the cabinets.


Build up the cabinets
A TV stand based on the standard 12-in. depth of upper cabinets would have a top and shelves that are too shallow for some TV bases and electronic components. To add depth to the stand, extend the backs of the cabinets using plywood frames. I extended the cabinets by 3 in.
Assemble the extension frames using nails or screws and a little glue. Note that one side of the frame (G) is 1/4 in. narrower than the other (H). That creates a recess for the 1/4-in. plywood back (S). Next, skin the cabinet sides with 1/4-in. plywood (Photo 1). After spreading glue, I tacked the plywood in place with a couple of brad nails and then weighted it down with paint cans. Also glue the fillers (E) into the recesses at the top and bottom of the cabinets. Fillers give you a solid core to drive screws through when you screw the cabinets to the base and top—without them, screws might pop right through the flimsy 1/2-in. particleboard of the cabinets.
The base and top
The base starts with a plywood frame constructed much like the extension frames: nails or screws, plus glue. Top off the frame by gluing on 1/4-in. plywood (L). Now you’re ready to wrap the frame with solid wood facing using one of my favorite woodworking shortcuts: Instead of routing the facing, then fussing with mitered corners, glue on the facing before you rout and just form simple 90-degree butt joints at corners. Sand the corners flush and then rout the facing (Photo 2). You’ll get tight, perfect corners—fast.
I used a 1/2-in.-radius cove bit and cut to a depth of 1/2 in. That’s too deep for a single router pass, so I made three passes, removing and replacing the breakout block after each pass. To make the base top, use the same wrap-and-rout procedure. Round the top and bottom of the banding (see Figure A) with a 3/8-in. round-over bit. Again, use a breakout block to prevent splintering. Repeat this entire process to build the top of the stand, which is simply a larger version of the base top. To complete the top, add scraps of plywood and cove molding on the underside (Photo 3).
Assembly and finishing
Assemble the entire stand to make sure all the parts fit together correctly. Use screws only—no glue! This TV stand is heavy, and screws will allow quick disassembly for moving.
Screw the cabinets first to the base, driving screws from inside the cabinet boxes (see Figure A). Then set the top in place and fasten it the same way before adding the back panel (S). Measure between the cabinets and subtract 1/8 in. to determine the width of the shelves. To make the shelves, glue banding to a long piece of plywood and rout it with a round-over bit, just as you did to make the top. Then cut the plywood into sections. The shelves rest on adjustable supports. I drilled 2-in. holes into the extension frames for cables to exit behind the stand. Those holes also provide a nook to stuff excess wires into. Next, disassemble the stand for finishing. I applied two heavy coats of Minwax Ebony stain followed by two coats of Minwax Wipe-On Poly. Later, with the stand assembled and in place, I drove a single screw through the top cleat (T) into a wall stud—insurance against tipping forward.
Figure A: DIY TV Stand
The two cabinets are joined with a base and top and skinned over with 1/4-in. plywood on the sides and back.
Overall dimensions: 35-3/4” tall x 43-1/2” wide x 17” deep.
See Additional Information below for the Cutting List and Material List.
Cheap Trick: Routed Finger Pulls
A recess cut with a 1/2-in. cove bit lets you open doors with your fingertips. No hardware needed. Sometimes—like with this TV stand—that’s a sleek design choice. And sometimes, it’s a big money saver: I recently cut finger pulls in a whole set of laundry room doors and drawers. Compared with the cost of knobs (even inexpensive ones), that saved almost $100.
Storage cabinet
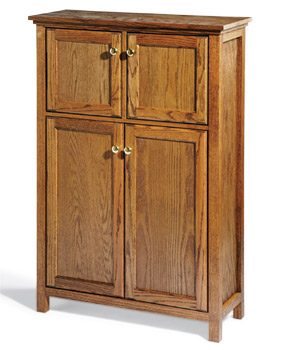
Versatile storage cabinet
This is my favorite cabinet furniture project because it’s so versatile. Use it to store books, small appliances, games and more. Assembly is amazingly fast and easy when you use a brad nailer and glue.
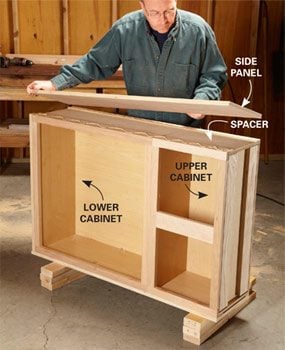
Photo 1: Cover the sides
Screw two cabinets together and glue spacer strips to the sides. Then glue on the side panels. Tack the panel into place, positioning nails where they’ll be hidden by the legs or rails later.


First, screw the face frames of the two cabinets together. Drill pilot holes and drive screws through the lower face frame into the upper. Then lay them on one side and hold a straightedge across the fronts of the face frames to be sure they form a straight, flat surface. I had to slip a strip of cardboard between the two cabinet boxes to get the face frames aligned.
Next, add spacer strips that match the thickness of the protruding edge of the face frames. For my cabinets, I cut strips just a hair thicker than 1/4 in. from a 2×4. Cutting thin strips on a table saw can be tricky, even dangerous. For tips, see “Ripping Boards Safely.”
Fasten the strips with plenty of glue and a few brad nails. Then add the side panel (Photo 1). Make sure the front edge of the panel is perfectly flush with the face frames, and remember that the panel overhangs the lower cabinet by 1 in. Follow the same steps on the other side.
Lay the unit on its back and check that the doors are centered on the cabinets and in line with each other before you add the legs and rails. The doors on my cabinets were a mess—I had to slip paper spacers behind one of the hinges and completely reinstall another.
Now you’re ready to glue and nail on the legs and rails (Photo 2). Glue front leg parts (L, M and N) together, then add them to the cabinet. The top rail (T) is too thin to nail to the face frame, so just nail it to the center stile (S) and clamp it in place until the glue sets. Then remove the doors, finish-sand the whole chest and add the top, which is just two layers of plywood edge-banded and glued together (Photo 3).
Figure B: Storage Cabinet
The guts of this cabinet are a 15-in. and 30-in. cabinet stacked together.
Overall dimensions: 50-1/2” tall x 35” wide x 13-3/4” deep
See Additional Information below for the Cutting List and Material List.
Cheap Trick: Edge Banding
Every cheapskate should learn how to use iron-on edge band. It’s the easiest way to cover plywood edges, and it makes inexpensive plywood look like solid wood. The top on this chest, for example, used less than $20 worth of plywood. Solid wood would have cost more than twice as much. To see how easy it is, see “edge banding.”
Entry bench
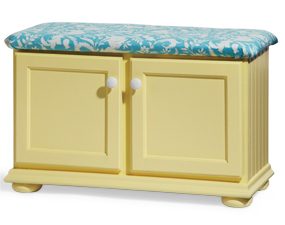
Easy entry bench
This just might be the easiest piece of furniture I’ve ever built. And the handiest, too: Besides the storage space, it’s the perfect perch for slipping on your shoes.

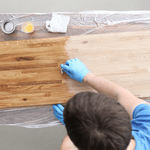
Photo 1: Upholster the seat
Lay out the fabric, batting and foam. Stretch and staple the fabric to the seat, starting at the middle of each side and working toward the corners.

I covered the sides of the cabinet the same way I skinned the sides of the TV stand cabinets (above), but used primed beadboard paneling instead of 1/4-in. plywood. The next step is to build a base (parts E, G and H) and wrap it with trim.
Your local home center may not carry the same chair rail molding I used, but it will have a similar profile. Glue fillers into the recess at the top and bottom of the cabinet. (Actually, most stock cabinets don’t really have a “top” or “bottom”—just pick one.) Then screw the base to the spacers and add the bun feet (Photo 3).
I used 3/4-in. particleboard for the seat, though plywood or MDF would work just as well. For a better-looking upholstery job, round all the corners and edges of the seat like I did. A router and 1/4-in. round-over bit work best, but a sander will work too.
Cut the foam to size so it overhangs all four sides of the seat by about 1 in. and glue it to the seat. Spray adhesive is the standard glue for this job, but I just dribbled a few lines of wood glue onto the seat—that saved me $5—and then set the seat onto the foam.
Cut the batting so it overhangs the seat by about 3 in. and the fabric so it overhangs by 4 in. Then stretch and staple the fabric (Photo 1). There are a few ways to deal with seat corners. Photo 2 shows the method I find easiest. Don’t worry about mistakes—the nice thing about upholstery work is that you can always pry out staples and fix mistakes. To fasten the seat to the cabinet, drive screws through the cabinet and fillers and into the seat.
Figure C: Entry Bench
This painted entry bench has plenty of room for storage under the seat.
Overall dimensions: 20″ tall x 31-5/8″ wide x 13-1/2″ deep
See Additional Information below for the Cutting List and Material List.
Cheap Trick: DIY Bun Feet
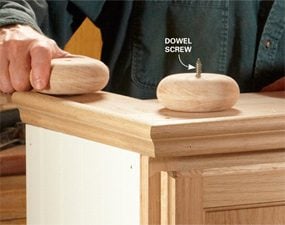
There are lots of online sources for bun feet, but I wasn’t going to spend $30 or more when I could make my own for free. I gathered up some 3/4-in.-thick wood scraps, glued two layers together and cut out circles with a hole saw. After sanding the rough edges, I screwed each foot to a scrap of wood to hold it securely and rounded both sides with a round-over bit. A 3/4-in. round-over bit will cost you just as much as factory-made bun feet would. But spending on tools is always the right thing to do, even for a cheapskate.
Additional Information
- Figure A: TV Stand
- Cutting List: TV Stand
- Materials List: TV Stand
- Figure B: Storage Cabinet
- Cutting List: Storage Cabinet
- Materials List: Storage Cabinet
- Figure C: Entry Bench
- Cutting List: Entry Bench
- Materials List: Entry Bench
Required Tools for this Project
Have the necessary tools for this DIY project lined up before you start—you’ll save time and frustration.
- 4-in-1 screwdriver
- Air compressor
- Air hose
- Brad nail gun
- Circular saw
- Clamps
- Cordless drill
- Countersink drill bit
- Drill bit set
- Framing square
- Hole saw kit
- Miter saw
- Orbital sander
- Paintbrush
- Router
- Safety glasses
- Stapler
- Table saw
- Utility knife
Required Materials for this Project
Avoid last-minute shopping trips by having all your materials ready ahead of time. Here’s a list.
- See Materials List in "Additional Information"
- Wood glue