How to Tile a Shower
Updated: Jul. 19, 2022Build a high-end shower enclosure with this DIY tile shower project.
- Time
- Complexity
- Cost
- Multiple Days
- Intermediate
- $501-1000
How to Tile a Shower Wall Overview
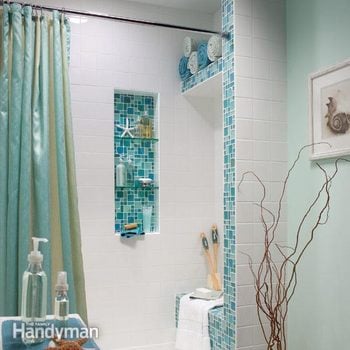
Add a unique touch to your tile shower project by building these features into the walls.

Showers used to be simple boxes for fear that any special architectural features could lead to a leak—and expensive repairs. But modern tiling materials, especially spreadable waterproof membranes, can put these fears to rest. Now you can build in a bench or other structure with confidence and make showering more convenient and pleasant with this how to tile a shower guide.
In this article, we’ll show you how to build in three features for your tile shower: a bench, a shelf and an alcove. We’ll include the key planning steps and the waterproofing and how to tile a shower using special tiling techniques and shower wall tile. This project isn’t for a tiling rookie. You should have some hands-on tiling experience before tackling a complex project like this one. But if you have rudimentary framing skills, and have successfully tiled floors, backsplashes or simple shower surrounds, the advanced techniques we show here will enable you to move on to a shower tiling project like this.
How to tile a shower like we show here will take you about four full days. The shower tiling alone will take two days. Shower tile and shower tiling supplies will cost about $600 if you choose standard tile. If you want fancy glass tile accents like the ones we show, brace yourself. Glass tile can be expensive, so it’s wise to think of it as an accent only. It pays to rent or buy a “score and snap” tile cutter if you’re using 4 x 4-in. tiles like we show. But if you’re using natural stone or larger tiles and your shower wall tile layout requires lots of cuts, especially notching, rent a tile saw for a day. You can score and snap glass tile (small mosaic tiles only), but you’ll break about every 10th tile—not a big deal if you plan the tile layout well and only have to cut a few.
Plan the layout

First make sure you have enough space in your shower to add a bench. You’ll need to leave at least 3 ft. of shower area so you can still move around. This bathroom originally had a 5-ft. tub, which we tore out and replaced with a 4-ft. shower base. This left a 1-ft. space for the bench and the overhead shelf at the end of the shower.
The key to an exceptional how to tile a shower tiling job is to plan the shower with the actual tile you intend to use. Use the tile to decide on exact dimensions and positions of benches, alcoves and even wall thicknesses so you can use whole tiles as much as possible and minimize cutting.
A foolproof method of how to tile a shower is to draw a full-scale template of each wall on rosin paper (Figure A and Photo 1). Be sure to draw the walls including the thickness of backer board and any plywood that’s needed, like on the bench seat. Then mark existing studs that outline alcove positions. Next, lay the tile on the template to decide on the heights, widths and depths of shower features like benches, alcoves and shelves.
Try to wind up with full tiles outlining or covering those features whenever possible. Notice that our alcove is surrounded by full tiles. Those tiles determined the final position and size of the alcove. (It’s easier to deal with cutting the tiles that cover the back of the alcove than the ones that border it.) Notice also that the exact height of the bench allowed for full tiles around it—no cutting needed.
Also adjust the thicknesses of walls and ledges for full tiles. We furred out the 2×4 wall with strips of 1/2-in. plywood so the glass tile would cap the end without any cutting. We chose framing and sheathing thicknesses to achieve the same aim with the shelf edge. If possible, plan the tile for the large wall expanses so that you’ll have columns of similar-width tiles at both ends of each wall. Study Figure A to make all of this clear. You won’t be able to avoid all tile cutting, of course. The goal is to simplify the tile work as much as possible. The more effort you put into planning the how to tile a shower tiling project, the easier it will be to install the shower tile. And you’ll be rewarded with a first-class tile job.
Figure A: Tile Shower Layout Objectives
1. Shelf rests on full tile
2. Thickness matches face tile
3. Adjust alcove width for full field tiles
4. Plan height for full field tiles
5. Start alcove at top of tile row
6. Fur out as needed to avoid cutting
7. Full tiles define bench height
8. Start with full tiles at base
Frame the tile shower
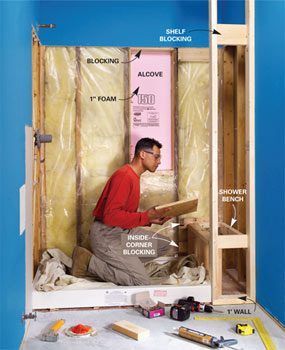

If you have a space between the shower base and the wall, as we show, start by framing a continuous wall for this how to tile a shower tiling project, floor to ceiling, between the base and the wall (Photo 2). If there’s no framing behind the ceiling for anchoring the wall, just screw it to the drywall and then add a bead of construction adhesive around the ceiling plate. Next, frame in the alcove. Use your template to establish the height of the top and bottom and then add blocking there. Fur out the side(s) if needed to accommodate tile sizes within and/or surrounding the opening. If your alcove is on an outside wall, glue 1-in.-thick foam insulation against the outside sheathing using special foam adhesive.
Frame the bench with a 1/4-in. slope so water won’t pool. Cap the bench with 3/4-in. plywood, screwing it with 1-5/8-in. screws. Lastly, add 2×6 blocking to anchor any shelves and any missing blocking at any inside corners.
Cement board tile backer is commonly used for shower walls, but we used a drywall-type tile backer called DensShield for this tile shower. It’s slightly more expensive than cement board but much easier to work with. You score it, snap it and cut it just like drywall.
Whatever material you use, anchor it with 1-1/4-in. cement board screws spaced every 4 in. at seams and every 6 in. everywhere else. If you have a premade shower base, keep the bottom row of backer board just above the lip. The shower tile will hang down over the lip to direct water into the base.
Next lay a strip of fiberglass mesh tape (the type for use with thinset mortar) over all seams and corners. It has adhesive on one side, but many brands don’t stick very well or for very long. If you have trouble, use staples to hold it in place. Mix up about a quart of thin-set mortar to the consistency of creamy peanut butter and trowel it over all the seams with a 6-in. taping knife. Try to avoid big buildups during this how to tile a shower task, which keep the tile from lying flat.
Apply waterproofing membrane


Any area that will be exposed to lots of water during this how to tile a shower wall task should be coated with two coats of a brush-on waterproofing membrane (available at some home centers and all tile stores). Use disposable brushes and let the first coat dry thoroughly before recoating. The product we show goes on pink and dries to red when it’s ready for a second coat (Photos 4 and 5). Focus on areas that will get the lion’s share of showerhead water, especially corners and horizontal bench surfaces and recessed alcoves. For extra protection in your tile shower, also coat all of the screw heads in areas that’ll get deluged. As with the thin-set, try to avoid big buildups.
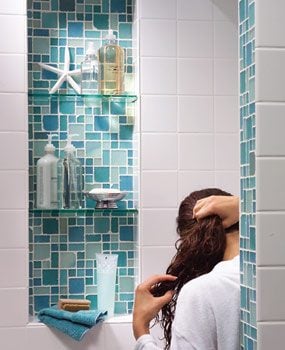
Tile the alcove wall

Photo 5: Alcove
Spread thin-set on the back of the alcove with a 1/4-in. notched trowel and then embed the mosaic tile into the adhesive.
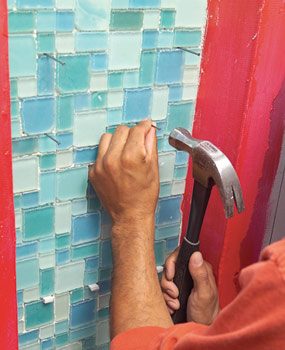
Photo 6: Space and support tiles
Support sagging mosaic tiles with shims and/or nails until the adhesive sets. Tamp all the tiles level as we show in Photo 11.
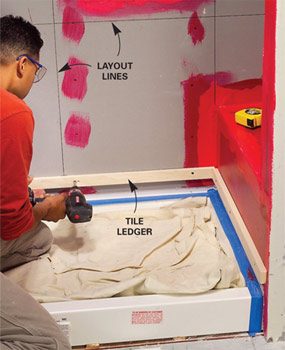
Photo 7: Work from a ledger
Lay out the critical tile lines with a chalk line. Screw a 1×2 to the studs to support the second row of tiles.

Use your template as a guide to snap exact tile layout lines. First establish lines for the rows of tiles surrounding the alcove. Then dry-stack and measure tiles to get an exact measurement from the bottom of the alcove to the top of the first row of tile. Draw a level line and screw a 1×2 ledger to the wall (Photo 7). The ledger will ensure a perfectly straight bottom course of tiles and keep them from sliding down the wall before the adhesive sets. (You’ll remove the ledger and add the bottom row of tiles later, cutting them to height if needed.)
Mix up about a quart of thin-set at a time (follow the directions on the bag). Comb the thin-set onto the back of the alcove with a 1/4-in. notched trowel (Photo 5). Then press the mosaic tile sections into the thin-set. Lightly tap the tiles with a grout float to embed each small tile evenly with its neighbors (Photo 11). Look carefully for grout that works its way out between the tiles and wipe it off with a damp rag; it’s tough to scrape off after it sets.
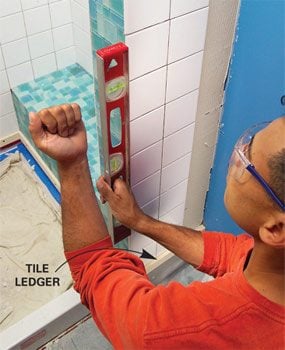
Begin setting the field (wall) tile following your layout lines. After you set each tile, give it a little rap with your fist to better embed it. Dip tiles in water before sticking them to the wall so they form a better bond with the thin-set (Photo 8). Continually check the rows of tile for straightness. When the thin-set is still fresh, you can even out rows just by pushing a level against several tiles at once (Photo 12). Finish tiling the wall, cutting the top row to fit as needed as you work on this how to tile a shower project. Leave out the row of tiles where the shelf will rest (Photo 8).
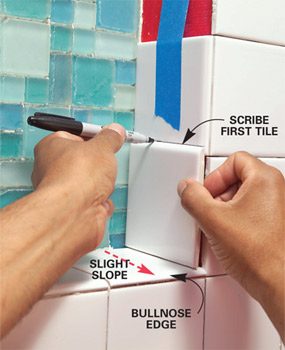
Tile the alcove sill and then the sides and top. Slightly slope the sill tiles toward the shower for drainage by piling on a little extra thin-set on the back side. Match the slope on the bottom tiles at the side by taping the bottom tile even with the row above it and scribing the angle with a full tile (Photo 9).
Tile the bench

Photo 10: Start at the front
Tile the front of the bench first. Cut the mosaic tiles into strips if you need to adjust the spacing to get a better fit with less cutting.

Starting at one end, set the tile on the face of the bench. If you’re left with a gap at the other end, cut the mosaic into strips and slightly expand the grout lines between rows (Photo 10). Small variations in the width of the lines won’t be noticeable in this how to tile a shower demonstration. Lay tile on the seat to gauge the final grout line width between the seat and the face tile. Then add the seat tile, working from front to back and aligning the grout lines with the face tile. Make sure the seat tile edges align perfectly with the face tile surface—they shouldn’t be backset or overhanging. Finish tiling the rest of the field tile above the bench, stopping at the shelf (Photo 13).
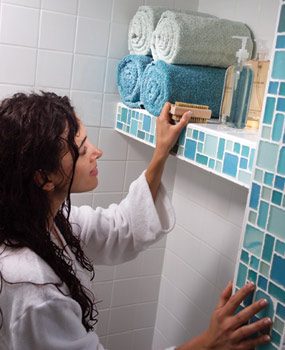
Mount and tile the shelf

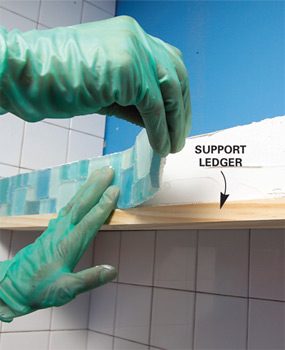
Build the shelf 1/8 in. narrower than the opening so you can tip it into place. Leave off the plywood top but add backer board to the underside. Rest the shelf on the field tile and screw it to the blocking behind the backer board with two 3-in. screws at each side. Then screw the 3/4-in. plywood top to the framing with 1-5/8-in. screws (Photo 13) and add the backer board to the top and the front edge.
Tile the edge first, supporting it with a ledger screwed to the shelf underside (Photo 14). Remove the ledger after an hour or so, and then finish tiling the underside and top and the field tile above it. Lastly, remove the 1×2 ledgers and add the bottom row of tiles. Also, keep that shower tile looking fresh in the future by regrouting wall tile.
Required Tools for this Shower Tile Project
Have the necessary tools for this how to tile a shower DIY project lined up before you start — you’ll save time and frustration.
- 4-in-1 screwdriver
- Bucket
- Caulk gun
- Circular saw
- Cordless drill
- Framing square
- Grout float
- Hammer
- Level
- Miter saw
- Notched trowel
- Paintbrush
- Rags
- Safety glasses
- Stapler
- Taping knife
- Trowel
- Utility knife
Required Materials for this Shower Tile Project
Avoid last-minute shopping trips by having all your materials ready ahead of time. Here’s a list.