How to Install Edging for Plywood
Updated: Feb. 22, 2023Tips for installing oak and hardwood edgings for plywood.
- Time
- Complexity
- Cost
- An hour or less
- Beginner
- Less than $20
Solid wood nosing
Plywood is a great material for building cabinets, bookcases and shelves. But exposed edges usually look unfinished unless they’re covered with a layer of wood. While wood veneer tape is one easy way to cover edges, a better method is to glue or nail on a strip of solid wood nosing. It’s good looking and durable, and it protects vulnerable edges from abuse in high-wear areas. It also stiffens the plywood, an important feature for shelving. If you make it even wider than the plywood, as we show in this article, the extra stiffness will help keep plywood shelves from sagging. And unlike thin veneer edgings, the wood nosing can be routed to create a decorative edge (Photo 8).
In this article, we’ll show you how to glue and clamp wood nosing to plywood and how to sand the top for a perfectly flush surface and nearly invisible joint. Pipe clamps like the ones we’re using are available at home centers, hardware stores and lumberyards. They’re a good investment. They’ll often come in handy for all kinds of gluing projects around the house.
Buy a length of black iron pipe (3/4 in. or 1/2 in., depending on your clamps) that’s threaded on at least one end to complete each clamp (2-ft. and 4-ft. pipes are the most versatile). You’ll also need a belt sander fitted with a 120-grit belt to sand the edges flush, but 100-grit sandpaper wrapped around a wood or rubber sanding block will also work. It’ll just take more elbow grease.
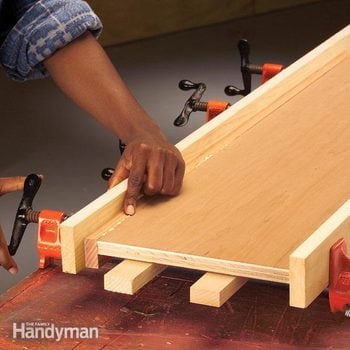
Set up the clamps before you start gluing

Your gluing and clamping operation will go more smoothly if you set up the clamps before you start. That way you can move quickly once you spread the glue. Photo 1 shows the setup we used.
Any straight scraps of wood will work for the clamp pads. They protect the nosing and plywood from the metal clamp faces and help spread the force of the clamps over a wider area. Use spacer boards to hold the plywood above the clamps and flush to the top edge of the nosing.
Start with straight-edged plywood and straight nosing boards

You can use any size and thickness of nosing you want. But 3/4-in. thick strips anywhere from 3/4 to 1-1/2 in. wide are easy to find and look great. If you don’t own a table saw, you can cut a clean, accurate edge on plywood by clamping a straightedge to the sheet and using it as a guide for your circular saw.
Hardwood boards for nosing are available at home centers and lumberyards. If you want a 3/4-in.x 3/4-in.nosing, you’ll have to rip it on a table saw or have it ripped at the lumberyard. Cut the plywood and nosing to length, or if you need more precision, leave it slightly long and cut it off later.
You don’t need much glue
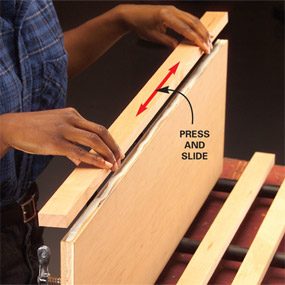
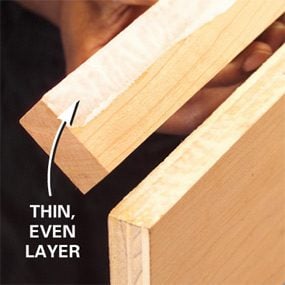

A thin layer of yellow wood glue is all it takes to make a virtually indestructible glue joint. Extra glue just makes a bigger cleanup job, and it causes the nosing to slide around, making alignment difficult. To get a feel for the right amount, pull off the nosing after you’ve slid it back and forth on the glue (Photo 3) and look at the back. You should see a thin, even layer of glue covering both mating surfaces. When you apply the clamps, a small bead of glue should ooze out of the seam.
It’s difficult to get the plywood and nosing to line up perfectly flush when you clamp them together. Snug up all of the clamps, but don’t tighten them. Then push the nosing up or down to adjust it as you tighten the clamps. Hold the nosing slightly above the plywood, about the thickness of a sheet of paper (Photo 4), and sand it flush after the glue dries.
No-Clamp Nosing
If you’re painting the plywood or you don’t mind the look of filled nail holes, you can simply glue and nail the nosing into place rather than messing with clamps. Predrill holes for the 1-1/2-in. finish nails and drive them below the surface with a nail set.
Then fill the holes with wood filler or patching compound and sand them smooth before you paint, or fill them with matching putty after you stain and varnish the wood.
Video: Make a Sanding Platform for Edge-Sanding Wood
Don’t let the glue harden


Cleaning up glue squeeze-out is easy if you catch it at the right time (Photo 5). At room temperature, the glue will set enough for you to remove the clamps and scrape off the excess in about 20 to 30 minutes. Since the glue hasn’t reached full strength, you still have to be careful not to jar the nosing loose. Removing the plywood from the clamps frees them up for the next piece and allows you easy access to scrape glue from both the top and bottom.
Dried glue smears are hard to see and can cause trouble when you apply finish to the plywood. Photo 6 shows how to expose dried glue by wiping it with a damp rag. The wetted glue shows up as a white spot that you can scrape off with a sharp-edged putty knife.
Sand carefully to avoid damaging the veneer


The top layer of plywood is a thin layer of wood, called veneer. It’s easy to accidentally sand through this veneer and expose the lower layer of wood, which doesn’t match the surface.
Use light pressure and a fine, 120-grit belt on the belt sander. Stop sanding as soon as you see the squiggly pencil line start to disappear over the glue joint (Photo 7). Be careful to hold the belt sander perfectly flat. Tilting it toward the plywood could cause it to sand through the veneer. Tilting it away will bevel the nosing. If the nosing isn’t quite flush, finish by hand-sanding.
There are many other methods for getting the nosing perfectly flush to the plywood. Experienced woodworkers use sharp planes and scrapers. A router with a flush-trimming bit also does a nice job. But both these techniques require practice for ideal results.
If you want to dress up the edge of a plywood shelf, simply rout a shape on the solid wood nosing (Photo 8). Make sure to wear safety glasses, hearing protection and a dust mask when routing. Move the router from left to right as you face the shelf.
Oops, I Sanded Through!
Over the years, I’ve glued on a lot of shelf nosing. And by far the toughest part is sanding the nosing flush to the plywood. I can’t tell you how many times I’ve accidentally sanded through the veneer in the process. Usually it’s because I decided to remove the last bit of protruding nosing with the belt sander, rather than stop and finish sanding by hand. But even sanding through the veneer isn’t a fatal mistake. In most cases you can still use the shelf, and you’ll be the only one who notices the mistake.
Required Tools for this Project
Have the necessary tools for this DIY project lined up before you start—you’ll save time and frustration.
- Belt sander
- Clamps
- Dust mask
- Hearing protection
- Miter saw
- Putty knife
- Router
- Safety glasses
Required Materials for this Project
Avoid last-minute shopping trips by having all your materials ready ahead of time. Here’s a list.
- 120-grit sandpaper
- Flush-trim router bit
- Glue
- Lumber for the nosing