How to Find Studs
Updated: Dec. 20, 2017Find the studs in your walls without an electronic stud finder

Use clues and your powers of deductive reasoning to locate studs and ceiling joists with out an electronic stud finder. Here are some tips to make finding studs and ceiling joists a piece of cake.
Video: How to Find Studs
The Family Handyman Senior Editor, Gary Wentz, will show you a few techniques that will help you learn how to find studs in a wall. Next time you are hanging a picture or installing trim, these tips will help you get the job done quickly.
How to Find studs is elementary!
When Sherlock Holmes wanted to hang a picture of the queen on the wall, do you think he went out and bought an electronic stud finder? Even if he’d had the 15 shillings to drop on one, he would’ve used his powers of deductive reasoning and used the clues in front of his nose to find the framing members in any wall or ceiling.
And so can you—the carpenters, electricians, drywall finishers and heating contractors have all left dead-giveaway evidence that will help you find concealed framing locations. This article will show you how to analyze those clues to detect a framing member behind any wall or ceiling. Follow our sleuth in Photos 1 – 8 to help deduce the hidden structure lurking behind your walls and learn how to find studs.
Most of the ideas shown here not only work on drywalled surfaces but also in older homes finished with plaster and lath (where electronic stud finders tend to work poorly).
Picture the concealed framing behind the surface

Photo 1: Remove cover plates
Remove a cover plate and look for the two spacing knobs that are located on the side of plastic boxes. The knobs will be on the side of the box that’s attached to the stud. The center of the stud will be 3/4 in. away from the side of the box.

Photo 2: Poke through the finished surface
Tap a nail or thin flat-blade screwdriver at an angle through the drywall or plaster surrounding electrical boxes to locate ceiling joists if they don’t have the placement knobs shown in Photo 1. Your nail will either go into empty space or hit solid wood.
WARNING: Shut off the power at the main panel.

Photo 3: Examine trim boards
Examine horizontal trim boards such as chair rails and baseboards for filled nail holes. Look closely. If the painters did a good job of filling the nail holes, they can be tough to spot. You can confirm stud spacing by measuring between nails.

Photo 4: Shine a bright light
Shine a strong light along the surface of a wall (in a darkened room) to highlight imperfections in the wall that represent tape joints, bowed studs and hidden fasteners.
Direct someone to mark the studs while you hold the light because you won’t find them once you remove the light.
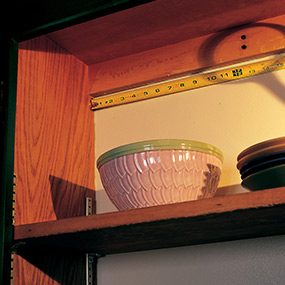
Photo 5: Look inside cabinets for screws
Locate studs in the kitchen by looking inside or on top of the cabinets to find the screws or nails that hold the cabinets to the walls.


The fundamental framing on homes has changed little over the years. Most walls generally have 2×4 or 2×6 studs placed on 16-in. centers. That means that the center of one stud is 16 in. from the center of its neighbor. Most ceiling members have the same spacing only with 2x8s, 2x10s or 2x12s to support the floor above.
One exception: If the ceiling lies below an attic space and the house was built after the mid-’60s, your home most likely has premanufactured roof trusses, which are usually on 24-in. centers.
You can find out whether your ceilings are 16 or 24 in. on center by looking in the attic. If you don’t have a set of stairs to the attic, access holes are usually located in the ceiling of one of the closets, so grab a stepladder and poke your head up there with a flashlight and tape measure to find out.
Deciphering your discovery


Once you’ve revealed a stud or ceiling joist, you can easily find all of the framing members for that particular wall or ceiling by using the 16- or 24-in. spacing rule. Simply use a tape measure to pull measurements from the location of the stud or joist you’ve discovered.
Most tape measures have 16-in. marks enabling you to easily find all the other framing locations by just looking at the tape. Stanley tape measures, for example, have a little red square at 16-in. increments (Photo 8) so you don’t have to do any math in your head. You’ll still need to count by twos for each 2-ft. increment if your ceilings are 24 in. on center, but even Watson could do that calculation in his head.
How to transfer stud locations vertically
Even though you’ve found a stud location, say at an electrical box or heating grate, it may not be at the height you need. Transfer stud positions up and down with a 4-ft. level to get to the desired height. Or measure from an end wall to the stud location. Move the tape measure up the wall until you’re at the height you want.
Once you think you’ve found the framing member you want to hang something on, pound in a small nail first to make sure you’ve really found it. A small hole is easier to disguise than a big one.
It’s also important to confirm that you’re in the middle of the framing member before hanging something—especially if it’s heavy. You might be at the very edge of the lumber, in which case the fastener could give way under a load. Angle the small nail one way, then pull it out and angle it the other way. You’ll be able to tell if the nail breaks through the side of the lumber into open space. If that happens, simply move the fastener 1/2 in. away from the original hole to hit the heart of the wood.
Now go out and buy a deerslayer cap, a magnifying glass and a cape and start your investigation of learning how to find studs!