How to Build Beautiful Faux Ceiling Beams
 Updated: Feb. 17, 2023
Build these faux beams to finish the industrial, farmhouse, rustic or modern style of your home's interior.
Our editors and experts handpick every product we feature. We may earn a commission from your purchases.
Multiple Days
Intermediate
Varies
Introduction
Magicians never reveal their secrets, but I’m a carpenter, so I’ll tell you one of mine. You know those beautiful ceiling beams you see in rustic, industrial and farmhouse interiors? Most of them aren’t real!
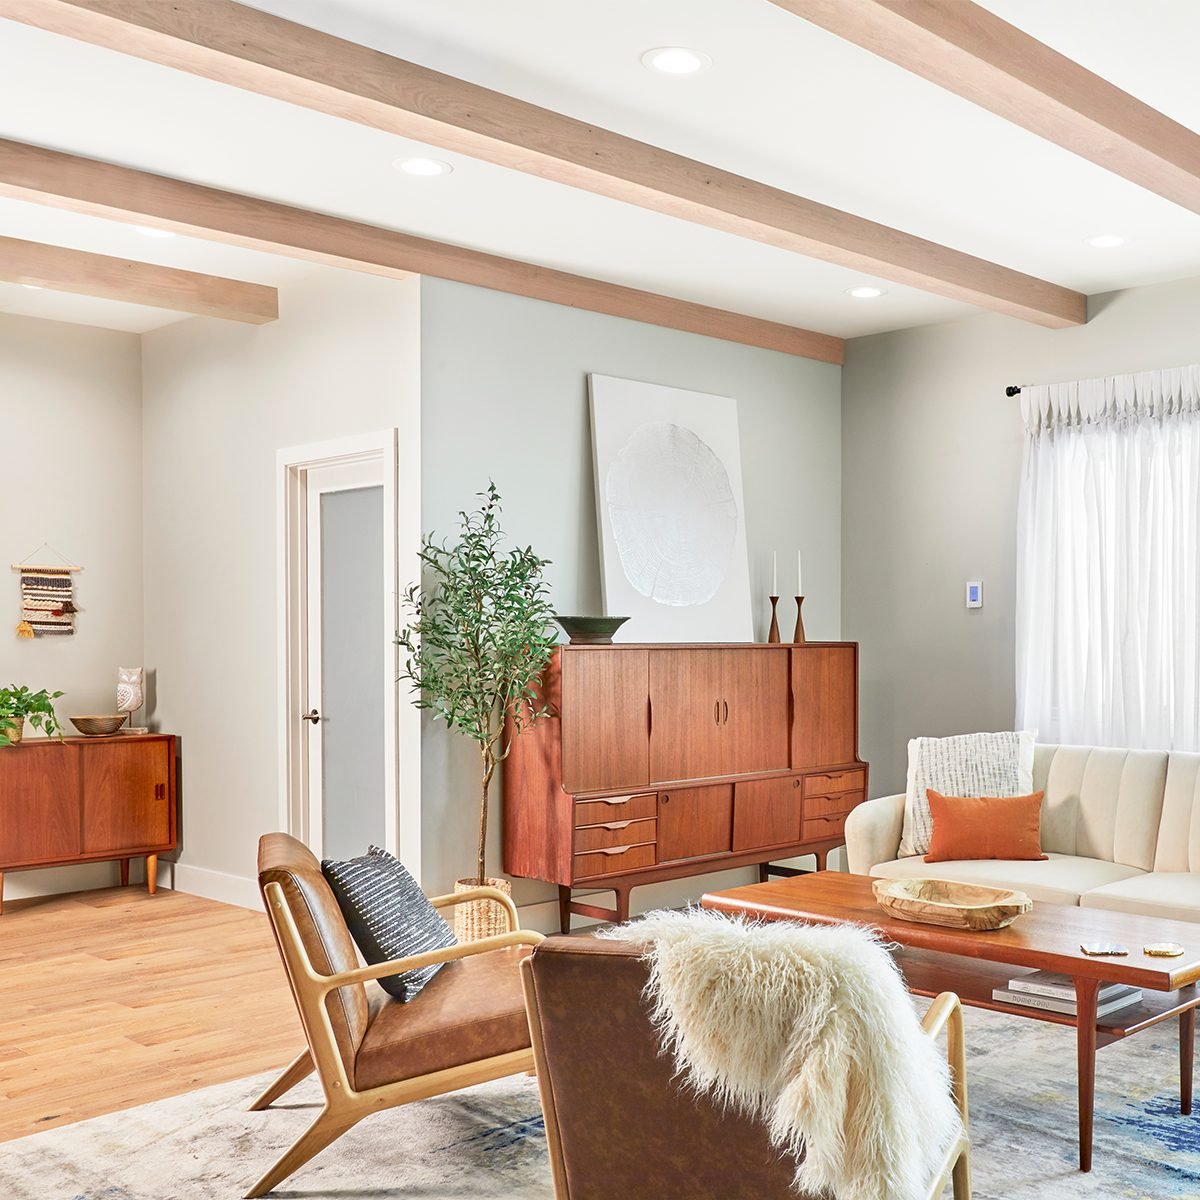
This is good news — it means you can get the look even if you don’t have exposed beams. You can add depth and character to any room by building your own. You can stain them, paint them white or choose a weathered, decades-old look. I’ll show you how to make beams for any home.
Tools Required
- Basic woodworking tools
- Belt sander
- Drill driver
- featherboard
- Finish nailer
- ladder
- Table saw or track saw
Materials Required
- 2x6 boards
- 3-in construction screws
- Glue
- red oak 1x6
- red oak 1x8
- reinforced packing tape
- stain and finishing supplies
- trim screws
Authentic, Seamless Beams
For this project, I’m going for a real-beams look. Using a method called miter folding, I’ll transform a pair of 1x6s and a 1×8 board into a hollow beam. The miter seams will be invisible, and each beam will look like an actual solid piece. You’ll need a table saw or a track saw to pull this off, but your beams will look as if they are actually holding up the ceiling.
Beam Styles for Any Home
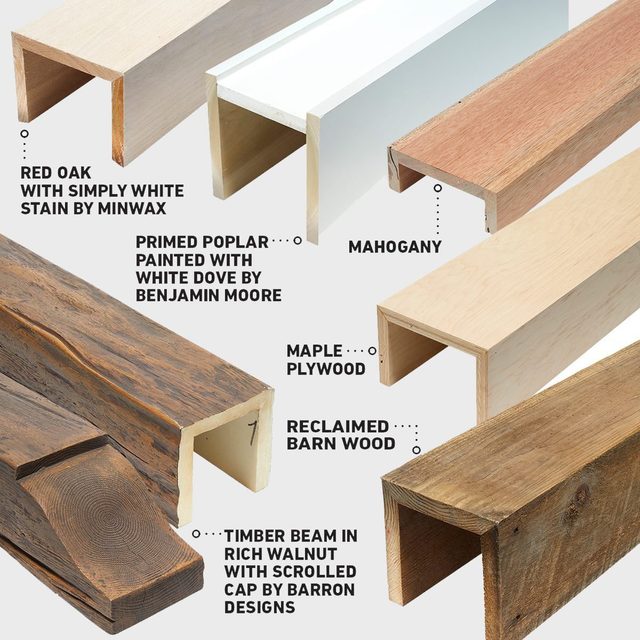
Hardwood + Stain
This is the clean, modern real-beam look I used for this project. I used red oak lumber with Simply White 275 Minwax stain.
Box Beams
You can build this beam style without a table saw by using 1×6 boards right from the store. No long bevel cuts needed.
Painted: Use finger-jointed preprimed boards, which come perfectly straight. Just nail them together, and then caulk, paint and install them.
Hardwood: Use straight-grained hardwood like mahogany, and the seams almost disappear. Nail the boards flush, apply finish and install.
Veneered Plywood
The advantage of veneered plywood? The sheets come straight as an arrow, making them easy to cut and fold together. The downside? You’re limited to the length of a sheet of plywood. Build longer beams by butting them together and covering the seam with a piece of matching molding.
Rustic/Distressed
With reclaimed barn wood, you can achieve that authentic farmhouse look. Barn wood is much more forgiving because it already has nail holes, dents and dings, and it requires no staining or finishing.
Ready-Made Faux Beams
A few companies manufacture beams of all styles using high-density foam. These beams are lighter than wood, easier to install and look realistic. Barron Designs customizes ultra-realistic beams in any length, width and height, and can even cap beams with a decorative scrolled end.
Project step-by-step (11)
Fasten Ceiling Cleats
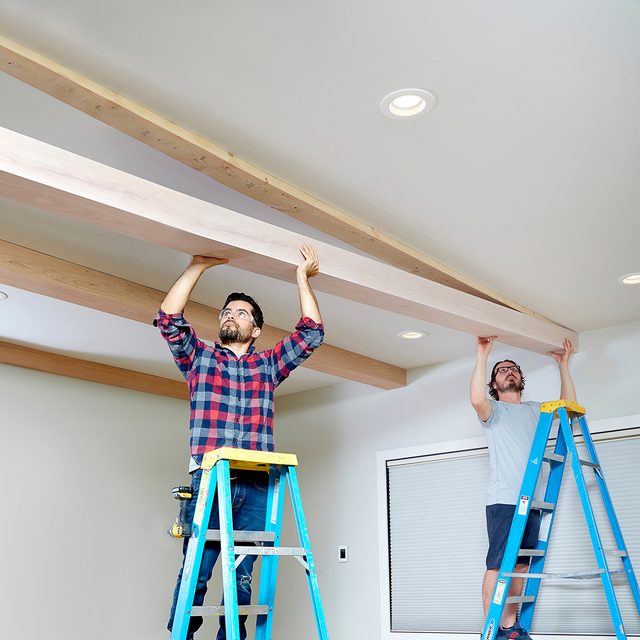
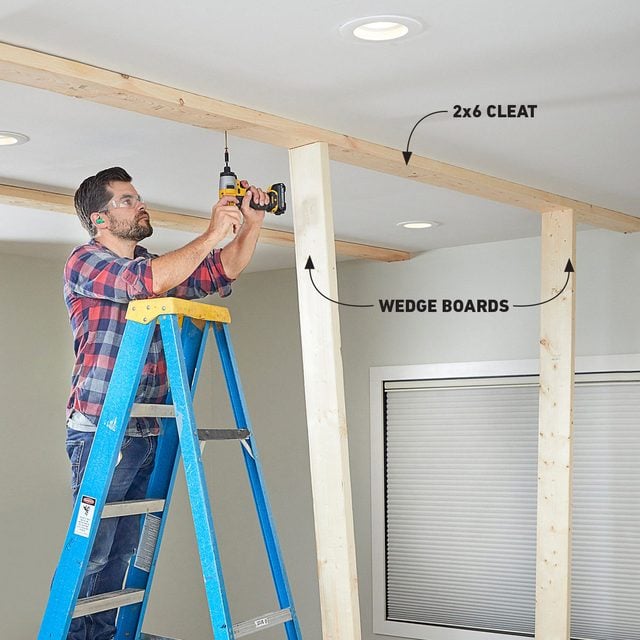
First, locate and mark the position and direction of each ceiling joist around the edges of the ceiling. Then, avoiding ceiling fixtures, mark where the beams will be positioned. Keep their spacing even and ensure each beam will be attached to a joist. The beams can be installed across or along the ceiling joists.
Next, attach 2×6 cleats to the ceiling joists where you’ll place the beams. I used a pair of 2×6 boards to wedge the cleats into position while I fastened them to the ceiling joists.
Check For Flatness
While you’re installing the cleats, check to see how flat the ceiling is. Hold a straightedge along the 2×6 cleat. Take note of any gaps more than 1/8-in. between the level and the ceiling. This will come in handy when you scribe and trim the beams to get a perfect fit.

Choose the Right Boards
Begin the actual beam-building process by choosing the material that suits your style.
Hardwood
Choose the straightest boards possible at a length that will span the entire room. Bowed boards will be trouble when you’re cutting and assembling. Sight down the edges and put only straight ones in your cart.
Finger-Jointed Boards
Built to be straight, these are a great option if you’ll be painting your beams.
Veneered Plywood
Perfectly straight factory edges ensure crisp corners, and strips are easy to cut and assemble. But lengths are limited.
Reclaimed Lumber
Go this route to nail the rustic look, but expect extra work to get a straight edge. You’ll need to send one edge of reclaimed boards through a jointer, use a table saw with a jig or use a track saw.

Cut the Long Miters
This is the trickiest part of building seamless faux beams.
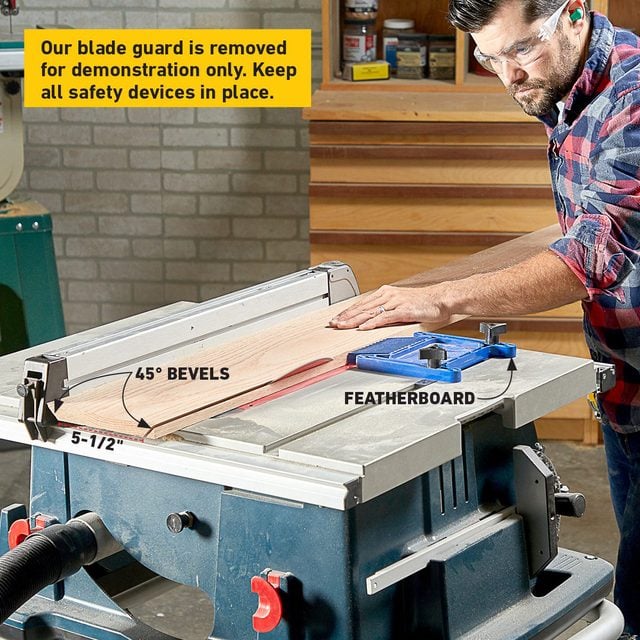
Set up a table saw to make a 45-degree bevel and adjust the fence so the narrow face between the bevel cuts is at least 5-1/2-in. wide. Cut a bevel on both long edges of the 1×8 boards. Use a featherboard to keep the material against the fence and press the board to the table as you feed it through the saw. Then cut the same bevel on one edge of the 1×6 boards.
Back-Bevel the Top Edges
The 1×6 boards will turn into the sides of the beams, and the top edge will meet the ceiling. Cutting a slight bevel on the top edge, opposite the 45-degree bevel, will help you if your ceiling is not flat.
If you found a 1/8-in. or smaller gap when you checked how flat the ceiling was (in Step 2), cut a five-degree bevel. If your ceiling has 1/4-in. or larger gaps, cut a 15-degree bevel. Cutting a steeper bevel than necessary might cause the wood to split where the screws are installed.

Tape the Seams
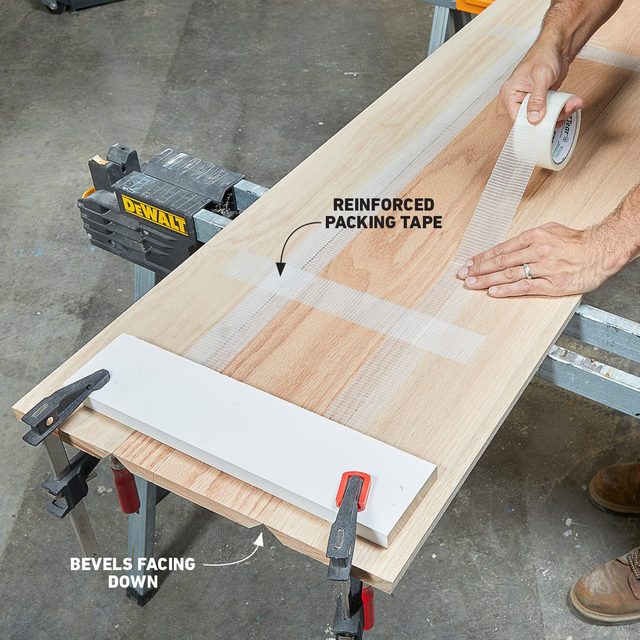
Arrange the three boards on sawhorses with the bevel cuts down and the points of the miters touching. Using reinforced packing tape, join the boards across the seams, then down the lengths of the seams. I sandwiched the ends of the boards with scrap offcuts and clamps to secure them. This helped keep everything together when the boards were flipped for the next step.
Glue and Fold
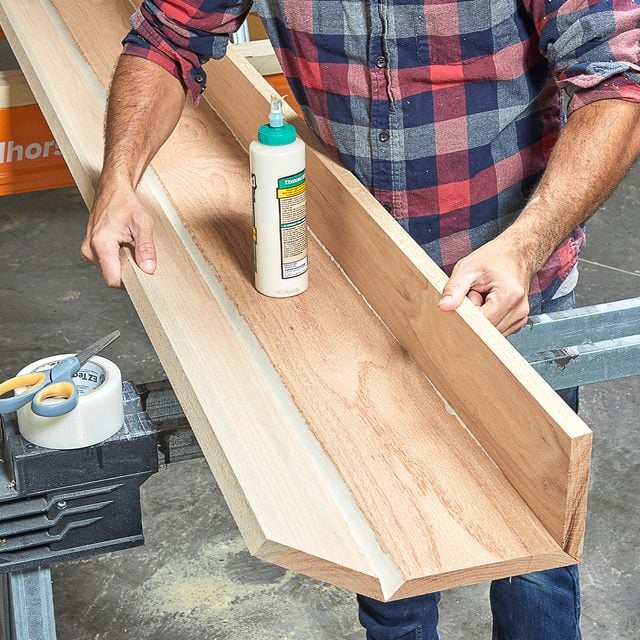
Flip the boards over, then spread glue on the beveled edges. Titebond III glue is great when I need extended working time, and it’s easy to spread with a brush. I folded the edges of the beams up and used more packing tape to hold the tops in place while the glue dried. Don’t be afraid to use a few 18-gauge brad nails to pin the miter together at the ends.
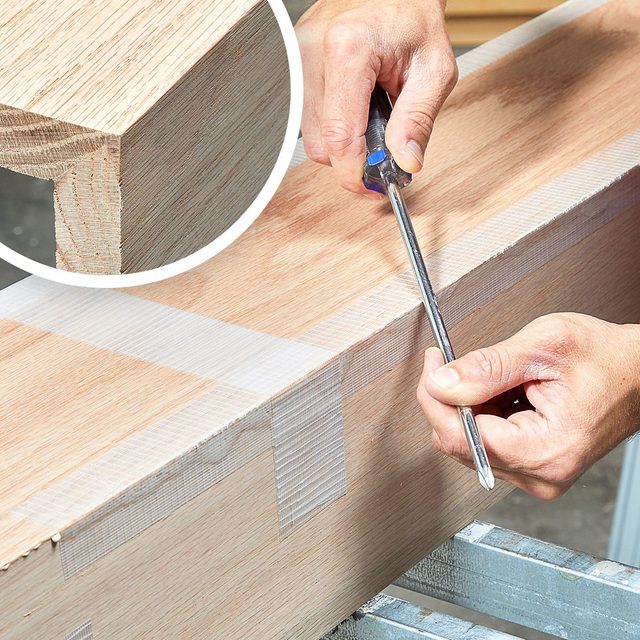
Burnish the Corners
With the tape still on and the glue still drying, run a screwdriver shaft along each corner. This presses the corner of the miter completely closed while the glue is still wet to make a tight, invisible miter that will last. Be careful not to rip the tape as you burnish the corners.
Scribe in Place
Once the glue is dry and the beam is sanded and stained, fit each beam into place. Hold the beam tight to the ceiling. With your pencil flat on the ceiling, run the tip along the entire length of the beam.

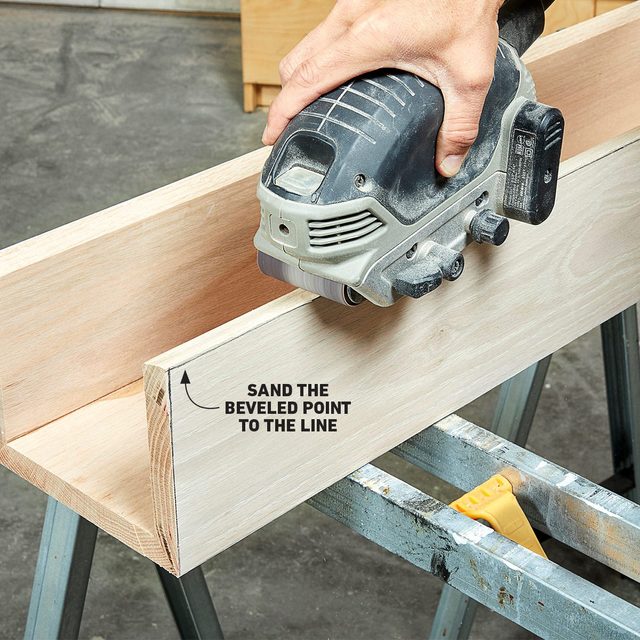
Sand to the Scribe
With the beams back on sawhorses, use a belt sander to sand the top edges to the scribed line. The back-beveled tops make this a quick and easy job. Instead of sanding down the entire 3/4-in. thickness, you need to remove only the point of the outside face.
Install the Beams
Drill pilot holes along the tops of the beams every 16 inches. Then lift the beams back into place and fasten them to the cleats with trim screws. Fill the small screw holes with wood putty and touch them up with stain. The beams will look as if they’ve been holding up the ceiling since Day One.