
How To Build a Spinning Bar Cabinet
 Updated: Sep. 30, 2022
This round cabinet has shelves that spin to hide, or show what's inside.

Multiple Days
Advanced
$501-1000
Introduction
“One step at a time, you CAN build this.”
I repeated that mantra through each phase of this project. I try to stretch the limit of my skills every time I build something new. This round cabinet with revolving shelves stretched, and even bent, my skills. And I had so much fun!
If you're up for a challenge, this is for you. Yes, it made my head spin. But once I started, I knew I could build this piece. You can, too. Let me show you how.
Tools Required
- 18-gauge brad nailer
- 23-gauge pin nailer
- Basic woodworking tools
- Clamps
- J-roller
- Jig Saw
- narrow crown stapler
- Router
- Table saw or Circular saw
Materials Required
- 1/4" custom tempered glass top
- 16" heavy-duty lazy Susan
- all-purpose wood filler
- Bendable Plywood
- Brad nails
- finishing supplies
- Glue
- Hardwood plywood
- Maple Hardwood
- Narrow crown staples
- Paper-backed veneer
- Table legs
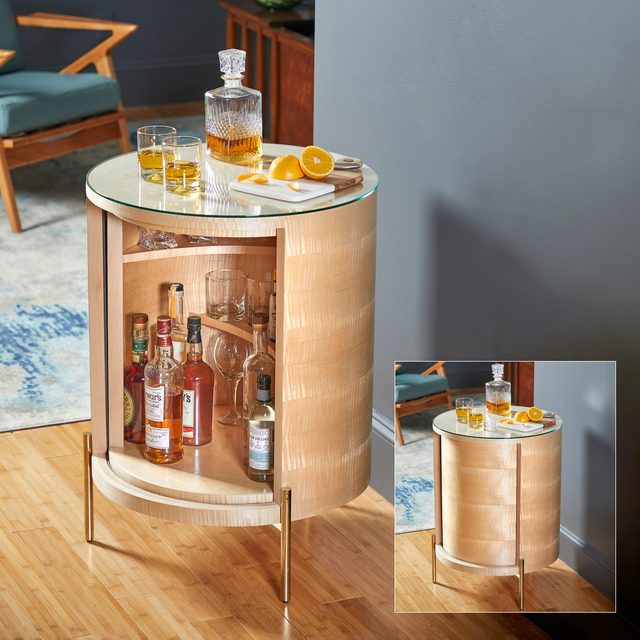
Figure A: Cabinet Unit
Overall Dimensions: 24-1/8-in. W x 24-1/8-in. D x 31-in. H
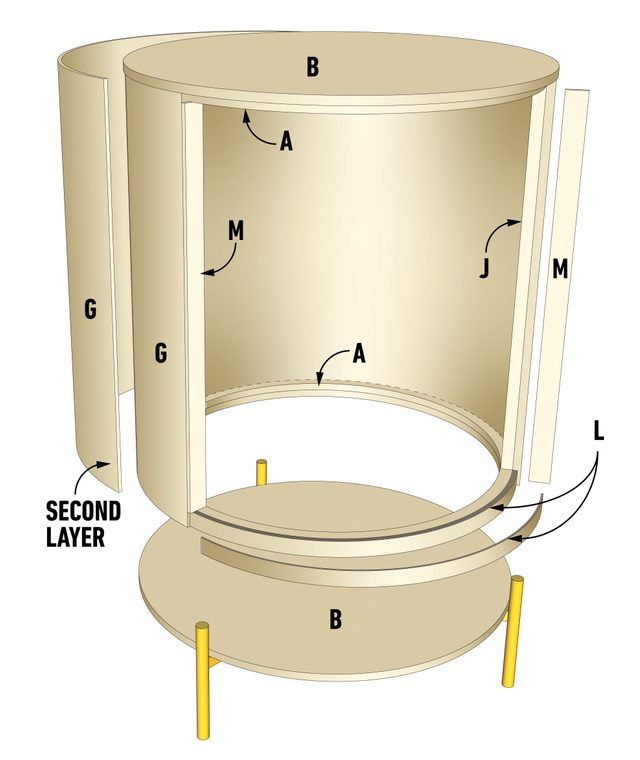
Figure B: Shelf Unit
Overall Dimensions: 21-9/16-in. W x 21-9/16-in. D x 23-3/4-in. H

Cutting List
| KEY | QTY. | DIMENSIONS | PART |
| A | 3 | 1/2″ x 11-5/8″ radius | Cabinet inner disc |
| B | 2 | 1/2″ x 12-3/16″ radius | Cabinet top/bottom disc |
| C | 3 | 1/2″ x 10-3/8″ radius | Shelf inner disc |
| D | 2 | 1/2″ x 10-11/16″ radius | Shelf top/bottom disc |
| E | 3 | 3/4″ x 5-1/2″ x 23-1/2″ | Cabinet form spacer (Photo 5) |
| F | 3 | 3/4″ x 5-1/2″ x 21-3/4″ | Shelf form spacer (Photo 5) |
| G | 2 | 1/4″ x 25″ x cut to fit | Cabinet shell |
| H | 1 | 1/4″ x 22-3/4″ x cut to fit | Shelf shell |
| J | 2 | 3/4″ x 3/4″ x 23-1/2″ | Cabinet stiffener |
| K | 2 | 3/4″ x 3/4″ x 21-3/4″ | Shelf stiffener |
| L | Build layers to fit | 1/8″ x cut to fit | Bent wood strips |
| M | 2 | 1/4″ x 1-1/4″ x 23-1/2″ | Cabinet edge banding |
| N | 2 | 1/4″ x 1-1/4″ x 21-3/4″ | Shelf edge banding |
| P | 1 | 10-3/8″ radius | Shelf (halve the disc and shape to your preference) |
| Q | 2 | 1/8″ x 1″ x cut to fit | Shelf edge banding |
Those That Bend Together Stay Together

Bendable plywood comes in different thicknesses, with the thinnest version flexible enough to bend into a circle as small as 15-in.- dia. The 1/4-in. sheets I used easily formed a 21-in. circle. The sheets bend in one direction. An 8- x 4-ft. sheet will make a 4-ft.-tall column, a 4- x 8-ft. sheet will make an 8-ft.-tall column.
Paper-backed veneer is easy to cut with a utility knife. You adhere it with contact cement, which bonds two coated surfaces instantly. I was concerned that activating adhesive on pressure-sensitive adhesive (PSA, also known as peel-and-stick) veneer would require more force than the thin bendable plywood could handle. I went with paper-backed quarter-sawn curly maple veneer.
Project step-by-step (21)
Trace All the Circles
The first phase of this project is to build the forms. The bendable plywood needs a structure to hold its shape. In steps 1-5 I’m building two forms, one for the inner shelf unit and one for the cabinet unit. I’m using pairs of plywood discs at the top and bottom of each cylinder.
This cabinet consists of 10 plywood discs in four sizes. To draw perfect circles on plywood, I made a compass with a 1/4-in. plywood scrap. I drove a finish nail through one end and then measured from the nail to mark the radius of each of the four circles.
I drilled holes at each mark to fit a pencil, then drove the nail into the plywood and pivoted the pencil around the nail. Then I roughly cut out all the circles with a jigsaw.

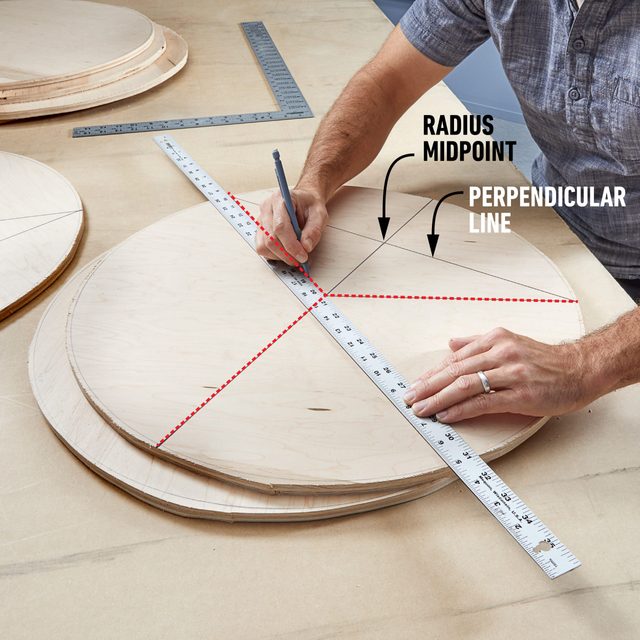
Divide into Three Equal Slices
Dividing each disc into three slices (like a pie) helps align the discs when you build the forms. Draw a line through the center, then a perpendicular line through the midpoint of the radius. Connect the points on the outside of the circle to the center to outline the three equal slices.
Cut Perfect Circles
You can cut perfect circles with a compass jig.
To attach the router to 1/4-in. plywood, start by removing the baseplate and using it to trace the holes onto the plywood. Then drill the holes and screw the plywood to the router using the baseplate screws.
Measure from the straight bit to mark the radii of the inner discs (A and C); drive a nail at each mark. Place a nail in the center of the disc and pivot the router around the nail counterclockwise. Trim the inner discs for the revolving shelf and two of the inner discs for the cabinet.

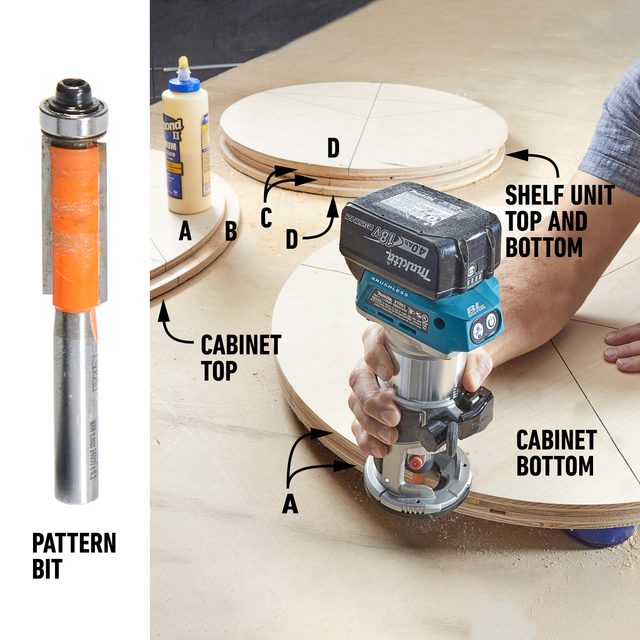
Glue and Trim the Discs
Glue the inner discs to the top and bottom discs, centering them using the lines that divide the discs. The top and bottom of the shelf unit are identical, with the top/bottom discs larger by at least 1/4-in. than the inner discs. The top of the cabinet unit disc is larger than the inner discs by at least 1/2-in. Glue together the bottom discs of the cabinet unit and trim them flush with a pattern bit.
Connect the Discs
Join the tops and bottoms of the cylinders with form spacers. I cut three pieces (F) sized for the shelf unit and three more (E) for the cabinet unit from 1×6 boards, then drilled pocket holes on both ends. I lined them up to the dividing lines on the discs, pointing the pocket holes toward the opening (to make them easier to remove).
Flush the form spacers with the outside of the discs and fasten them with pocket screws.

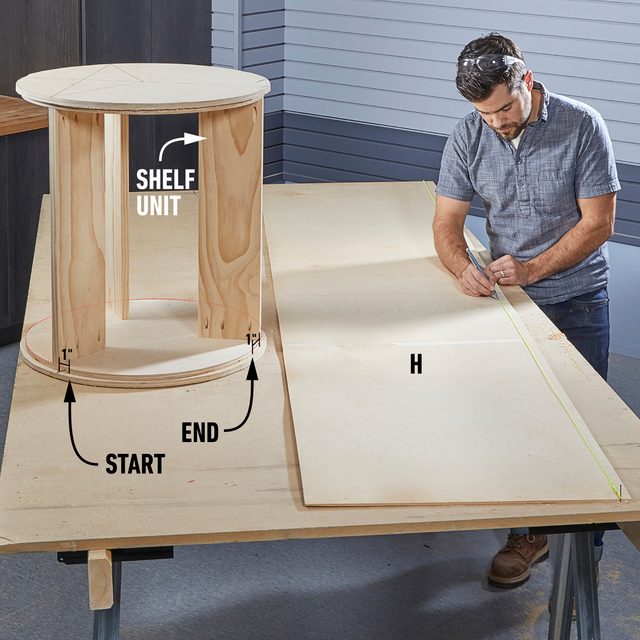
Cut the Bendable Plywood to Length
For the next phase, steps 6-13 I’m wrapping bendable plywood around the forms. The bendable plywood fits between the top and bottom discs on the shelf unit. The plywood for the cabinet unit will be cut wide, and the bottom trimmed after it’s fastened.
After ripping the bendable plywood to width, determine its length. To do this, make marks at each edge of the opening, one inch inside the form spacers. Drive a nail to loop the string at the “start” mark, then wrap the string around the back and mark the string at the “end” mark. Then use the marks on the string to transfer the measurements to the plywood.
You can also calculate the total circumference with the formula 2πr and then subtract the opening size.
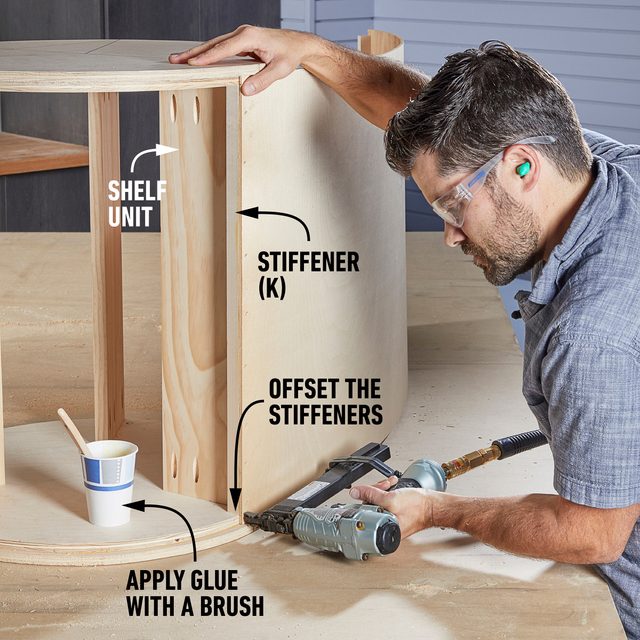
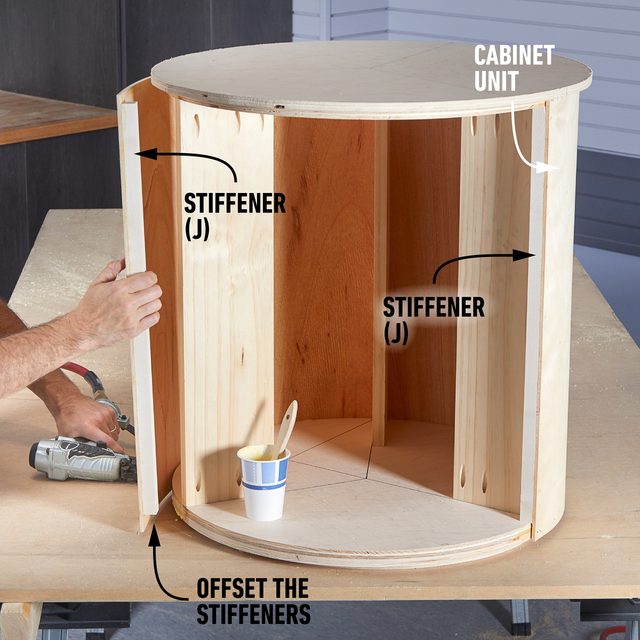
Fasten Stiffeners
Staple and glue stiffeners to each end of the bendable plywood. The stiffeners are cut to fit between the tops and bottoms of the shelf and cabinet units to prevent the plywood from bowing while you bend it around the forms. Be sure to offset the stiffener so the plywood fits the form, then glue and staple the plywood to the form on one side of the opening.
Bend the Plywood
I temporarily screwed the form to my work surface. Brush glue on the edge of the top and bottom discs. Work in small sections and flex the plywood tight to the form as you staple it to the sides, alternating between top and bottom. Keep pressure on the plywood to keep it from springing back and pulling through the staples.
Add a Second Layer
The shelf unit needs only one layer of plywood, but the cabinet needs to be sturdier so I added a second.
Mark the length of the second layer by clamping one end of the bendable plywood flush with the opening and bend it around to the other side of the opening. Cut it to length and spread a layer of glue on the back side. Staple it to the stiffener, then bend and fasten it around the cabinet just like the first layer.

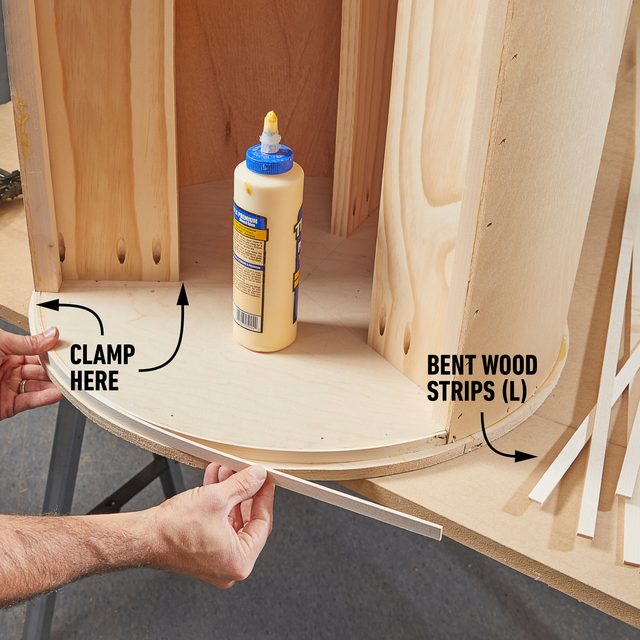
Layer Edge Banding
I used a technique called “bent wood lamination” to cover the exposed plywood and build up the opening to match the rest of the cylinder. Using strips of 1/2-in. maple cut to 1/8-in. thick, I glued, bent and stapled them to the exposed edge until it was flush with the plywood. Don’t worry about a perfect fit; vertical edge banding will hide gaps.
Cover Bent Plywood Edges
I cut a 1-1/4-in.-wide strip of 1/4-in. maple to fit between the top and bottom and glued it to the plywood edge and the stiffener. A few 23-gauge pin nails hold it in place.

Trim Them Flush
When the glue is dry, use a pattern bit to trim the top and bottom discs flush to the plywood and trim the plywood on the cabinet unit. The bent laminations at the openings weren’t quite flush with the bendable plywood, so I sanded and smoothed out the unevenness. This doesn’t have to be perfect, but applying the veneer will be easier if it is.
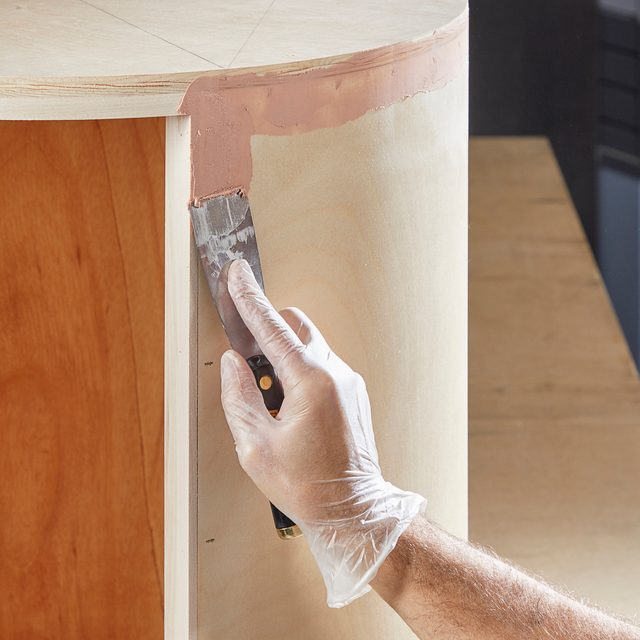
Smooth It Out
After sanding and smoothing, fill all the staple dimples and gaps on the outside with all-purpose wood filler. Let it dry and then sand it smooth.
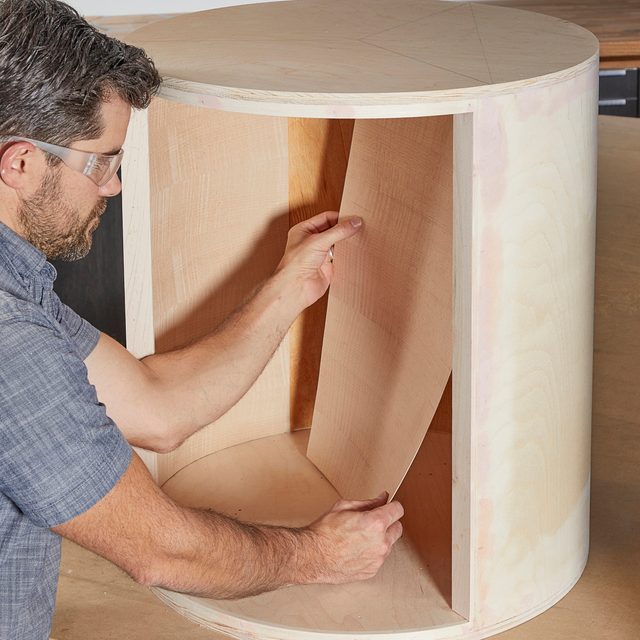
Veneer The Inside
The final phase is finishing. In steps 14-21 I finish the shelf unit then fit it inside the cabinet unit before applying more finish and adding the finishing touches.
The inside of the shelf unit is visible so it needs to be veneered. But after cutting the veneer to width, I realized the difficulty of adhering this in one piece. So I sliced it into 12-in. lengths, keeping it in sequential order to keep the grain continuous.
To adhere the veneer, spread two coats of contact cement on the plywood inside and one coat on the paper side of the veneer. Let the contact cement dry until it’s barely tacky after each coat (about 20 minutes). Then align the first piece to the plywood and press the veneer on. Butt the next pieces in sequence against the previous one. Trim the last piece and press the entire surface against the inside wall.
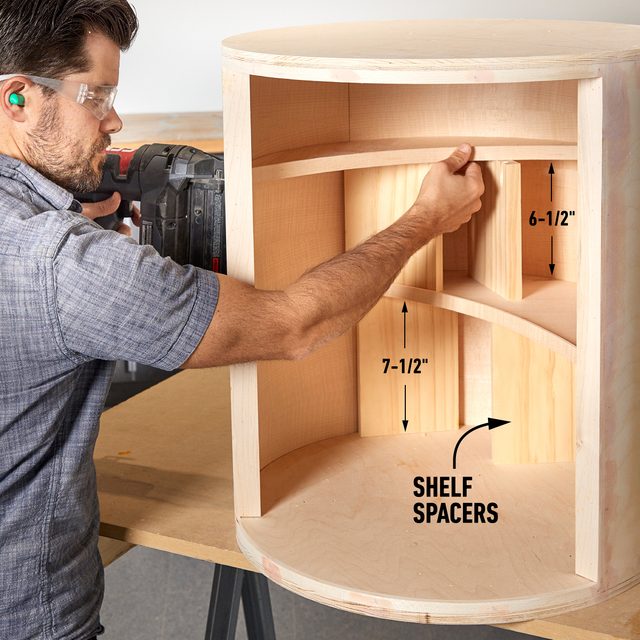
Fasten Shelves
From the extra inner disc (C) cut for the shelf unit, trace two curved shelves. Glue a 1-in. strip of maple edge banding along the front edge of each. I cut spacers to hold up the shelves evenly, then nailed them into place from the outside.
Veneer the Outside
Rolling the veneer on the outside of the pieces wasn’t the most difficult step, but it made me nervous anyway. Contact cement sticks permanently on initial contact, so I had one shot to apply it right. Here’s how I did it.
- I attached a fence to my work surface to hold the veneer against, then I added a strip to that fence to act as a guide while I roll the cabinet. This gave me some wiggle room.
- I cut the veneer 1-1/2-in. wider than I needed, then spread two coats of contact cement on the plywood and one coat on the veneer.
- With the veneer and the shelf against the fence, I lined up the end of the veneer so it was within the shelf opening. I put craft paper at the corners to keep them from sticking.
- I rolled the shelf in place and pressed it against the fence until the outside was covered completely. Then used a J-roller to ensure every inch of the veneer was adhered well.
- With a sharp utility knife, I roughly cut out the opening and cut through both layers of the veneer at the seam. Then I removed the craft paper and pressed the veneer into the contact cement.
- Using a trim router with a pattern bit, I cut the overhanging veneer flush at the opening, top and bottom of the shelf.

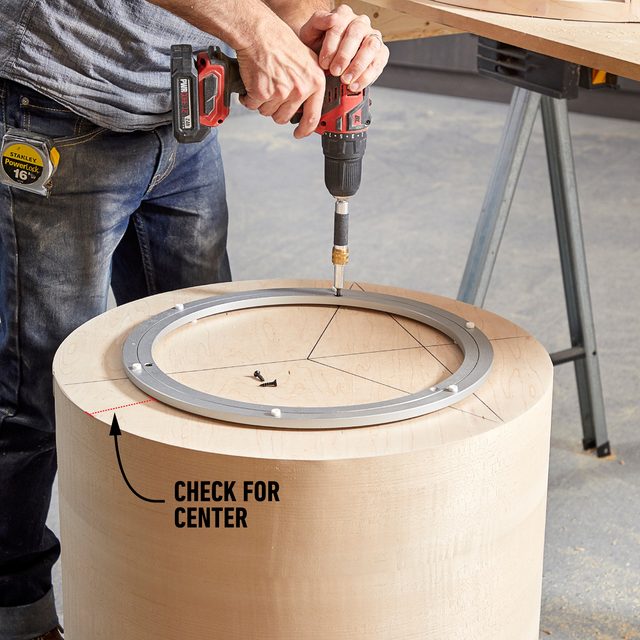
Install the Lazy Susan
Flip the shelf unit upside down and fasten the lazy Susan hardware. Position the hardware as close to centered as possible; be sure the distance from the outside of the hardware to the outside of the shelf is even all the way around. Flip it upright and test how it spins. If it’s off center, shift the hardware until it spins evenly. Lightly sand and apply finish to the shelf unit, inside and out.
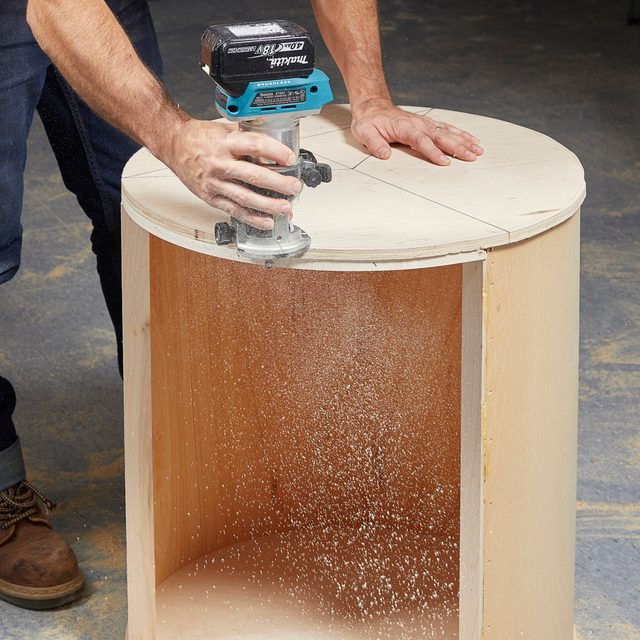
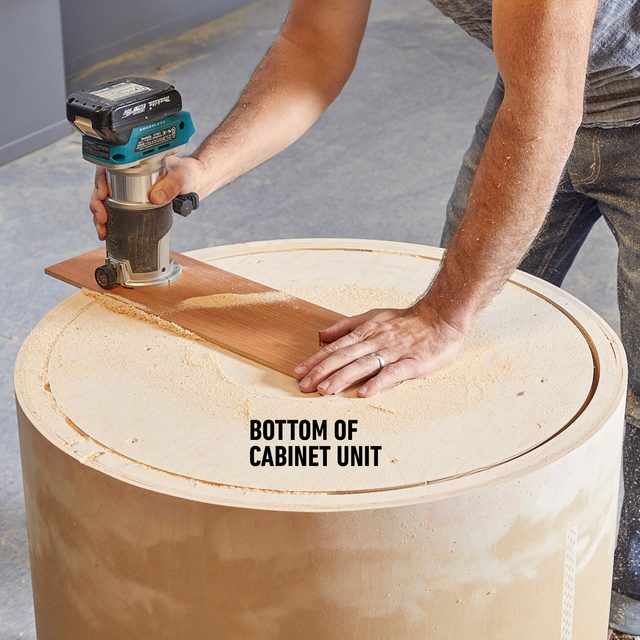
Cut Out the Cabinet Bottom
To get the shelf inside the cabinet unit, cut out the cabinet bottom with the router compass jig. I set my jig to cut a 10-7/8-in. radius, which is 1/4-in. bigger than the shelf unit.
I cut it out in three shallow passes. The first two passes I routed a complete circle. On the final I made two half-circle passes, leaving the cutout attached at two points. This way I could safely remove the router and use a saw to finish the cuts and prevent splintering as the cutout fell.
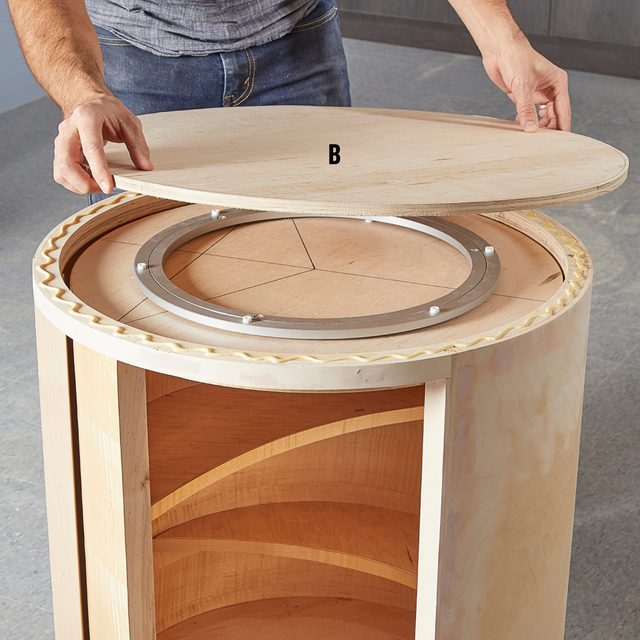
Fit the Inner Shelf
Place the shelf unit inside the cabinet, then glue and nail the final disc (B) to cover the hole. Once the shelf unit is sealed inside, trim the bottom disc flush to the outside of the cabinet. Fill and sand any staple dimples, veneer the outside of the cabinet unit and apply a finish.
Fasten Legs
Flip the finished cabinet upside down and fasten three legs. I aligned the two front legs with the edges of the cabinet opening and centered the third leg at the back of the cabinet. (These legs are from norseinteriors.com.)

Position the Shelf and the Glass Top
I flipped the cabinet upright and adjusted the inner shelf to move smoothly without bumping the inside of the cabinet. I ordered a piece of round glass to fit the top and set it on rubber bumpers to keep it in place.
