
How to Make Your Lawn Mower Last Longer
Updated: Mar. 01, 2023Tune up your lawn mower in 5 simple steps.
- Time
- Complexity
- Cost
- An hour or less
- Intermediate
- $51–100
Overview
Mowing is enough of a chore without having to deal with a rough-running, poor-cutting lawn mower. With just a few bucks’ worth of parts and a couple of hours’ work, you can get your lawn mower in prime shape to start the mowing season. We’ll show you how to drain the old gas, replace the air filter, put in a new spark plug, change the oil and sharpen the blade—tasks that will keep your gas-powered mower starting easy, running smooth and cutting clean.
Add fresh gas at the start of the season

Fuel system problems top the list of lawn mower malfunctions. Many of these, like gunked-up carburetors, are often caused by gasoline that’s been left in the mower too long. Although fall is the best time to take preventive measures, you can at least get off to a good start in the spring by replacing the old gas in your tank with fresh gas. Photo 1 shows one method.
Gasoline is highly flammable. Work outdoors or in a well-ventilated area away from sparks and flame. Wipe up spills immediately and store gas in approved sealed containers. To dispose of the old gas, call your local hazardous waste disposal site for instructions.
Most mowers have a mesh screen over the outlet at the bottom of the tank. If you can see the screen through the filler hole, use an old turkey baster to suck up dirt and debris that may be covering it.
Next, learn what you need to know about lawn mower oil.
Video: How to Change Oil in Lawn Mower
Rick Muscoplat, an automotive expert at The Family Handyman, will show you how to change oil in your push lawn mower in our video tutorial. Changing your oil after every 25 hours of use will keep your engine healthy.
Change your oil regularly

Photo 2: Seal the gas tank
Seal the gas tank by removing the gas cap and covering the opening with a plastic bag. Screw the cap back on over the plastic bag.

Photo 3: Empty out the old oil
Remove the dipstick from the oil filler tube and tip the mower to drain the oil. Pour the used oil into a plastic milk jug or similar container and recycle it.

Photo 4: Refill with clean oil
Refill the engine with clean oil. Most engines require about 20 ozs. (5/8 quart). Insert the dipstick and check the oil level. Add oil if needed but don’t overfill.

Photo 5: Alternate oil draining method
Unscrew the plug located on the bottom of the engine and allow the oil to drain into a pan. Lower the mower down on its wheels to make sure all the oil drains. Replace the plug, set the mower on a level surface, and fill the engine with clean oil through the filler hole near the base of the engine.
Changing the oil in your lawn mower takes about 15 minutes and costs less than $2. That’s time and money well spent considering that changing oil at the recommended intervals will greatly extend the life of the engine. Most engine manufacturers recommend an oil change at least every 25 hours of operation or every three months.
Older mowers have a fill plug close to the mower deck. Fill this type until oil reaches the threads of the refill hole. Two-cycle engines that use a gas/oil mix for fuel don’t have an oil reservoir on the engine and don’t require oil changes. Before you drain the old oil, run the mower a few minutes to warm the oil and stir up sediment. Then disconnect the spark plug, drain the old oil and add new (Photos 1 – 4). Use SAE 30 W oil (check your owner’s manual). There are two ways to drain old oil: through the filler neck (Photo 3) or out the drain plug in the bottom of the engine (Photo 5). It’s quicker and easier to drain the oil through the filler neck if your mower has one. If you have an older mower without a filler neck, locate the drain plug on the bottom of the engine and remove it to drain the oil. Pour used oil through a funnel into a plastic milk jug or other container and label it for recycling.
Whenever you tip a lawn mower up on two wheels (Photo 3) to work on the underside, only lift the side with the air cleaner. This prevents oil from running into the carburetor and soaking the air filter. Also, if your lawn mower has a fuel valve, turn it off.
Remember to check the oil level occasionally between oil changes, setting the mower on a level surface. Top it off as needed. Newer mowers have dipsticks with markings that indicate when to add oil. Don’t overfill. Check your manual for instructions to see whether the dipstick should be fully screwed in or just set in when you’re checking the level. If you accidentally add too much oil, follow the procedure shown in Photos 3 and 5 to drain some out.
CAUTION!
Always disconnect the spark plug wire from the spark plug (Photo 6) before reaching under your mower.
Add pep with a new spark plug

Spark plug and spark plug wrench
If you’re not familiar with them, this is the spark plug and the spark plug wrench.

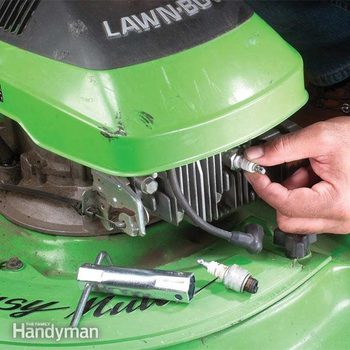
Photo 6: Remove the spark plug
Remove the spark plug wire by pulling it straight out. If it’s stuck, try twisting it slightly as you pull. Wipe off dirt from the area. Use a 3/4-in. or 13/16-in. deep socket or spark plug wrench to unscrew the old spark plug. Turn the wrench counterclockwise.

Photo 7: Install the new spark plug
Install the new spark plug by turning it clockwise two or three complete revolutions by hand before switching over to the spark plug wrench to tighten it. Don’t overtighten the spark plug. Manufacturers recommend tightening the plug about a half turn after it seats to compress the new washer. Complete the job by pressing the plug wire onto the plug.
Often a new spark plug will make a big improvement in the way your engine starts and runs. Spark plugs are so cheap (less than $3) and easy to install that it’s good insurance just to replace your plug every spring. Check your owner’s manual for the correct spark plug, or take the old plug with you to the store to match it up.
New spark plugs are factory set with a .030-in. gap between the electrodes at the tip of the plug. Inspect the plug when you buy it to make sure there’s a gap about the thickness of a matchbook cover. If there’s no gap, the plug may have been dropped and damaged. Choose another one.
If you don’t own a socket wrench set with a 3/4-in. or 13/16- in. deep socket for changing the spark plug, pick up an inexpensive spark plug wrench.
Don’t suffocate your mower—change the air filter

Photo 8: Remove air filter cover
For pleated paper air filters: Locate the air filter near the carburetor. Unscrew, unsnap or twist off the cover to remove the old filter.

Photo 9: Replace air filter
Remove the old air filter and replace it if it’s dirty. Wipe grass and dirt from the filter cover and the mounting area with a clean cloth before installing the new filter. Be careful not to let dirt fall into the carburetor.

Photo 10: Foam air filter removal
Unscrew or unhook the cover and pull out the old filter. Wipe the filter cover parts with a clean rag to remove dirt and grime.

Photo 11: Prepare new foam air filter
Pour about 1/4 cup of clean motor oil over the new foam filter. Wrap the filter in a clean cloth and squeeze it firmly to distribute the oil evenly and remove any excess. Install the filter, making sure the foam lip covers the top of the filter holder. Replace the cover and tighten the screw.
Air filters are cheap and easy to replace. Dirty air filters choke the engine, causing it to run poorly and lose power. If your lawn is dry and dusty, check the filter after every few mowings. Otherwise, check it a couple of times during the season. Replace it when it starts to get plugged with dirt and debris. One common test is to shine a flashlight through the filter. If you can’t see the light through the filter, replace it with a new one.
Most newer mowers have pleated paper filters that are either flat or cylindrical (Photo 9),while many older mowers have foam filters (Photo 10). Both types of replacement filters are readily available at lawn mower retailers, hardware stores and home centers. Take your old filter along and have your mower manufacturer’s name and model number handy.
In a pinch, you can wash foam filters in a solution of laundry detergent and water and allow them to air dry. But it’s best to just buy a new one. In either case, saturate the foam filter in motor oil and squeeze out the excess before installing it (Photo 11).
Video: How to Sharpen a Lawn Mower Blade
A sharp lawn mower blade will help keep your grass healthy. Jeff Gorton, an editor at The Family Handyman, will show you how to sharpen a lawn mower blade so you can keep your lawn in great shape.
Keep your blade sharp for the best cut

Photo 12: Remove the cutting blade
Disconnect the spark plug wire, turn off the fuel valve and seal the gas tank (Photo 2). Then clamp a block of wood to the lawn mower deck with the sharp edge of the blade against the block. Remove the blade by turning the large nut counterclockwise with a socket wrench.

Photo 13: Sharpen the cutting blade with a grinder
Sharpen blades with nicks or rounded cutting edges on a grinder. Hold the blade firmly and tilt it so the grinding wheel contacts it at the original angle (about a 30-degree bevel). Move the blade steadily across the grinding wheel while applying slight pressure. Dip it in water after each pass to cool it.


Photo 14: Sharpen the cutting blade with a metal file
File previously ground or slightly dulled blades with a 10-in. mill bastard file to hone the edge. Align the file with the angle of the blade and push down across the blade. You should feel the teeth cutting the metal. Maintain the same angle throughout the stroke. Files cut only on the push stroke. Use a file card to clean built-up metal from the file’s teeth.

Photo 15: Balance the cutting blade
Balance the blade on a balancing cone ($4 at hardware stores) before reinstalling it. Working on a level surface, set the blade on the cone and eyeball each end. Mark the heavy end. Grind some metal from the blunt part of the heavy end. Recheck the balance and repeat until the blade balances. Reinstall the blade, washer or other parts in the reverse order you removed them.

A sharp blade will make your lawn mower cut like new. The cleanly cut grass will look better, and your mower won’t bog down every time you hit a thick spot. If your lawn is rough and you mow over rocks and dirt spots, your blade may need to be sharpened several times during the season. Otherwise, once or twice should be plenty. Keep on top of the sharpening task by tuning up the blade with a mill bastard file whenever it starts to dull (Photo 14).
Once the edge of your blade becomes rounded or chipped, it’s a lot faster to use a grinder to restore the edge (Photo 13). Most hardware stores and lawn mower mechanics will sharpen your blade for $3 to $5, but you have to remove it for them. Use a permanent marker to mark the bottom of the blade and other parts like washers and mulching accessories. Then number them so they’ll be easy to reinstall in the right sequence and orientation.
Inspect the blade for cracks or worn-thin areas every time you sharpen it, paying special attention to the area at the base of the upswept section (refer to labeled Close-up of ruined blade in Keep your blade sharp for the best cut section above). Replace the blade with a new one if the metal is worn thin or cracked ($10 to $15). You’ll find the best selection of new blades at a lawn mower service center or your lawn mower retailer.
It’s surprising how quickly you can put a new edge on a blade with a sharp file. Buy a 10-in.mill bastard file ($6) and keep it sharp by protecting it from moisture and contact with other tools when you’re not using it.
Grinding is much quicker than filing, but you have to follow a few safety precautions and avoid overheating and ruining the blade. Wear goggles or a full-face shield when grinding. Never wear loose clothes or jewelry that could get caught in the wheel. Keep your hands and face out of the path of the sparks, and make sure there are no flammable liquids or spilled gasoline nearby.
It’s easy to overheat blades on a grinder by applying too much pressure or leaving the blade in one spot too long. Overheated metal loses its temper and won’t stay sharp. You’ll know if you’ve overheated the metal by the change in color from silver to dull, blackish blue. Proper grinding technique (Photo 13) and dipping the blade frequently in water will help keep it cool.
CAUTION!
Always disconnect the spark plug when you check the blade or remove it for sharpening.
Some maintenance is best left to the pros
The basic maintenance tasks we show will go a long way toward keeping your mower in good running condition. But there are two more items that would normally be included in a professional tune-up. The first is disassembly and cleaning of the carburetor and linkage. This may be necessary if you’ve left untreated gas in the tank over the winter and the lawn mower won’t start or runs poorly. This repair requires some mechanical experience.
Cleaning grass and debris from the engine’s cooling fins (the cooling fins are the metal ridges that cover the engine) is another maintenance task that should be performed periodically. On mowers with exposed cooling fins, this is an easy do-it-yourself job. Use a stiff-bristle brush to clean gunk from between the fins. On many newer mowers, however, the plastic or metal covering on top of the engine has to be removed first, which may also require disconnecting the fuel tank. Use a flashlight to inspect the cooling fins under these covers. If they look clogged, you’ll have to decide if you’re up to the challenge or would feel more comfortable letting a pro handle the job.
Storing Your Lawn Mower for Winter
Gasoline left in your mower during storage can deteriorate and leave gum deposits that clog the fuel system. There are two storage methods: completely draining the system or leaving it filled with fresh, stabilized gasoline.
Most manufacturers of newer mowers recommend draining the gas completely. Do this by opening the drain valve or drain bolt on the carburetor bowl and draining the gas into a container. If your carburetor doesn’t have a drain valve, check with the manufacturer or lawn mower repair center for instructions.
Older lawnmowers with a foam filter and carburetor that’s screwed to the top of the gas tank should be filled with stabilized fuel for the winter. Purchase a container of fuel stabilizer, available at hardware stores, home centers, gas stations or lawn mower service centers, and mix as recommended with fresh gas. Fill the empty lawn mower tank with the stabilized gas and run the mower for about 10 minutes. Then top off the fuel tank with stabilized gas and shut the fuel valve. Check your owner’s manual for storage instructions.
Required Tools for this Project
Have the necessary tools for this DIY project lined up before you start—you’ll save time and frustration.
- 4-in-1 screwdriver
- File
- Flashlight
- Grinder
- Paint tray
- Rags
- Wrench set
Required Materials for this Project
Avoid last-minute shopping trips by having all your materials ready ahead of time. Here’s a list.
- Container of water
- Fresh gas
- New air filter
- New oil
- New oil filter
- New spark plug
- Old gas container
- Old oil container
- Small plastic bag


