
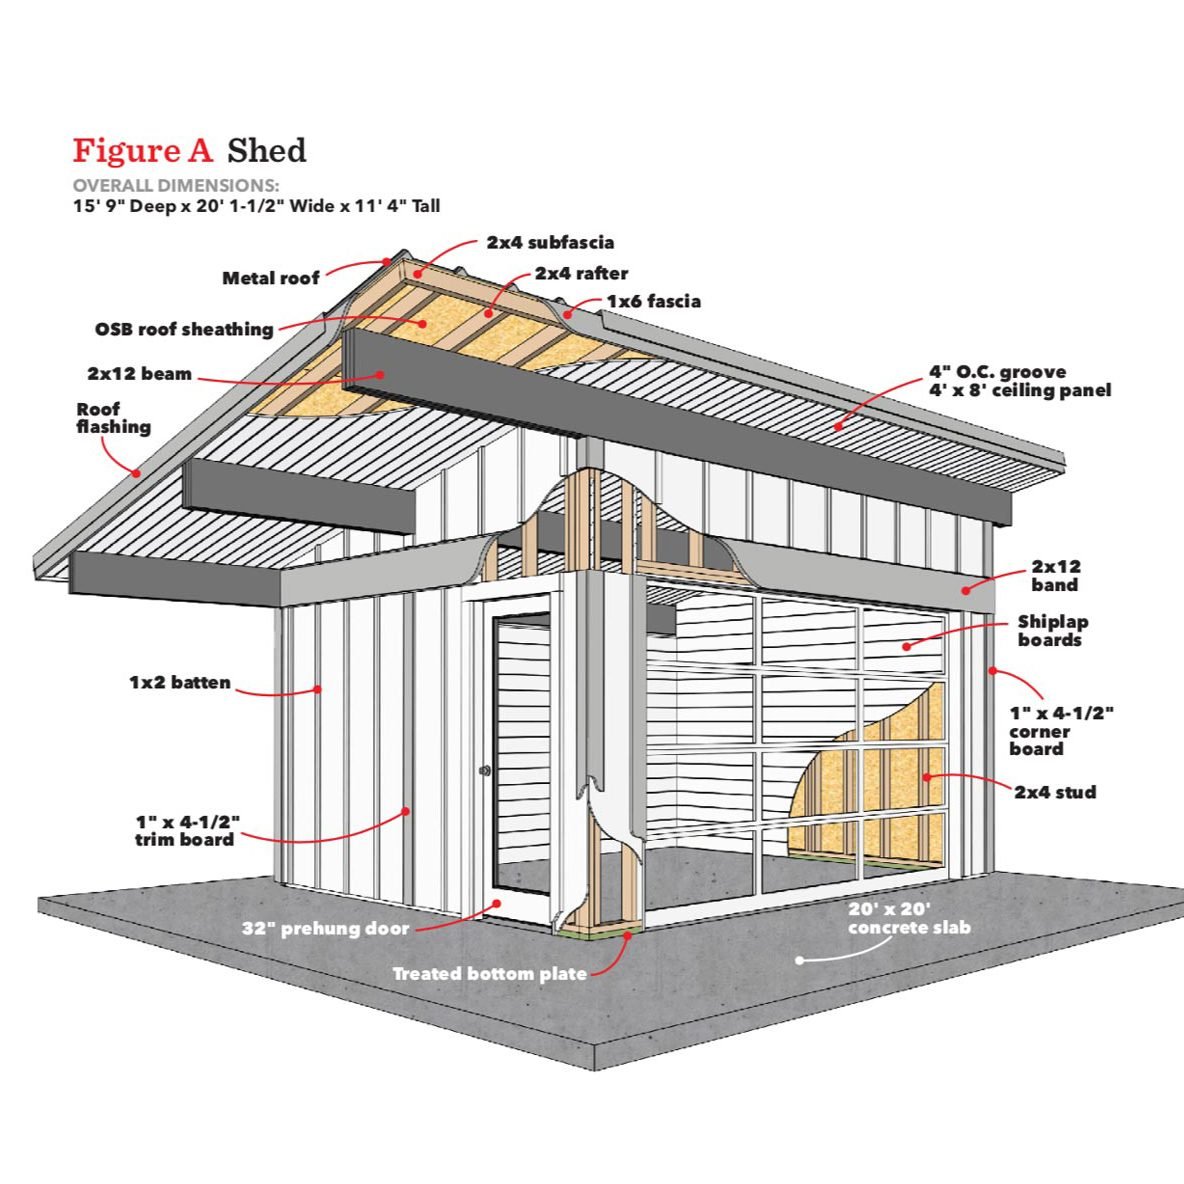
How to Build a Game Day Shed
Updated: Jun. 29, 2021A wide-open design perfect for work and play.

Aside from the large beams and heavy roof panels that require a bit of muscle to hoist up, the simple design and plain detailing on this shed make it relatively easy to build. Our online plans provide all the information you need to reproduce this shed exactly, or you can modify the plans to suit your needs. For example, it would be easy to build the front wall to accommodate windows instead of the garage door.
Watch this video to learn about all of the unique features incorporated into this shed
Most of the materials for this shed are available at home centers. We special-ordered the 2×12 beam material, the LP SmartSide panels and the outswinging doors for the storage locker.
As shown, this shed could cost you $16,000 or more. But there are ways to cut costs. Our bill for standard materials like lumber, siding, doors and paint was less than $6,000. Hiring contractors to provide and install a concrete slab ($5,000) and a metal roof ($3,000) drove up the bill. If you want to tackle these jobs yourself, get information by searching this website. A glass garage door costs about $4,500.
Expect to spend a weekend building the walls, and then about 10 or 15 more days to finish construction. You’ll need strong helpers if you plan to prebuild the roof panels as we did, and to help lift the beams into place.
Check with your local building department to see if a permit is required to build this shed. Call 811 to locate buried utility lines a few days before you dig.
Plus: Learn how to build a shed on the cheap here.
Pour the slab
We built our shed on a 20 x 20-ft. concrete slab (see Figure B), but you could substitute a wood foundation. If you want to pour your own slab, start by placing forms for the 12 x 14-ft. footprint and pouring the concrete. Then if you want the concrete to extend beyond the edges of the shed as ours does, build another set of forms and pour this section with a slight slope to the outside for drainage. For more on pouring a slab, search for “concrete” at familyhandyman.com.
Build the roof

1. Nail the subfascias to the rafters. Measure diagonally from opposite corners to square the frame. Tack the corners to the 2×12 to hold the frame square. Build and square the second roof frame.
Build the roof panels
To save time, we built the roof framing in two 10 x 16-ft. sections (Figures G and H and Photo 1). The resulting panels required a crew of six to hoist onto the roof (Photo 9). If you build your roof like this, take extra care to make sure the two sections are exactly the right size and perfectly square before you install the ceiling material.
Start by cutting the rafters and top and bottom subfascias to length. Then mark the rafter locations on the subfascias using Figure G and Photo 1 as a guide. Nail the subfascias to the rafters and square the assembly. Rest the frames on 2x12s and tack them down to hold them square while you install the ceiling panels. After assembling the two frames, connect them with temporary cleats to create the 20 x 16-ft. roof. Next, install the grooved LP SmartSide panels that will become the shed ceiling (Figure H). Start the panel installation along the center seam, carefully aligning the edge of the panels with the intersection of the two frames. Then work out in both directions.
Doing it this way ensures that the seam between the two roof panels will align properly when you connect the panels on the roof.
If you don’t have access to a crew, build the roof in a more conventional manner. To do that, get the beams up, then build the roof frame over them. Then cut the ceiling panels to fit around the beams.
Plus: DIY shed building tips you need to know.
Build and stand the walls

2. Stand and brace the front wall. Then build the side walls and stand them up. Nail the corners together. Then anchor the walls with concrete anchors, making sure to keep the bottom plates aligned with the chalk line.
Build the walls
After you assemble the roof panels and set them aside, it’s time to build and stand the walls. But first, snap chalk lines on the slab to locate the outside edge of the walls. Using Figure B as a guide, mark the four corners of the shed on the slab. Measure diagonally from opposite corners. The two diagonal measurements should be equal. If not, adjust the marks until they are. Then snap chalk lines.
Using dimensions from Figures C, D and E, cut the wall plates to length and mark the stud locations on them. Cut the studs to length and nail the walls together by driving two 16d nails through the plates into each stud. Because the siding material must be held 1 in. above the slab, we added a treated bottom plate for better nailing support at the bottom of the siding panels. Add this plate after you build the walls.
Build and stand the front and back walls, using temporary braces to hold them up. Then build and stand the two side walls (Photo 2). Nail the corners together. Then line up the outside edges of the walls with the chalk lines and drill holes for anchor bolts.
Check that the top plates of the walls are straight and level. If they’re not, drive plastic or treated lumber shims under the plates to correct for irregularities in the slab before you tighten the nuts on the anchor bolts. Finally, use a long level to plumb the corners and a temporary diagonal 2×4 to hold them plumb until after the siding panels are installed (Photo 3).
Watch the Game Day Shed come to life in this time-lapse video

Plumb and brace the corners
3. Hold a long level against the corner and push or pull the wall until the corner is perfectly plumb. Screw a diagonal brace to the inside of the wall to hold it plumb. Repeat this on all four walls.
Assemble the beams

4. Screw temporary support blocks to 2×4 spacers. Rest the first 2×12 against the supports, making sure it overhangs 5 ft. Add the next 2×12 and nail it to the first one. Complete the beam by nailing the third 2×12 to the first two.
Measure for the beam post

5. Choose a straight 2×4 and attach it on edge to the front and back beams. Hold a scrap of the 2×12 material against this 2×4 and measure from the top plate to the bottom of the 2×12 scrap to determine the height of the center post.
Anchor the center beam

6. After cutting and installing the short, triple 2×4 posts on each end, build the center beam in place. Then screw through the posts into the beam to hold it in place.
Assemble the beams
The 2x12s for your beams will most likely be slightly longer than 20 ft., allowing you to cut the ends perfectly square. Use a framing square to mark the cuts, and cut all nine 2x12s to exactly 20 ft. long. You’ll install the front and back beams first, and use them as a reference for aligning the center beam. The front and back beams overhang the top plate 1-1/2 in. to provide a nice reveal after the siding and trim are installed (Figure F).
To help hold the beams in the right spot while we installed them, we nailed temporary beam braces to 2×4 spacers at the corners and middle of the front and back walls (visible in Photo 4). To avoid having to hoist a heavy beam into place, we lifted the 2x12s into place one at a time and nailed them together while they were in their final position.
Nail the three 2x12s together, making sure to keep the edges aligned. Mark the assembled beams 5 ft. from the end on the side with the large overhang. Then press the assembled beams against the beam braces, line up the 5-ft. mark with the outside edge of the wall, and secure the beams by driving 4-in. structural screws through the top plate into the beams.
The next step is to determine the height of the center beam. Photo 5 shows the setup and how to measure for the triple 2×4 post that supports the center beam.
Here’s another tip: Nail a 10-ft. 2×4 vertically to the top and bottom plates of the end walls, aligning one edge with the down- hill side of the triple stud (beam post). This temporary 2×4 will sup- port the center beam as you tip it up into position, and provide a guide for positioning the short triple beam post (visible in Photo 6). Build the center beam and mark as you did for the front and back beams. Lift it onto the posts and attach it (Photo 6).
Complete the wall framing

7. Nail the short studs to the plates to complete the framing on the upper part of the side walls.
Complete the side wall
Cut 12-degree bevels on the ends of the angled top plates, fitting them between the beams and lined up with the temporary 2×4. Anchor the ends of the plates. Then mark the stud positions. Measure for the studs, cut them to length with a 12-degree bevel on one end and nail them into place (Photo 7).
Add the band

8. The first step is to nail a 1-1/2-in. metal drip cap flashing along the top edge of the siding. Then nail the 2×12 band to the studs, keeping it aligned with the back beam.
Install the siding and band
Cut the siding for the lower wall sections to 83 in. long. Then cut a panel 2 ft. wide and use this half sheet to start the siding on the end wall (Figure J). Use the other half of the sheet to finish the same wall. Rest the sheets on 1-in. blocks while you nail them to the studs. Use 2-in. hot-dipped galvanized siding nails to install the siding and trim. Make sure the top edge of each sheet is aligned 1/8 in. below the top plates to allow room for the drip cap flashing between the beam and the siding (Figure L).
When you’ve completed the siding on the lower part of the walls, nail the 1-1/2-in. metal drip cap flashing to the studs to cover the top edge of the siding. Then screw the 2×12 bands to the studs (Photo 8) and cover the top with another piece of metal drip cap (Figure L). Finally, cut and install the siding that goes above the 2×12 band.
Hoist the roof panels

9. Round up some strong friends to help lift the roof frame. Tip a frame up and lean it against the back wall. Lift the bottom and push the frame onto the roof. Press with 2x4s to position the frame. When both frames are in place, adjust them until they’re even with the beams and the front overhang is 18 in.
Anchor the roof

10. Drive 8-in. structural screws down through the 2×4 rafters into the beams. Place screws 32 in. apart along each beam.
Install the roof sheathing

11. Starting with a 6-ft. sheet on one end, nail the sheathing to the rafters. Leave a 1/8-in. space between the sheets to allow for expansion. Start the second row of sheathing with a 2-ft. cutoff from the first row.
Add corners and trim

12. Cut the corner boards to length and nail them together. Nail the corners to the shed. Cut the battens, center them over the studs and nail them on. Nail a 1×6 fascia to the roof frame.
Add corner boards and battens
The corner boards are 1 in. thick. One is 4-1/2 in. wide and the other is 3-1/2 in. wide. When nailed together, they form a corner that’s 4-1/2 in. wide on both faces. The 4-1/2-in. width aligns with the beams to simulate corner posts. Cut the parts for the corners and nail them together. After you seal all the cut ends with paint, nail on the corners (Photo 12). Then cut battens, seal the ends and nail them on, centering them over the studs. The wall framing was planned so that the 1×2 battens would look nice when aligned over the studs. See Figure K for trim placement.
Because the LP SmartSide trim must be held 1 in. above the concrete, we used 1×6 boards for the garage doorjambs to avoid the gap at the bottom. If you’ve followed the plan carefully, you should be able to nail the top garage doorjamb directly to the wall framing, leaving 1/4 in. exposed below the 2×12 band.
Ours didn’t work out perfectly, so we shimmed the top jamb down about 1/4 in. to create the reveal.
We also ripped the 1×6 to 4-7/16 in. so the interior edge would be flush with the interior paneling. Nail on the top jamb, then add the sides. Keep the bottom ends of the side jambs about 1/4 in. above the slab to prevent water from soaking into them. Finish the garage door opening with trim boards on each side.
Build the storage locker

13. Anchor the treated plates to the concrete. Then plumb up to locate the top plates. Fill in the studs and cut the siding panels to fit.
Build the back storage area
The storage area on the back of the shed is optional, but the open sections are a great place to store fire-wood, and the locker is perfect for lawn equipment and tools. Given that the concrete slab may be sloping in this area, it’s easier to build these walls in place than to build them and then fit them in.
Start by marking the position of the treated bottom plates and securing them to the slab with concrete anchors. Use Figures C and M as a guide. Plumb up from these plates to locate the top plates. Cut the angled top plates with 12-degree bevels on the ends and nail them to the ceiling. Then cut studs to fit and nail them in. Finally, cover the sides with siding material (Photo 13). Cap the ends of the two outside walls with a 5-1/2-in.-wide trim board. Wait until after you’ve installed the double doors to install the trim over the center walls.
Install the doors
The prehung exterior doors for the side and back of the shed must be installed before you can add the exterior trim pieces on the top and sides of the doors. After you shim the frames and secure the door frames to the framing with screws, cut the trim to fit on the top and sides.
Finishing up
You can see from the photos that we painted the ceiling panels, beams and wide band before installing them. Then we painted the siding panels before installing the corners and battens. If you do the same, you’ll have very little painting left to do after construction is done. We finished up by caulking the spaces between trim boards and touching up scuffs and caulked areas with matching paint.
We finished the interior of the shed with shiplap boards. You’ll get a neater job if you finish the interior before the garage door is installed. Also, if you want outlets or wall lights in the shed, install the wiring before you finish the walls.
Plus: 15 Awesome Man Cave Spaces for Watching the Big Game
PDF Links:

Super-cool garage door
 This aluminum-framed garage door from Wayne Dalton cost about $4,500, including installation. These garage doors are custom made for each project, and you can choose from dozens of finishes and glass options. We kept it simple with plain aluminum frames and clear glass. Custom-sized glass garage doors like this are available from several manufacturers. Go online and search for “glass garage doors” to find a dealer.
Optional out-back storage

We added a lockable, critter-proof storage locker with double doors, as well as two tall, narrow spaces that are just right for storing firewood, lawn furniture or gardening equipment. If you choose this option, you won’t regret it!
Long-lasting exterior


We used several kinds of engineered wood products from LP Building Products on this shed, ranging from roof sheathing to trim. For more information on all LP products, visit LPshed.com.
Off-the-grid shed

This shed stood a long way from any power source, so we opted to use a Honda EU2200i inverter generator for all our electrical needs, along with the EU2200i Companion unit when we needed more power. These small, light and powerful 2,200-watt generators had no problem running our circular and table saws and charging our cordless tool batteries. Because they generate super “clean” power, they could also handle our delicate electronic gear like cameras and computers. After the construction was done, the Honda generators provided the power for the shed itself. For more information on Honda generators, visit gen.honda.com.
Plus: Check out more awesome sheds here.


