
DIY Shed Building Tips
 Updated: Dec. 22, 2022
Must-read pro advice on everything from floors to roofs, windows and doors—plus, how to save time and money on your shed.
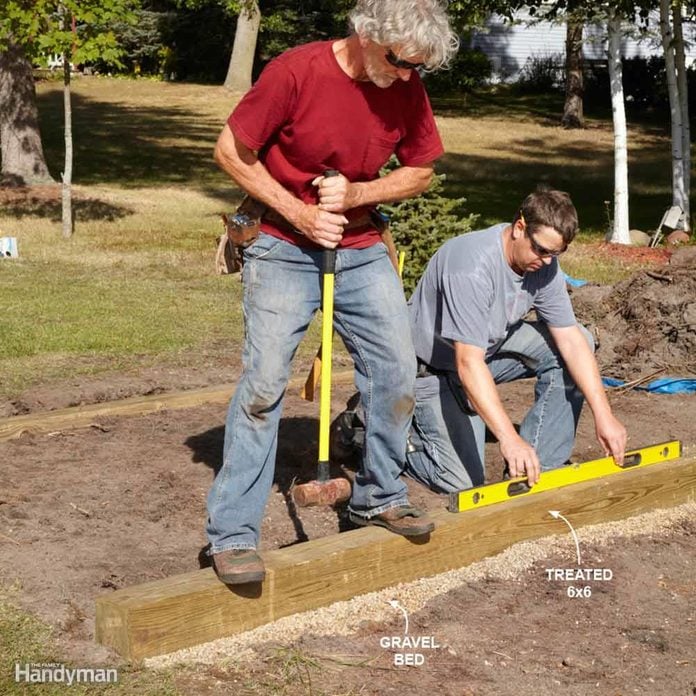
Easy Shed Foundation
In most cases when learning how to build a shed foundation, the shed doesn’t have to rest on deep footings. A pair of trenches filled with gravel and topped with treated 6x6s is adequate in areas with well-drained soil. Level and square the 6x6s and you’re ready to build and attach the joist system.
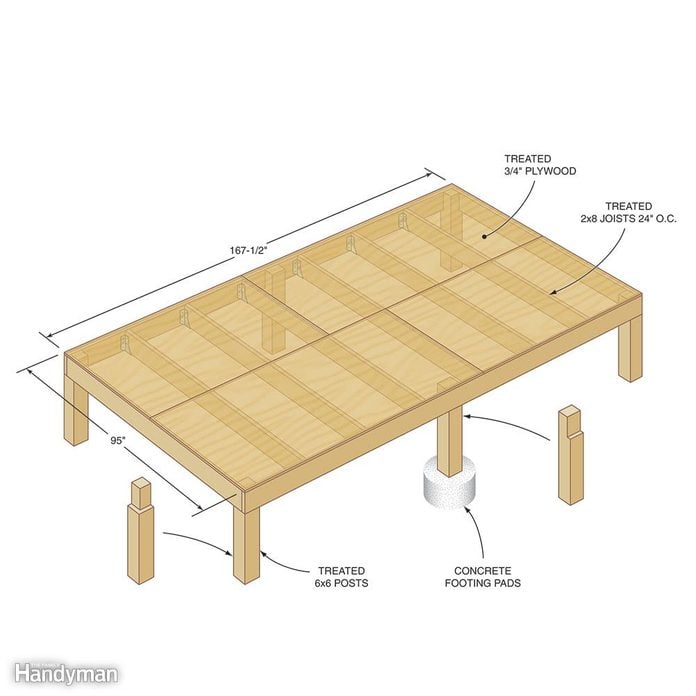
For Sloped Sites, Build on Posts
If your shed site slopes, pouring concrete is a bigger job because you have to build strong forms and pour extra concrete on the downhill side. A simpler method is to build your shed floor like a deck, with footings, posts and a wood frame covered by plywood. If you don’t like the opening under the shed, build a skirt to cover the space between the shed floor and the ground.
Since locating buried utilities is free, it doesn’t make any sense to skip this step. You can avoid an expensive mistake when building a shed, or worse yet, a tragedy, by going online to call811.com for more information and then calling 811 a few days before you plan to dig to have your buried utilities located.

Best Shed Floor is a Concrete Slab
For a shed floor that’s strong, long-lasting and low to the ground, it’s hard to beat concrete. Surprisingly, if you pour the slab yourself, the price is comparable to that of a wood platform. Read more about pouring your own concrete shed floor when building a shed.
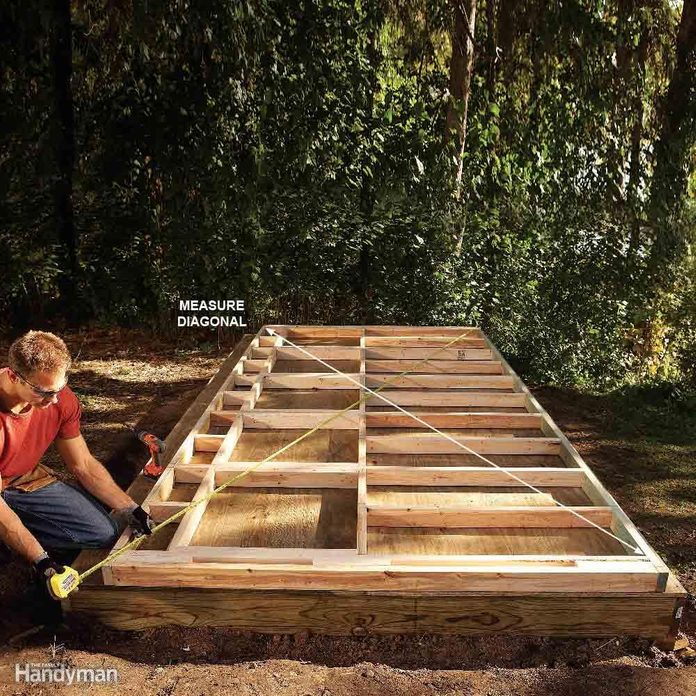
Be Precise With Shed Floor & Walls
Don’t be tempted to get sloppy when you square up the floor and walls of your shed. An out-of-square start will haunt you through the rest of the project, from doors and windows to trim and roofing. For a concrete slab, measure diagonally across the opposite corners of the form boards. Then adjust the forms until the diagonal measurements are equal. Do the same for a wood platform floor. If you’re installing sheet siding on the walls, before you stand them up, measure diagonally and square up the wall before you nail on the siding.
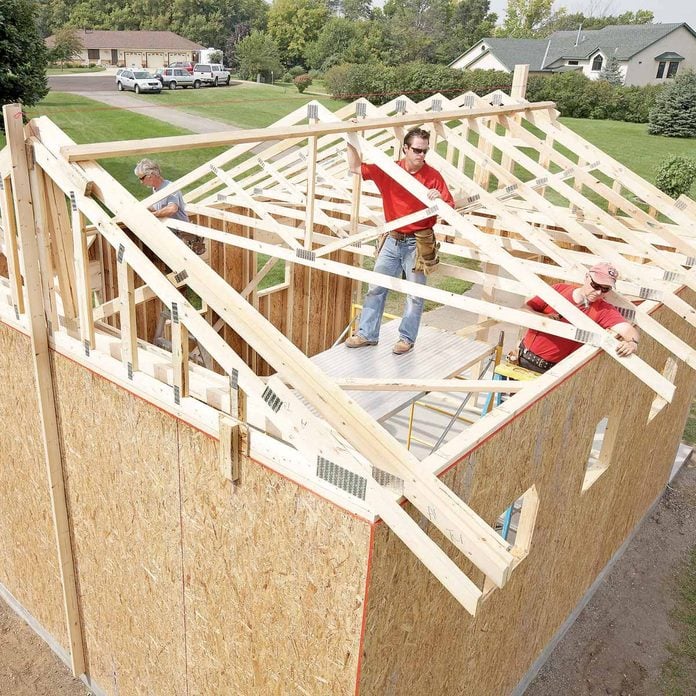
Build Shed Roof Trusses
Whether you build your own trusses or order them from the lumberyard, building a roof with trusses is much easier than framing a roof one rafter at a time. As a general rule when learning how to build a shed roof, you’ll need one truss every 2-ft. If you build your own, the cost will be about half this amount. Connect the framing for site-built trusses with plywood gussets glued and screwed to the joints.
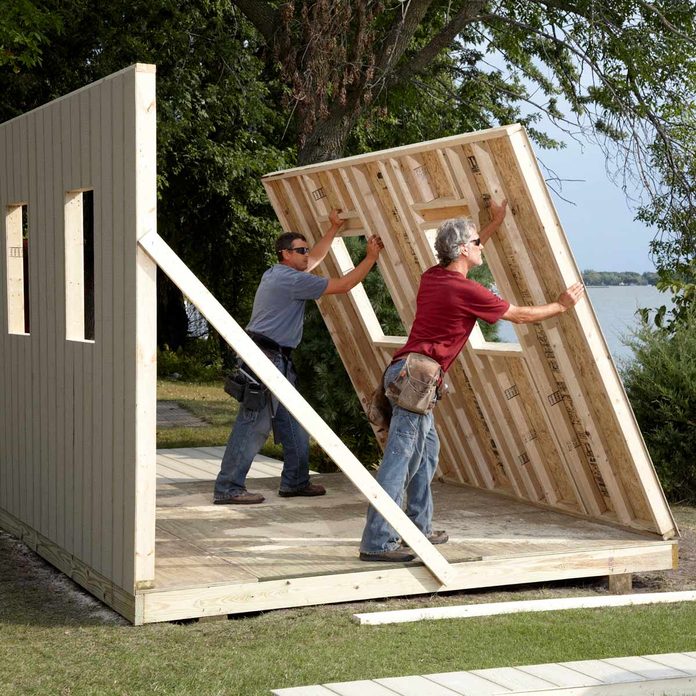
Install Siding, Then Raise Shed Walls
It’s not always possible, but if you’re using 4 x 8-ft. sheet siding and have enough helpers around to lift the wall when you’re done, you can save time by siding the walls before you raise them. Make sure to straighten the wall plates and square the wall by measuring diagonally before you nail on the siding. This is easier to do on a wood shed floor because you can tack the plates to the floor to hold the wall straight and square while you install the siding.

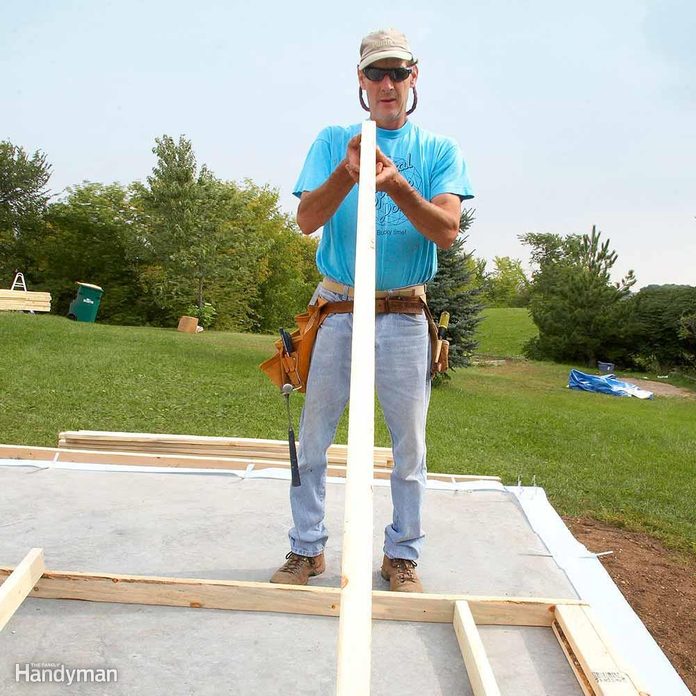
Keep Shed Framing Straight
A good carpenter is constantly working to keep all the framing straight. And all it takes is a string. Starting at the floor, you can stretch a string along the concrete forms or rim joist and make adjustments to straighten any deviations. Then do the same thing at the top of the walls, and finally when you set the roof trusses or ridge.
The trick for learning how to build a storage shed is to stretch the line across a scrap of wood at each end so there’s a space between the line and the part you’re straightening. On a wall, for example, tack small scraps of 1/2-in. plywood at each end of the top plate and stretch a line very tightly over the plywood. Then use a third scrap as a gauge to check the distance between the line and the lumber. Use braces or whatever is needed to adjust the top plate until the gauge just fits. Now your top plate will be perfectly straight.
Choose Straight Studs
In a perfect world, all of the studs would be straight, but since they aren’t, make sure to pick the best ones to use at corners and at door and window openings. Sight down the length of the studs and set aside the ones that are perfectly straight. While you’re at it, also set aside studs that are really crooked. You can cut these up to use as cripples or blocking. You may find other uses for short pieces later on.
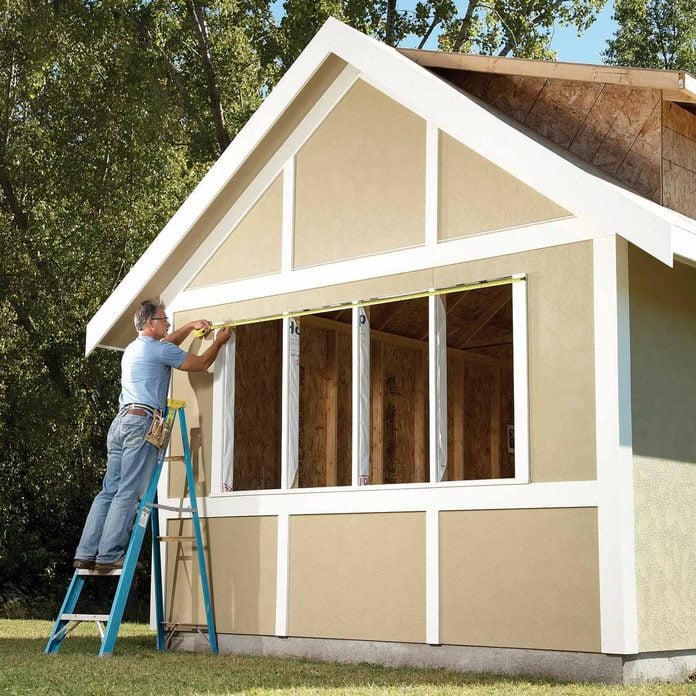
Dress Up a Plain Shed With Trim
Whether grooved or plain, installing 4 x 8-ft. sheets of siding is a fast and economical way to cover shed walls. But the result can look pretty plain. Adding wide corner boards, wide window and door casing, and maybe a horizontal band at the base and top can turn a utilitarian-looking shed into a masterpiece.

How to Build Trusses for a Shed: Build Trusses On the Shed Floor
If you’re building your own roof trusses, the handiest place to assemble them is right on the shed floor. But you have to do it before you build the walls. The best method is to snap chalk lines on the shed floor to outline the truss parts. Then use the chalk lines as a guide for cutting the truss patterns and assembling the trusses.
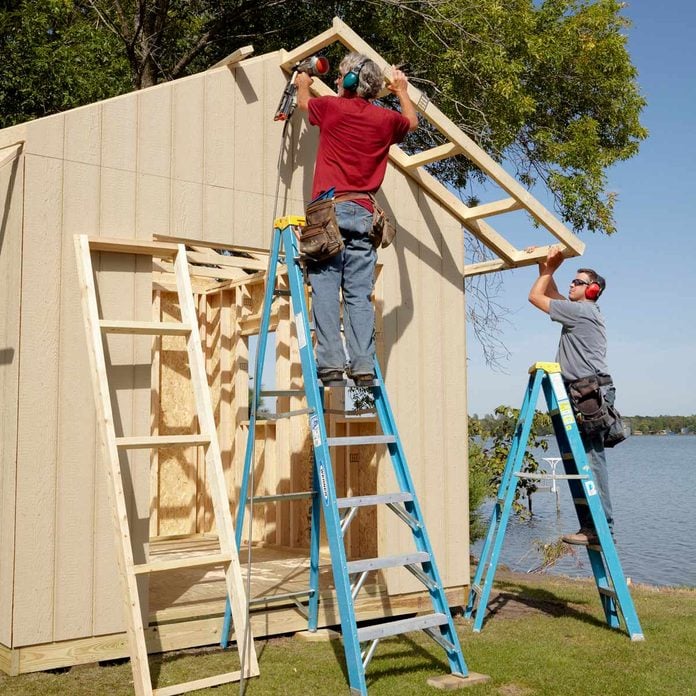
Add Overhangs to Protect Shed Siding
Consider adding overhangs to the ends of your shed. They’re more work and require some extra material, but overhangs provide some protection from rain and snow, which translates to less painting and maintenance. Plus, overhangs just look better, and they give you a place to add decorative brackets.

Build Economical ‘Sandwich’ Doors
Frame-and-panel doors are expensive, especially if you want a unique style. But you can get the same look for a fraction of the cost by simply laminating two layers of inexpensive 3/4-in.-thick boards together.
For strength, plan to build the front and back layers so the corners overlap each other. Then, to accommodate inset panels, make the front pieces a little wider to create a lip for the panels to rest against. Use plywood or tongue-and-groove boards for the panels, and hold them in with stops nailed on the back. You can assemble the two frames with pocket screws before gluing and screwing them together, but it’s not necessary. After the glue dries, plane or sand the edges to hide the fact that there are two layers.

Save Money With Barn Sash Windows
Utilitarian barn sash windows are perfect for sheds. Basically you order the sash—the movable part with glass—and build a simple frame to hold it. Add a few hinges and hold-open hardware and you’ve got an inexpensive, nice-looking window. If you want a screen, you’ll have to build a separate frame and staple screening to it.
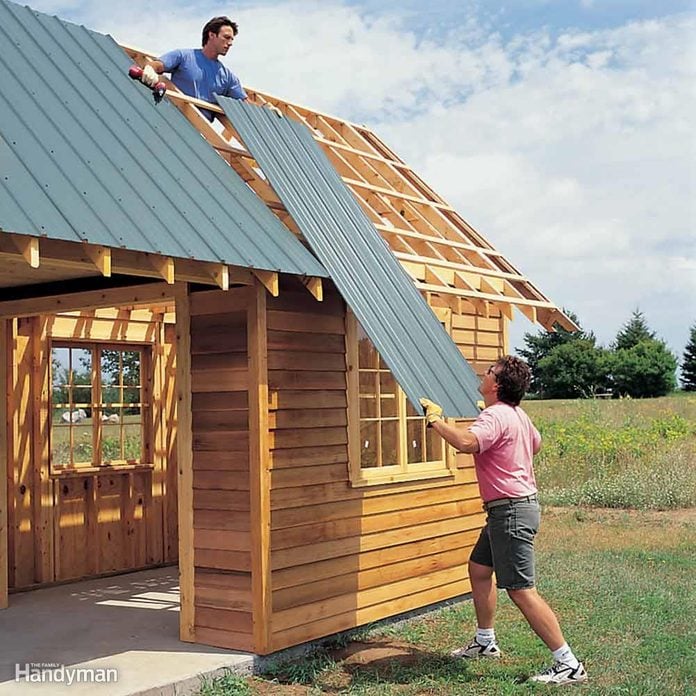
Order Cut-to-Length Steel Roof Panels
You can cut steel roofing panels with a circular saw and a carbide blade, but it’ll save you a lot of work if you order the panels the right length to start with. Plus, you’ll have a greater color selection if you order the roofing rather than buy off-the-shelf panels. Remember to order in advance, though, since it usually takes several weeks for the roofing to arrive. And make sure the overhangs are the right size so the panels will overhang the fascia slightly.

Save Money on Shed Siding
If you plan to paint your shed, natural wood siding isn’t necessary. You can buy sheets of OSB (oriented strand board) siding at a fraction of the cost of real plywood, and it’ll probably last longer too. LP SmartSide panel is one brand. You can buy plain, grooved or stucco-like panels in several thicknesses and sizes. Ask at your local lumberyard to see what’s available.
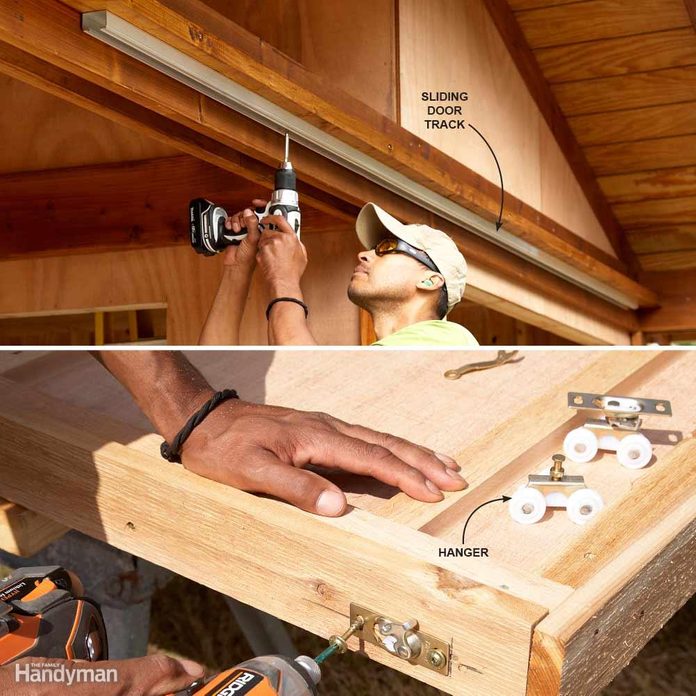
Closet Door Hardware for Sliding Shed Doors
If you buy heavy galvanized hardware designed for farm buildings for your shed, it’s overkill. Buy heavy-duty closet door hardware instead. It’s not really meant for outdoor use, but when it’s protected by an overhang, it holds up well. And if the roller bearings get corroded, it’s simple to replace the entire hanger mechanism. Check out Johnson Hardware’s 111 track and 1025 ball-bearing hangers.

Rent Scaffolding for Shed Roof Construction
Working from ladders is more dangerous than working from scaffolding. Plus, having to constantly move ladders around is time consuming. When you get to the roof construction, consider renting a set of scaffolding with wheels. You’ll be amazed at how much easier it is to have a stable platform to work from and to set your tools and materials on. You can rent a 5-ft.-tall section of scaffold with three planks and wheels for about $110 per week.
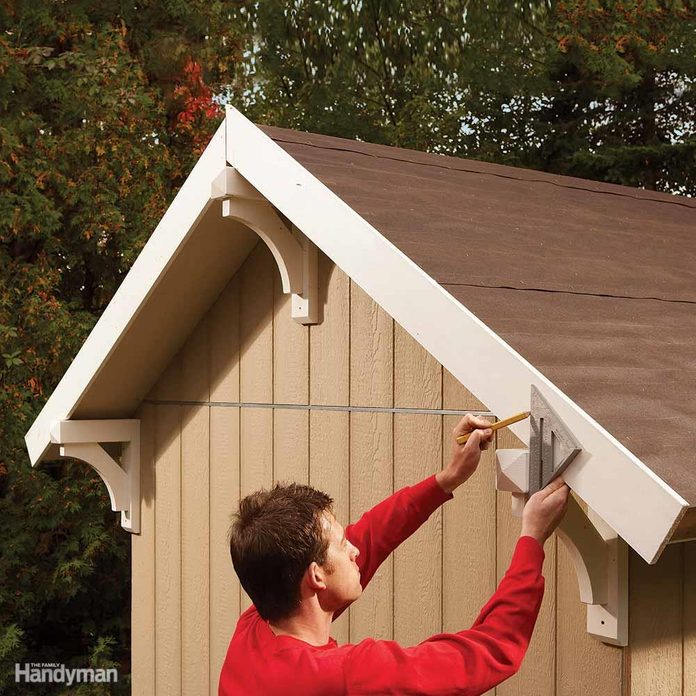
Add Brackets for a Custom Touch
Nothing dresses up a shed like brackets. They’re the ultimate low-effort, high-impact feature. In some cases they also provide extra support for your gable-end overhang. Depending on the design, you can build brackets from 4x4s or by laminating 2-by boards. Make a full-scale drawing to work out the details. Then build the brackets and attach them to the shed. Install the brackets tight to the underside of the overhang, and then notch the fascia board to fit over them.
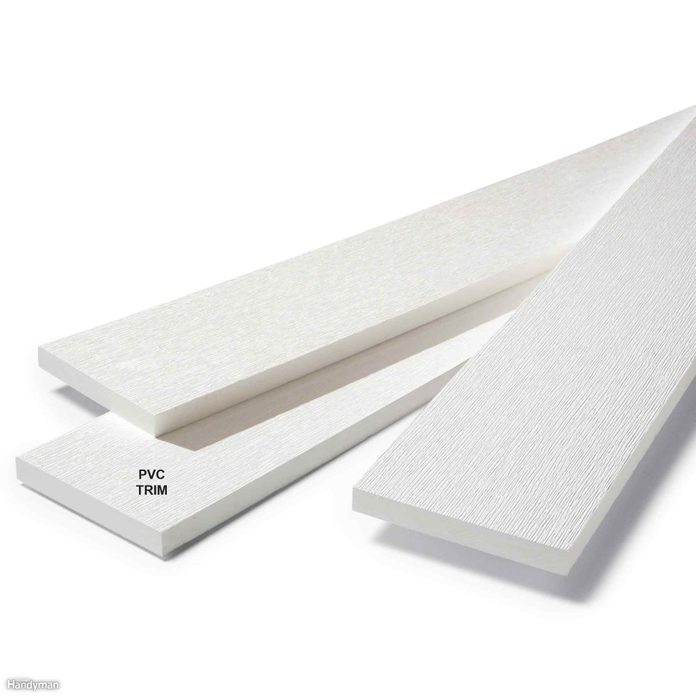
Avoid Painted Wood Trim
For painted trim, avoid real wood. There are other materials that hold paint better and won’t rot. Here are a couple of products to consider:
- PVC (Azek is one brand). You can paint it or leave it unpainted, but don’t use dark colors. It can be shaped with a router like wood.
- Fiber cement (James Hardie is one brand). This is less expensive than PVC, but you must take some precautions to protect it from moisture.
- Engineered wood-fiber trim (MiraTEC is one brand).