Trailer Lights That Always Work
Updated: Mar. 20, 2019LED lights and individual grounds make trailer lighting dependable
Trailer lights that always work

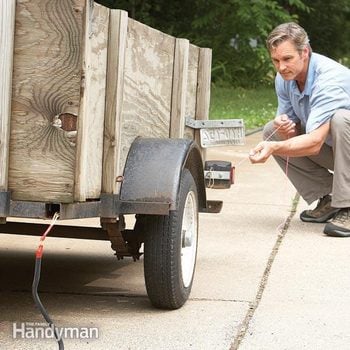
Photo 1: Assemble the new harness
Run the new harness and the extra ground wire through the split loom tubing. The loom protects the harness from rub-through and shorting inside the trailer frame.

When it comes to utility trailer lighting, nothing causes more trouble than burned-out bulbs and corroded ground connections at the frame. Rubbing (and shorting) connections come in a close second. If you want to get rid of those problems forever, switch over to LED lights and add an individual ground wire to each light. The entire project takes just a few hours.
The utility trailer light kit we used (Blazer International No. 127680; about $54 from amazon.com) comes with a new harness. At an auto parts store, buy a spool of 16-gauge wire for the individual ground wires. Then buy crimp connectors and a few packages of split loom wiring harness protectors (Curt Manufacturing No. I-1824-25; 25-in. length; from amazon.com).
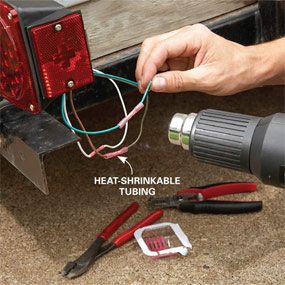
Disconnect the old trailer harness wires at each light and attach mason’s line. Then pull each line back toward the trailer tongue. Connect this “fishing line” to the new harness and loom (Photo 1). Next, pull the new harness through the frame (Photo 2). Finish off the utility trailer lights installation with crimp connectors and heat-shrinkable tubing (Photo 3). If you’ve got other issues, check out how to fix utility trailer wiring.
Required Tools for this utility trailer lights project
Have the necessary tools for this DIY utility trailer lights project lined up before you start—you’ll save time and frustration.
- 4-in-1 screwdriver
- Crimper
- Heat gun
- Mason's line
Required Materials for this utility trailer lights project
Avoid last-minute shopping trips by having all your materials ready ahead of time. Here’s a list.
- 16-gauge wire
- Crimp connectors
- LED trailer light kit
- Split-loom wiring harness protectors