What Is a P-Trap?
 Updated: Apr. 07, 2022
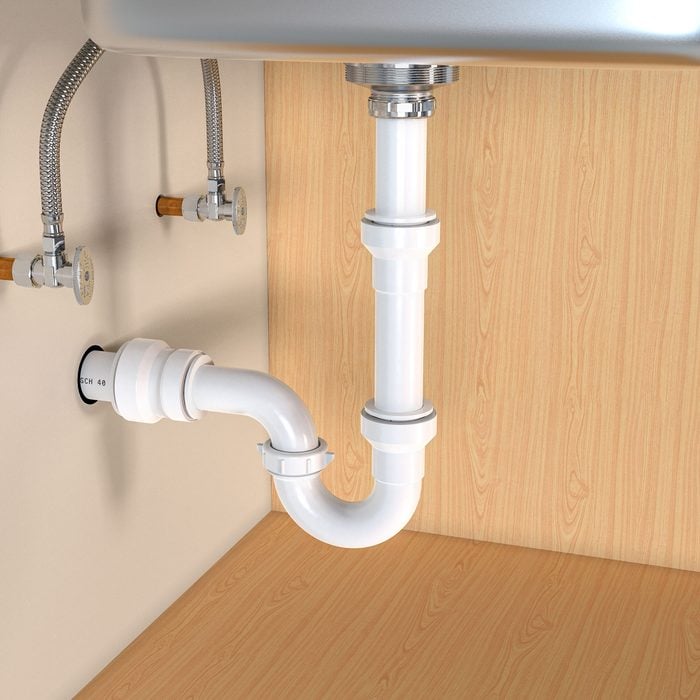
Curious about P-traps, how they function and what to look for when you buy one? Here's what you need to know.
Our editors and experts handpick every product we feature. We may earn a commission from your purchases.
It’s shaped like a “P” and can be found under sinks, tubs and showers. A simple device, a P-trap holds just enough water to create an airtight seal that prevents sewer gas from backing up into your home.
As you run water down a drain, you’re continuously refilling that trap. This plumbing masterpiece has been in use for about 250 years. Here’s what you need to know about P-traps.
On This Page
What To Know About P-Traps
P-trap pipes are available in different materials, but the assemblies are similar. Your P-trap can be polypropylene (white or black), ABS (black), PVC (white) or 18-gauge brass (chrome-plated or natural).
Plastic traps come in inside-diameter sizes of 1-1/4-in. for a standard bathroom sink; 1-1/2-in. for a laundry sink, bathtub or standard kitchen sink; and two inches for a shower or floor drain.
If your bathroom sink drains slowly, you may have a clog of hair around the stopper below the drain. Those clogs can usually be removed with a long wire hook.
If the clog is deeper than that, it could be inside the P-trap. The same design that traps water can also trap hair, food and diamond earrings.
To clear the first two, try a plunger; block the sink overflow or other openings before plunging. Drain cleaners can damage fixtures and pipes. A plumbing snake can also clear the trap but won’t retrieve that diamond earring. For that, you may need to disassemble and reassemble a P-trap in your kitchen or bathroom. Here’s how.
If you’re lucky, your sink’s trap has a cleanout nut located on the lowest portion of the bend. You can remove that and clear many clogs. Grab an empty bucket and place it under that nut, then remove the nut and let the contents drain out. If your trap lacks a cleanout nut, you can easily disassemble the trap and find that earring; you might not even need tools.
The P-trap connects the tailpiece at the sink end and the drain line (also called the waste line) at the opposite end. Those connections use slip nuts and beveled cone washers. An older home with metal P-traps might use squared and thick rubber washers with accompanying flat metal washers.
Either way, if you’re taking apart your P-trap to remove a clog, pay close attention to the placement of the washers and reassemble them the same way.
If you’re tackling this job because the P-trap is leaking, it’s best to buy a new PVC P-trap. It will last longer than metal and costs only about $10. If your plumbing is visible — underneath a pedestal sink, for example — you can purchase decorative P-traps.
Remove the P-Trap
If your P-trap was installed properly, you should be able to remove it by hand. A V-jaw tongue-and-groove pliers, sometimes called a water pump pliers, will give you a good grip on slip nuts.
First, grab some rags and place an empty bucket below the trap. Slowly loosen the nut connecting the P-trap on the outflow side. Pay attention to the placement of the washers inside and be ready for water to come out.
You might find the clog in the trap or the union joint. Clean those areas with water and a brush and replace the slip nut washers if the connection shows any sign of leakage — and I hope you found the diamond earring.
Reassemble the P-Trap
To reassemble the P-trap, start by replacing the drain line end, then reconnect the tailpiece to the sink. Keep any slip nut connections loose for now.
Connect the sink side of the P-trap to the tailpiece and position the drain line end to align with the drainpipe. That drainpipe slides into the wall with some adjustability for length, easing the final connection to the P-trap. Each beveled washer is placed so the large end contacts the slip nut. When tightened, a slip nut eases the washer into a leak-free connection.
Do not use plumbing tape or putty on any of these connections. Some plumbers use plumber’s grease on threaded connections, but that’s not necessary. Tighten all the connections by hand. If you overtighten them, you risk distorting the washer or cracking the pipe.
Once all the fittings are secured, run two tests. First, turn on the tap and run water through the sink while inspecting the P-trap connections for leaks. Second, fill the sink basin with a couple of inches of water, then remove the drain plug and let the water flow through the trap.
If you have a leak, loosen the slip nut where the leak appears, inspect the placement of the washers, then reinstall. Most leaks happen because a washer is installed incorrectly, or because a slip nut is threaded improperly or overtightened.
Simple P-Trap Option

Designed to make installation even easier, the Insta-Plumb from Keeney costs about $15 at home centers and hardware stores. Its hero features are the push-connect fittings where this P-trap connects to the sink and the drain. They eliminate the need to align a cone washer or properly thread and tighten a slip nut.
Inside each fitting there’s an O-ring and a locking ring. A release collar at the top of each fitting secures the connection. To undo a fitting, compress the release collar and disconnect the pipes. No tools necessary.
The Insta-Plumb is available in 1-1/4-in. and 1-1/2-in. P-trap sizes. For small cabinets with hard-to-reach pipes and P-traps, it can ease installation and service work. The system is approved in most plumbing codes, but check in your area. The Insta-Plumb is for use with drainpipes, not pipes under pressure or potable water pipes.