Masonry: How to Repair Mortar Joints
Updated: Jun. 27, 2019A beginner's guide to tuckpointing, or replacing mortar joints
Tuckpointing
Crumbling masonry joints start out ugly, and then things get uglier fast—bricks come loose, water seeps behind the wall and bees make their homes in the mortar holes. Let it go and the problem won’t go away. In fact, the deterioration will accelerate and you’ll have a much bigger fix on your hands. But you can mend the mortar joints yourself with a process called tuckpointing.
Tuckpointing isn’t difficult or expensive—the only real investment is your time. But you can pick away at it in your free time, area by area.
The steps we show here will work on any brick walls, chimneys and retaining walls. Tuckpointing won’t fix cracking or crumbling bricks, or cracks in walls caused by a shifting foundation. Those problems call for more drastic fixes that we won’t cover here.
Pick up tools and materials
First and foremost, you’ll need an angle grinder with a 4 or 4-1/4 in. diamond blade. Don’t bother renting one unless you only have several feet of bad joints. You can buy an inexpensive model for a few dollars more than the cost of a one-day rental, and even a fairly cheap one will do the trick (unless you’re a serious tool junkie or you have an entire house that needs extensive tuckpointing).
You’ll also need a few simple, inexpensive specialty hand tools that are available at masonry suppliers and some home centers. You’ll need a brick trowel and a tuck pointer. If you have concave mortar joints, you’ll need a masonry jointer that’s the width of your joints. For flat joints, you’ll need a joint raker. If you have just a few areas that need work, use a hammer and cold chisel to knock out the old mortar, but for more extensive work, plan on getting a rotary hammer drill fitted with a flat chisel to make the job go a heck of a lot quicker. You can rent one for a half-day or day. If you have days’ worth of work, rental costs can break the bank. In that case, spend the money to own one.
You’ll also need mortar mix. A 60-lb. bag costs a few dollars at home centers. If you need colored mortar, take a small piece of the old mortar to a masonry supplier and ask for help finding a mortar dye to match. But be aware of this—fresh tuckpointing always stands out against older mortar. However, it will eventually weather to match.
Start small
If you only have a few joints to tuckpoint, dive right in. But if you have a large wall to tackle, start in a small area to get a feel for the operation before you start hogging out entire walls. You’ll hone your skills and get a good idea of how much you can tuckpoint at one time. You’ll have 30 to 60 minutes of working time once you mix the mortar.
Get ready for the dust
Tuckpointing is a dirty business. Grinding the joints creates a dust storm, with chunks of mortar covering the ground. Spread a drop cloth on the ground to catch the mortar so cleanup will take minutes instead of hours. Close your house windows to keep out the dust, and tell your neighbors who might be affected to do the same.
How to remove mortar from brick: Grind out the joints


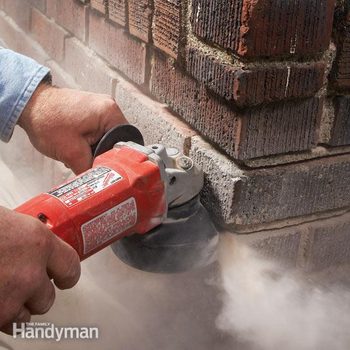
Before you can put new mortar in the joints, you have to cut out the damaged material. So how do you remove mortar from brick? Start by grinding the top and bottom of the horizontal (bed) joints with an angle grinder (Photo 1). Hold the grinder with both hands to keep it steady and avoid grinding into the bricks. You only need to grind 3/4 in. into the mortar.
Start at outside corners and work inward. That keeps you from putting extra pressure on the corner bricks, which could knock them out of the wall. After you’ve finished the horizontal joints, do the vertical (head) joints (Photo 2).
Knock out the mortar

Use the rotary hammer drill to pound the mortar out of the joints. Set the drill on the rotating mode (it puts less pressure on the bricks). Again, work from the outside corners inward (Photo 3). Keep the chisel point in the mortar joint and keep moving the hammer. The drill makes quick work of removing mortar, but be careful. The powerful tool can also knock out bricks. If that happens, take them all the way out, chisel off all the mortar, then reset them when you fill the joints.
There’s really no secret to knocking out the mortar. Just hold the drill at about a 45-degree angle to the wall, squeeze the trigger and watch the mortar fall out.
Caution: Wear eye protection—mortar pieces can go flying!
Clean out the joints


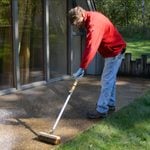
Once you’ve chipped out the damaged mortar, use a hand broom to sweep the joints. Sweep away mortar clumps and the dust (Photo 4). Use the rotary hammer drill to bust out stubborn chunks.
Then wash out the joints with water. But don’t hose down the wall or you’ll soak everything, including the ground where you’ll be standing or kneeling. Instead, fill a bucket with water and brush the water into the joints (Photo 5). Don’t worry about slopping water onto the bricks—you want them damp before you fill the joints anyway.
Mix the new mortar

If you’re tinting the mortar, stir the dye and the mortar mix in a bucket before adding the water. Dye is typically sold in 1-1/2-lb. bags. Mix one-quarter of the dye with one-quarter of a 60-lb. bag of mortar mix. Stir in water until the mix is the consistency of peanut butter (Photo 6).
The mortar will last 30 to 60 minutes, but you may need to add water to keep it workable. After one hour, throw out what’s left and mix a new batch.
Work the mortar into the joints

Use a brick trowel and a tuck pointer to pack the mortar into the joints. Most pros prefer this method to using a grout/mortar bag. Mortar that is hand packed is more durable.
Scoop mortar onto the trowel. Hold the trowel next to the joint, then press the mortar into the joint with the tuck pointer (Photo 7). Pack the joint until it’s flush with the front of the bricks.
Tool the joints

Let the mortar in the filled joints set for about 30 minutes. If you’re tuckpointing a large area, continually check the first joints you filled to see if they’re ready to tool (finish). Check by pressing the filled joint with your thumb. If your thumb leaves only a slight impression, it’s ready to tool. If it goes in deeper, wait five minutes and try again. But don’t let the mortar get too stiff—it can start to harden after just 30 minutes, making it difficult to tool the joints.
If you want rounded joints, press a masonry jointer into the top of vertical joints and pull the tool downward. The jointer will push out some of the mortar and leave a concave shape. For horizontal joints, start at a corner (Photo 8). Run the tool about halfway across the joint, then stop and finish tooling from the other side.
For flat joints, place a joint raker over an old joint to set the depth. Then run the raker along the new joints to make them flat.
Clean the bricks

Once the joints have set up (about 30 minutes after tooling), use a stiff-bristle brush to clean dried mortar off the bricks (Photo 9).
If the mortar refuses to come off, wait three days, then use muriatic acid (sold at home centers). Use 10 parts water to 1 part acid (add the acid to the water, not the other way around). Caution: Be sure to wear eye protection and rubber gloves when working with acid. Brush the acid onto the bricks with a stiff-bristle brush, scrub the bricks and let the acid fizz. Then rinse the acid off with water. If there’s still a little mortar residue left, treat it again.
The acid can slightly alter the bricks’ appearance, so test it on a small area first. If it does alter the appearance, increase the ratio of water to acid.
Required Tools for this Project
Have the necessary tools for this DIY project lined up before you start—you’ll save time and frustration.
- Angle grinder
- Bucket
- Cold chisel
- Dust mask
- Hammer
- Hammer drill
- Hearing protection
- Safety glasses
- Tuckpointing tool
Required Materials for this Project
Avoid last-minute shopping trips by having all your materials ready ahead of time. Here’s a list.
- Mortar dye
- Mortar mix
- Muriatic acid