Patch a Water-Stained Ceiling or Textured Ceiling
Updated: Oct. 17, 2019Repair sprayed ceilings with aerosol spray texture patch.
- Time
- Complexity
- Cost
- An hour or less
- Beginner
- Less than $20
Patch a water-stained popcorn ceiling
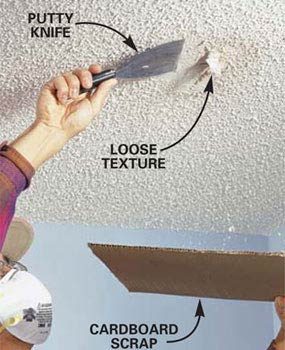
How to Fix Water Stains on Ceiling Photo 1: Scrap off the damaged texture
Lay down a tarp and scrape off all the loose, flaking texture with a putty knife. Hold a scrap of cardboard underneath the damaged area to catch the falling flakes.

How to Fix Water Stains on Ceiling Photo 2: Block off the surrounding area
Pin a plastic tarp around all four sides of the patching area (stay 1 ft. away from the damage), and let the tarp hang at least 4 ft. down.

How to Fix Water Stains on Ceiling Photo 3: Spray the area with primer
Spray stain-blocking primer over the water-damaged area and let it completely dry.
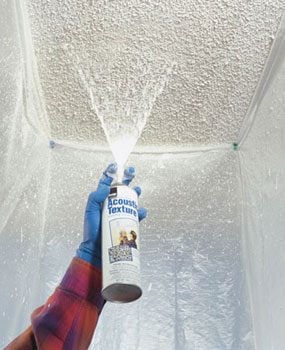
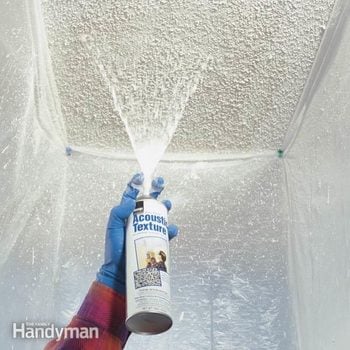
How to Fix Water Stains on Ceiling Photo 4: Spray the texture
Shake the can of texture for a couple of minutes, and then screw the nozzle onto the valve stem. Hold the can 9 to 14 in. away from the ceiling. Squeeze the trigger with quick half-second bursts while sweeping the can over the damaged area. Allow the texture to dry for 24 hours before painting.
Once the ceiling is dry, remove any loose or flaking texture (Photo 1). Wear a dust mask and safety glasses to protect yourself from falling debris. Spraying the stain blocker and ceiling texture are downright messy affairs, so tarp off a work area as shown in Photo 2. Many aerosol paints don’t spray well upside down, but the stain-blocking primer in Photo 3 is designed to spray up (Kilz Upshot is available at home centers and hardware stores).
Applying the new ceiling texture (Photo 4) is the trickiest part of the whole project. The texture comes out fast and the propellant dissipates quickly. You’ll only get about four seconds of spray per can, so you may want to purchase an extra can and practice on a sheet of cardboard. The texture repair is designed to match the original white ceiling texture color, but you might have to repaint the entire ceiling to completely hide the patch.
CAUTION!
If you have ceiling texture applied before 1978, it may contain asbestos. This mineral can be hazardous if it becomes airborne, so call your local health department to learn safe procedures for removal and disposal.
Required Tools for this Project
Have the necessary tools for this DIY project lined up before you start—you’ll save time and frustration.
- Dust mask
- Paintbrush
- Putty knife
- Safety glasses
- Stepladder
Required Materials for this Project
Avoid last-minute shopping trips by having all your materials ready ahead of time. Here’s a list.
- Paint
- Plastic sheathing
- Scrap cardboard
- Stain-blocking primer (spray)
- Texture (spray)