Drywall Taping Tips
Updated: Dec. 21, 2022How to get better taping results with less hassle
Tip 1: Mix the compound


If you’ve just opened a bucket, remove about a quart of the joint compound to make room for water. Then add about two or three cups of water and start mixing the compound. Pros use a powerful 1/2-in. drill with a special mixing paddle. But a hand-powered giant “potato masher”–type mixer made for this purpose works great for the casual taper.
The best consistency for joint compound depends on its purpose. It should be pudding consistency for hand taping, and a little thicker for the final coats. For smaller jobs, transfer some of the joint compound to another pail before mixing so you can make custom batches for taping or finishing.
Tip 2: Don’t use compound right out of the pail

Joint compound straight from the pail is simply too thick to apply and spread evenly. So before you start taping, begin by thinning and mixing the joint compound.
Tip 3: Prefill gaps with “setting” compound
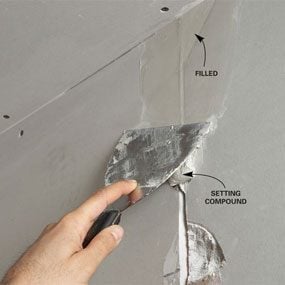
Setting-type compound is perfect for prefilling because it hardens quickly and doesn’t shrink as much as regular joint compound.
Start by breaking or cutting out areas of the drywall that are broken or crushed, then peel away any paper shreds left around the edges. Then mix up a small batch of setting-type compound (if you mix too much, it’ll harden before you use it up). Mix it thick so it’ll stick in the holes without sagging. When the compound sets to the hardness of soap, scrape off high spots and lumps with the edge of your taping knife. Also fill gaps between sheets with setting compound and let it harden before you apply joint compound and tape.
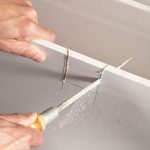
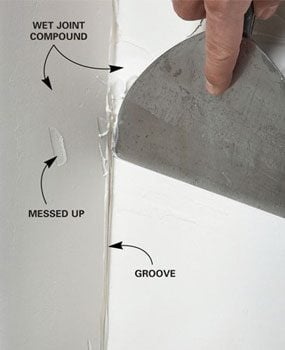
Tip 4: Cut “V” grooves at butt joints

The paper facing on drywall ends may show through the taped seam. Avoid this problem by carving a shallow “V” groove between the sheets after you hang them. Then fill the “V” with setting-type joint compound before you cover the seam with joint compound and tape. This will really help out with the toughest taping challenge—butt joints.
Tip 5: Scrape ridges and bumps between coats

Even experienced tapers leave little globs of joint compound and an occasional ridge. If you don’t get rid of these after they dry, they’ll cause you all kinds of grief. Chunks of dried compound can break off and get stuck under your taping knife and cause streaks in your fresh joint compound that you’ll have to fill in later. Avoid the problem by scraping the joints between coats. All it takes is a quick once-over with a 6-in. taping knife to knock off ridges and bumps. Hold the knife at a low angle and push it across the taped joints.
Tip 6: Embed the tape completely

You can avoid a lot of extra work later by making sure paper tape is thoroughly embedded in the joint compound. Start by laying a thick bed of joint compound down the center of the seam. Then smooth it down to a consistent thickness of about 1/8 in. with your 5- or 6-in. taping knife. Wet the tape and press it into the joint compound. Then, starting at the center and working toward the ends, press the tape into the joint compound with your knife. The key to success is making sure joint compound oozes out from under both sides of the tape as you embed it.
Tip 7: Don’t leave dry tape

Paper tape that’s not completely embedded in joint compound will bubble or fall off later when it dries. Keep a close eye on the tape as you embed it with the taping knife. If you see sections of the tape where one or both sides remain dry with no joint compound oozing out, pull off the tape and apply more joint compound under the dry areas. Then reapply the tape over the new joint compound.
Tip 8: Don’t mud both sides of the corner at once
It’s pretty easy to get a nearly flawless coat of joint compound on the first side of an inside corner. But if you start on the second side before the first is dry, things get tough. That’s because it’s impossible to avoid messing up the wet compound on the first side, and you won’t be able to avoid making a groove in the corner.
Tip 9: Mud one side of the corner at a time
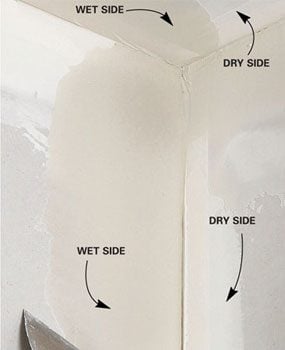
The trick is to coat one side of each corner and let it dry overnight before troweling joint compound on each adjacent side. Start by spreading about a 3-in. band of joint compound over the tape on one side of the corner. Then smooth it with a 5- or 6-in. taping knife. Press the outside edge of the knife against the drywall to create a feathered edge that won’t require much sanding. Try to avoid leaving too much joint compound over the tape—a buildup at the corner will make it harder to fit baseboard or crown moldings tight to the wall.
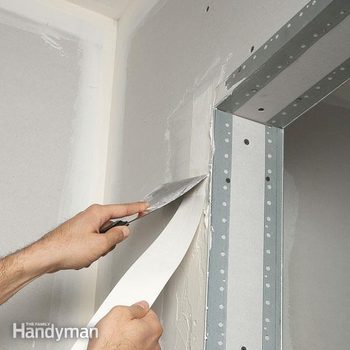
Tip 10: Tape over metal corner beads
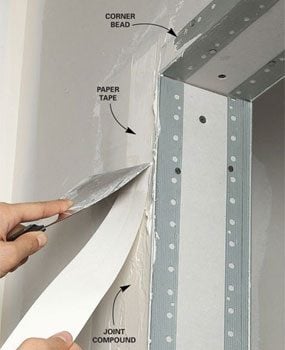
Cracking along the edge of metal outside corner beads is a common problem. And usually it doesn’t happen until after the wall is painted, so repairing the crack means repainting the wall again! There are a couple of solutions. One method that’s become standard practice for professional tapers is to use special corner bead that is held on by joint compound rather than nails. No-Coat Ultratrim is one such product.
If you don’t want to go shopping for special corner bead, avoid future cracking by applying paper tape over the metal edge after you’ve nailed on the bead. Embed the tape just as you would on any joint. Then fill the corner as usual.
Tip 11: Wet the paper tape

Wetting the tape before you embed it in the joint compound can help eliminate troublesome bubbles that show up after the joint dries. Keep a bucket of water nearby and quickly run each piece of tape through it before applying the tape to the wall.
Tip 12: Cut out bubbled or loose tape

Even if you’re diligent about embedding the tape, you’ll occasionally run into a section of tape that bubbles or comes loose. Don’t try to bury the problem with more compound. It’ll just reappear later. Instead, cut around the damaged area with a utility knife and remove the tape. Avoid a divot in this spot by filling the recess with setting compound and letting it harden before applying another coat of joint compound.
Required Tools for this Project
Have the necessary tools for this DIY project lined up before you start—you’ll save time and frustration.
- Bucket
- Mud pan
- Sanding block
- Taping knife
- Utility knife
Required Materials for this Project
Avoid last-minute shopping trips by having all your materials ready ahead of time. Here’s a list.
- 100-grit sandpaper
- Drywall compound
- Metal corner bead
- Paper drywall tape
- Setting-type compound