Taillight Replacement Made Easy
Updated: Mar. 01, 2023Use the Internet to find great prices on parts

Order and replace a broken taillight
Your teenage driver used the car and returned it washed and with a full tank of gas. Isn’t it great that he’s become a responsible adult? Oh, wait, you notice that the taillight is broken, and he has “no idea how that happened.” Time to head off to the body shop? Nope—this is a job you can do with ordinary hand tools and the Internet.
Finding a replacement taillight assembly is easy. Simply enter “taillight” into your favorite search engine. You’ll be amazed at the number of hits you get. Most of the companies sell low-priced offshore “knockoffs” of the original equipment (OEM) parts. If you’re OK with an “aftermarket” version, make sure the seller lists it as CAPA certified. A CAPA-certified part is guaranteed to fit and perform like the original. But don’t end your search there. Many car dealers have set up consumer-friendly Web sites that sell OEM parts at discounted prices. (See “Dealer Internet Sites” below.) Check out these dealer sites before you buy an aftermarket version. We actually bought a genuine Honda taillight for less than the aftermarket version cost.
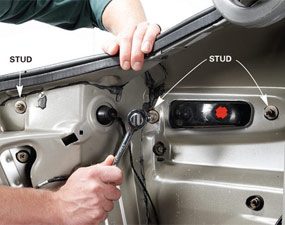
Car manufacturers use two different techniques to attach taillights to the body. One method uses threaded studs embedded in the taillight. The studs are inserted into holes in the sheet metal and fastened with nuts (Photo 1, top). For the second method see “The captive stud/socket method” below.
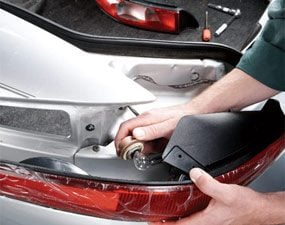
Once you have the taillight assembly disconnected, remove the lightbulb sockets by releasing the catch mechanism and twisting. If you haven’t replaced the bulbs in the past two years, now is a good time to do that, since you already have everything apart. Then install the sockets in the new taillight and reassemble.
The captive stud/socket method

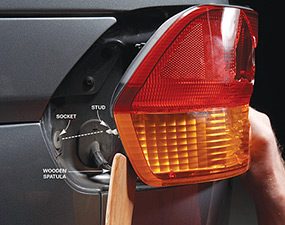
The second method uses screws to secure one end of the light, and captive stud/socket fasteners on the other end (Photo 1). If your vehicle has the captive stud/socket arrangement, use a wooden or plastic tool to pry the stud out of the socket. Metal screwdrivers will scratch the paint.
Dealer Internet Sites
Chrysler/Dodge/Plymouth
newchryslerparts.com
dodgeparts.com
Ford
fordparts.com
Honda
hondapartscheap.com
Toyota
toyotapartsdeal.com
Nissan
nissanparts2u.com
Required Tools for this Project
Have the necessary tools for this DIY project lined up before you start—you’ll save time and frustration.
- 4-in-1 screwdriver
- Socket/ratchet set
Required Materials for this Project
Avoid last-minute shopping trips by having all your materials ready ahead of time. Here’s a list.
- New taillight assembly