
How to Make a DIY Under the Bed Storage Drawer
 Updated: Dec. 21, 2022
This easy under-bed storage idea turns unused space into extra bedroom storage.
Our editors and experts handpick every product we feature. We may earn a commission from your purchases.

An hour or less
Beginner
$20-50
Introduction
There’s a lot of storage space under the bed. The problem is keeping items contained, orderly and easily accessible.Tools Required
- Brad nail gun
- Clamps
- Drill
- Miter saw
Materials Required
- 1-1/2” angle aluminum (2’)
- 1-1/4” washer-head screws
- 1-in. screws
- 1x4 board (18’)
- 1x6 board (2’)
- 2-in. screws
- 2’ x 4’ 1/2” plywood sheet
- Appliance rollers (2)
- Wood glue
If you’re trying to organize your bedroom, you should definitely consider utilizing the space under your bed. It’s the perfect space to stow away toys, extra blankets, out-of-season clothing, stuffed animals, and so much more. The trick, however, is having something under the bed to keep that stuff contained, organized and accessible. These DIY under-bed drawer covers all the bases. Roll it out for access and roll it back in when you’re done. Whether your have a large or small bedroom, these drawers are an easy way to add some much-needed storage.
Before building, measure the height beneath your bed frame and alter our dimensions to suit.
Cutting List

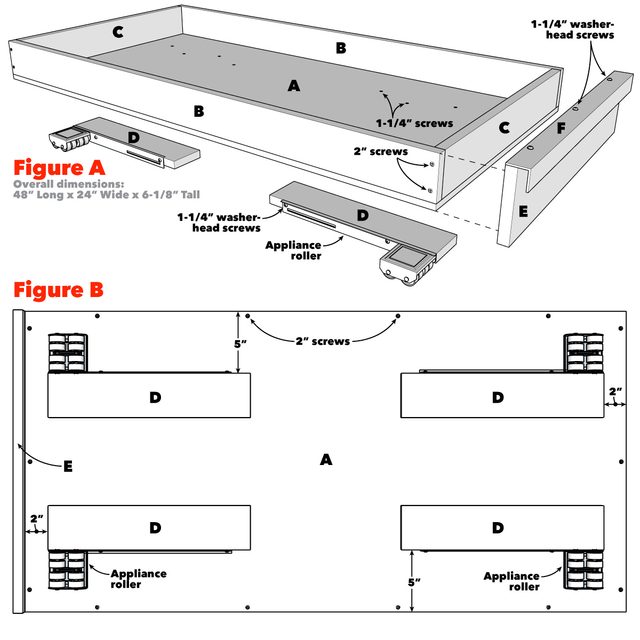
Under-Bed Storage Drawer Project Plans
Project step-by-step (5)
Build the Box
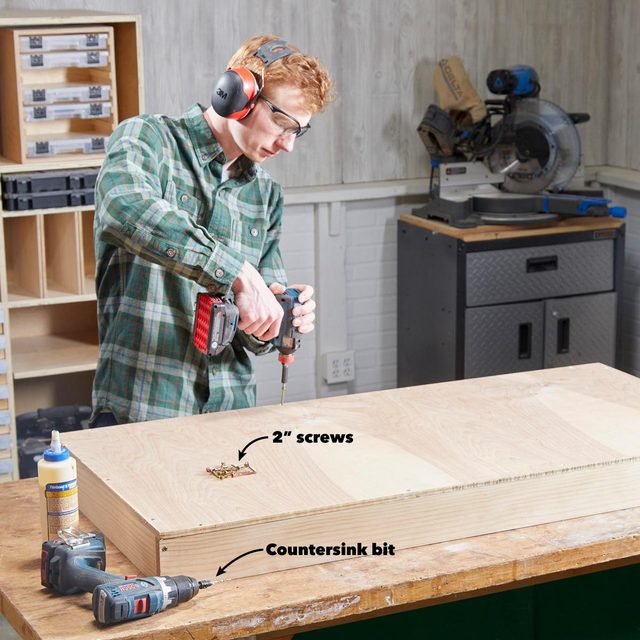
Drill countersunk holes and fasten the sides (B) to the ends (C) with wood glue and 2-in. screws (should need 24 total for this project). Attach the base (A) using the same method.
Locate and Fasten the Cleats

Mark the cleat (D) locations, 2 in. in from the front/back and 5 in. from each side. Place the cleats in position and trace them. Drill four clearance holes in each cleat outline. Glue the cleats and tack them in position with 1-in. nails.
Flip the box over, countersink the clearance holes and then drill pilot holes into the cleats (D). Fasten the cleats with 1-in. screws (should need 16 total for this project).
Attach the Rollers

Separate the halves of the appliance rollers. Drill two clearance holes into each half of the roller with a sacrificial board underneath. Clamp the rollers to the cleats (D) and fasten with 1-1/4-in. washer-head screws (you’ll need 8 total for this project).
Attach the Drawer Front
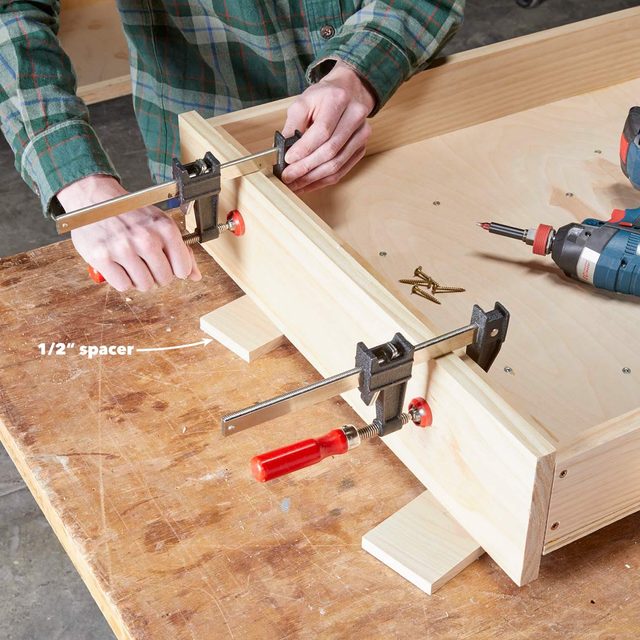
Drill six screw clearance holes through one box end. Clamp the drawer front (E) to the box end with a 1/2-in. spacer underneath. Drill pilot holes into the drawer front, and then attach it with 1-1/4-in. washer-head screws.
Install the Handle

Drill four evenly spaced clearance holes in the handle (F), and then clamp it to the top edge of the drawer front. Drill pilot holes into the drawer front and fasten with 1-1/4-in. washer-head screws.
