
Tried-and-True Leveling Tips From Pro Carpenters
 Updated: Feb. 20, 2023
Whether you’re just hanging a picture or building an entire house, getting things level is part of the project. Here, we'll share tips gathered through years in the trades that’ll help you get the job done quicker, easier or more accurately.
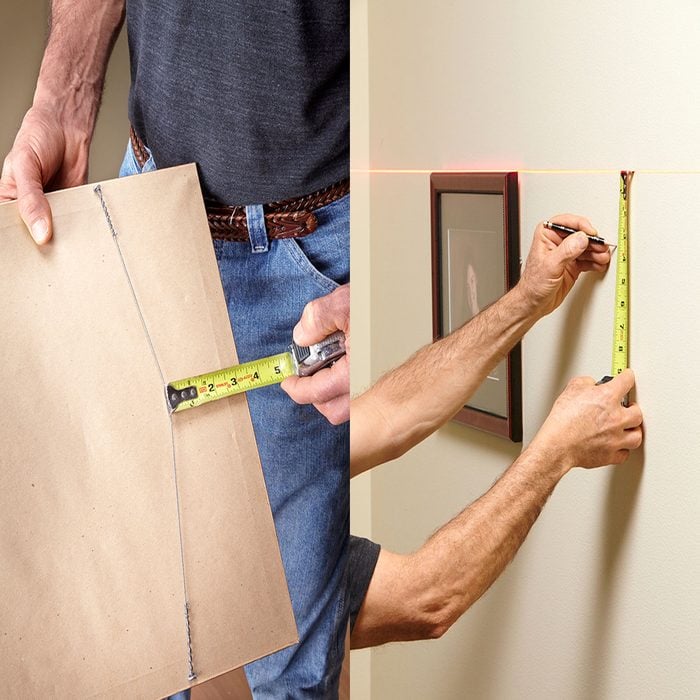
How To Level a Row of Pictures Perfectly
Getting a row of pictures to line up at the top can be tricky, especially if the hanging wires are different lengths. Here’s a tip from a professional picture hanger: Use a laser to create a level reference line. Hook a tape measure to the picture wire and pull it tight. Measure to the top of the picture frame. On the wall, measure down from a level line and mark this distance at the centerline of your new picture location. Align the hook of the picture hanger with the mark and nail it to the wall. Repeat this process for all of the pictures, and their tops will be perfectly aligned.
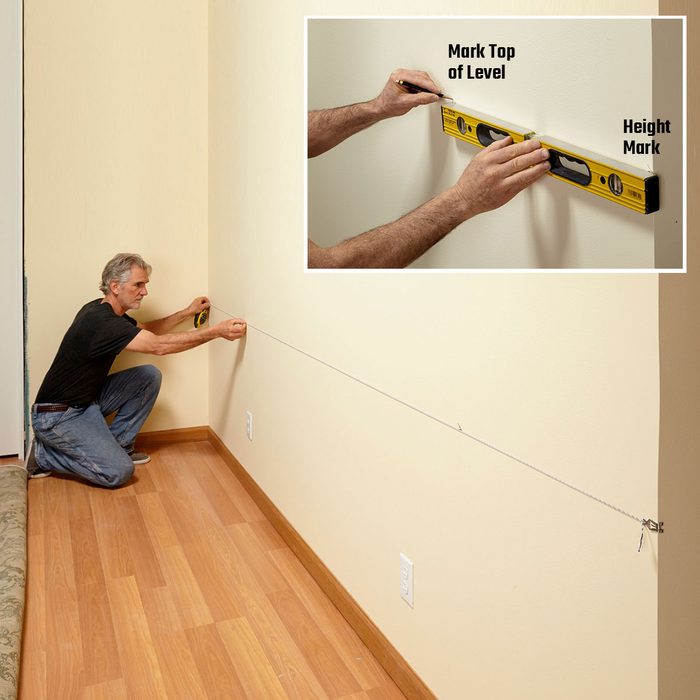
Poor Man’s Laser Level
If you need to make a long, level line and don’t own or have access to a laser, try this method. Mark the desired height of your line on the wall. Hold your level at the mark and adjust it until the bubble is centered. Then make a mark at the opposite end of the level. Extend the line by stretching a chalk line and aligning it with both marks. If you’re working indoors, use dust-off marking chalk, which is easy to erase. Stretch the chalk line and snap it to create a perfectly level line across the wall.

Pre-Level Your Doorjambs
If your floors are going to be carpeted, you don’t have to worry about a gap under one of the doorjamb sides. In fact, most trim installers raise the doors so they don’t drag on the carpet. This is done by resting the jambs on 3/8-in.-thick shims, or temporary scraps of trim. That raises the whole door so it completely clears the carpet. But if the jambs have to fit tight to tile, wood or vinyl floors, you’ll have to cut them to fit an out-of-level floor.
Step One: Check the opening
Lay a level across the opening and shim under one end until the bubble is centered. Measure the thickness of the shims (above).

Step Two: Trim the bottom of the jamb
Transfer the measurement to the appropriate jamb and draw a cutting line with a square. Saw along the line to trim the jamb. Now when you set the door in the opening, the top of the jamb will be level.

Check Old Levels Before You Use Them
When levels get beaten up like this one, it’s likely that some or all of the vials will be out of whack. And if you have a super cheap and/or older one, don’t trust it. Before you do any more leveling, test the vials for level (horizontal) and for plumb (vertical). Check the leveling vials by placing your level on a flat surface and piling playing cards under one end until the bubble is centered. Now lift the level and rotate it 180 degrees, end for end, and rest it on the cards in the same location. The bubble should still be centered. If it’s not, your leveling vial is inaccurate.
To check for accurate plumb vials, rest your level against a wall and note the location of the bubble between the lines. Then rotate the level 180 degrees, edge to edge, keeping the same end facing up. The bubble should be in the same spot. If not, your plumb vial is off. Levels like the one shown can be adjusted, but many levels can’t. In some cases, one set of vials will be good, and you can simply cross out the bad set with a permanent marker to avoid using it. Or toss a bad level and buy a new one.

Get Your First Row of Tile Perfectly Level
Tubs and shower bases aren’t always level, so starting your first row of tile against them could throw off your whole job. Instead, make level marks on the wall, and line up straight boards with the marks and screw the board to the wall. Rest the second row of tile on the board for a perfectly level tile job. You will have to custom cut the tiles on the bottom row. Make sure that neither the first row or the top row end up as tiny slivers of tile.

Fix Crooked Switches and Outlets
Here’s a handy tip from one of our electrical consultants. The screws that attach an outlet or a switch to the box go in a slot that allows the device to be adjusted. But you don’t always have to remove the cover plate to fix crooked switches or outlets. Instead, try pushing a flat-blade screwdriver against the cover plate. Use a screwdriver with a sharp blade. A rounded-over blade will just slip off. You may have to push from more than one corner to fix really crooked devices.

Easy Appliance Leveling
Here’s a two-part tip for leveling appliances. First, use a magnetic level to free up both hands. Most torpedo levels have a built-in magnet and work great for appliance leveling. The second part of the tip is to lift the front of the appliance with a pry bar to take pressure off the leveling feet. It’s much easier to turn the feet when they’re off the ground.

Extend Your Level
You could use a plumb bob to transfer layout marks from the floor to the ceiling, but extending your level with a straight board works much faster. Just remember to mark on the correct side of the level.

Human Transit
This tip won’t work for leveling house footings, but it’s great for approximating exterior grade changes as well as other long-distance leveling that doesn’t need to be exact, just close. Hold a level at eye height and center the bubble. Sight along the top of the level to the point you want to check. The distance from your feet to the level is the height of the point you’re looking at.
Of course, the elevation you’re trying to measure won’t usually be the exact distance from your feet to the level, so you’ll have to do some math. You might be squatting, sitting down or standing. Whichever, figure out the distance from your eye to the ground and that’s the height to the point you’re sighting. In this case, we’re checking the elevation to the top of the fountain to help us size the pump.