
How to Build an Infrared Sauna
 Updated: Nov. 04, 2022
Get all the benefits of a sauna without the expensive health club membership.
Our editors and experts handpick every product we feature. We may earn a commission from your purchases.
Multiple Days
Intermediate
Varies
Introduction
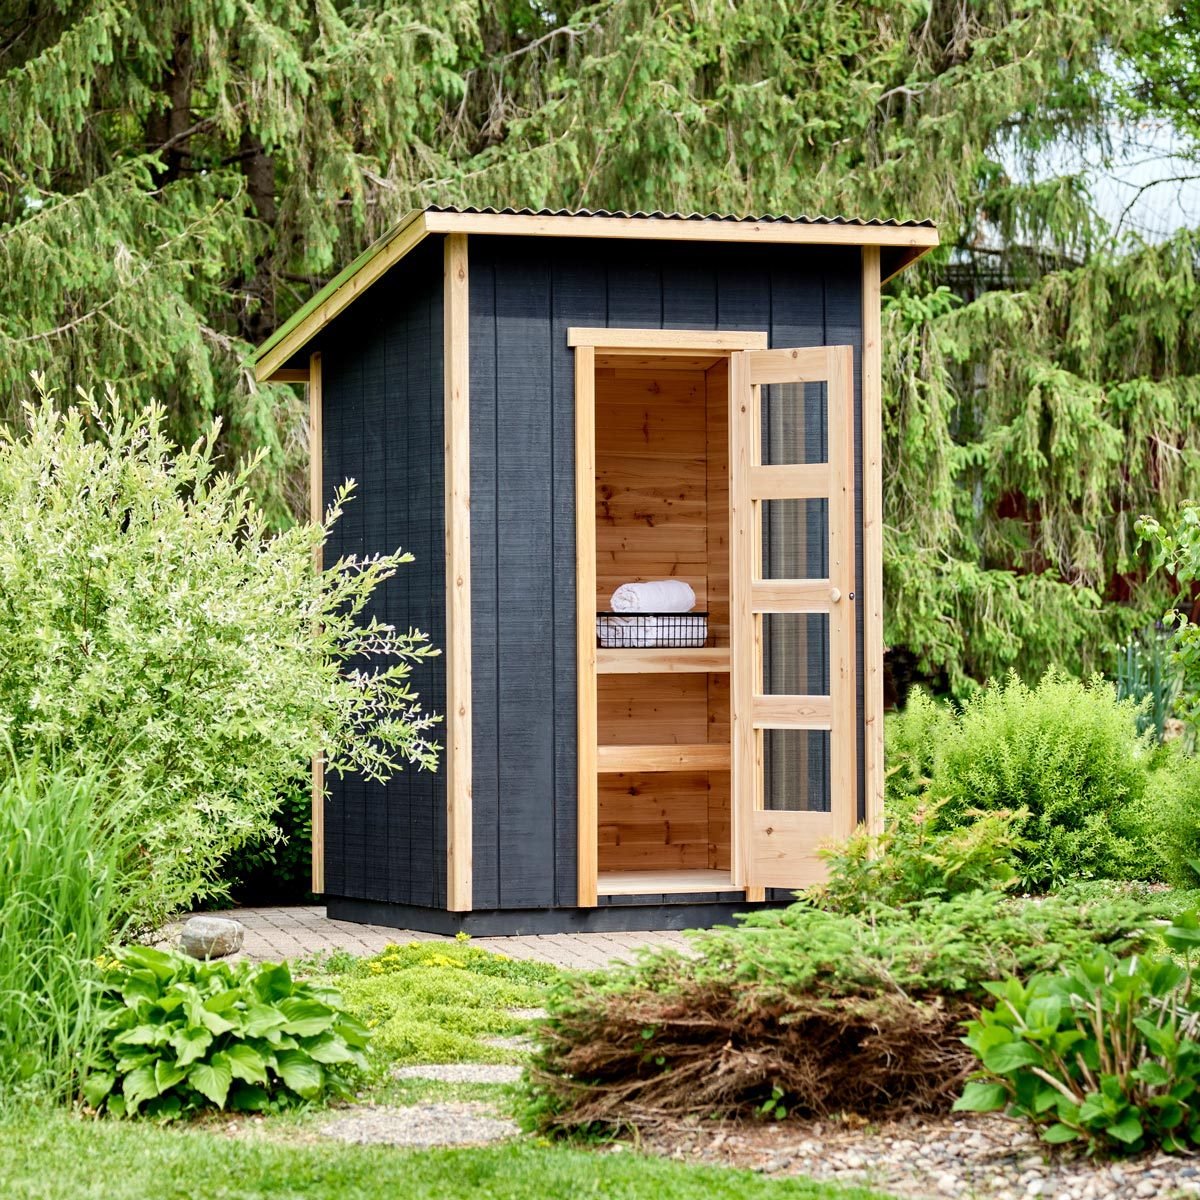
Traditional saunas have been around for centuries, but infrared saunas are catching on fast. Infrared sauna therapy has many proven health benefits. It allows you to detoxify, relieving tension and stress, but can also help you burn calories and maintain clear healthy skin.
Read on to learn how to build your very own indoor infrared sauna.
Tools Required
- 18-gauge finish nailer
- Bar clamps
- Circular saw
- Drill/driver
- Flush-trim router bit
- Hammer
- Hearing and eye protection
- Measuring tape
- Miter saw
- Router
- Speed square
- Staple gun
Materials Required
- #11-1/2 x 2 in. galvanized siding nails
- #8 x 2 in. finish screw
- #9 3" deck screws
- 1/4" x 3-1/2" cedar shiplap (114 Sq ft)
- 3-1/2" hinges
- 3/4" plywood 4x8 (3)
- 3/8-in staples
- 4 x 8 x 1-1/2" foam insulation (4)
- 4' x 8' T1-11 plywood (wall sheathing) (5)
- 5/16 x 4-in. structural screws
- 5/4 x 6 x 8-ft. cedar deck boards (3)
- 8' 2x2s (24)
- 8' 2x4s (17)
- Cedar 2x4 x 8' (4)
- Door handle
- Drive in door ball catch
- Foil tape
- Foil vapor barrier
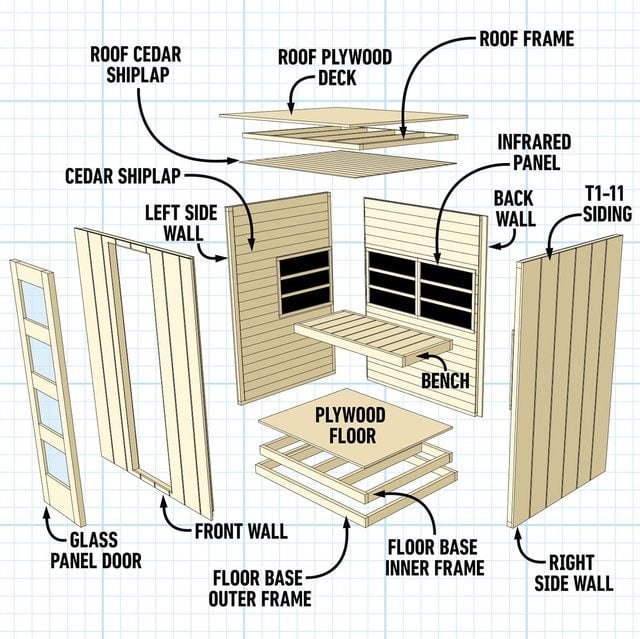
This modular design lets you construct the four walls, floor, roof, and benches of your indoor infrared sauna on-site, or build it and then transport it to a remote location. The overall dimensions are 5-ft. wide x 4-ft. deep x 6-ft. tall. Build your sauna to the size that meets your needs. Check out Fig. 1 to see how it all goes together.
Figure 1
Overall dimensions: 95-in. H x 6-in. W x 48-in. D.
Cutting List
| KEY | QTY. | PART | DIMENSIONS |
| A | 2 | Floor Base Outer Frame Front & Back | 1-1/2″ x 3-1/2″ x 60″ |
| B | 2 | Floor Base Outer Frame Sides | 1-1/2″ x 3-1/2″ x 45″ |
| C | 2 | Floor Base Inner Frame Front & Back | 1-1/2″ x 3-1/2″ x 57″ |
| D | 5 | Floor Base Inner Frame Stringers | 1-1/2″ x 3-1/2″ x 42″ |
| E | 1 | Floor Base Plywood Floor | 3/4″ x 45″ x 57″ |
| F | 4 | Front, Back Walls Top & Bottom Plates | 1-1/2″ x 1-1/2″ x 57″ |
| G | 4 | Side Wall Top & Bottom Plate | 1-1/2″ x 1-1/2″ x 48″ |
| H | 10 | Front, Back, Side Walls 2×2 Stud | 1-1/2″ x 1-1/2″ x 72″ |
| I | 4 | Front & Side Wall 2×4 Stud | 1-1/2″ x 3-1/2″ x 72 |
| J | 2 | Roof Frame Front & Back | 1-1/2″ x 1-1/2″ x 55-3/4″ |
| K | 5 | Roof Frame Studs | 1-1/2″ x 1-1/2″ x 40-3/4″ |
| L | 1 | Roof Deck | 3/4″ x 49-1/8″ x 61-1/8″ |
| M | 14 | Roof Cedar Shiplap | 1/4″ x 3-1/2″ x 45″ |
| N | 42 | Front Walls Cedar Shiplap | 1/4″ x 3-1/2″ x 17-9/16″ |
| O | 21 | Back Wall Cedar Shiplap | 1/4″ x 3-1/2″ x 45″ |
| P | 42 | Side Walls Cedar Shiplap | 1-1/2″ x 3-1/2″ x 45″ |
| Q | 2 | Side Wall T1-11 Siding | 9/16″ x 48″ x 75″ |
| R | 1 | Front & Back Walls T1-11 Siding | 9/16″ x 48″ x 75 |
| S | 1 | Front & Back Walls Filler T1-11 Siding | 9/16″ x 13-1/2″ x 75 |
Project step-by-step (12)
Planning Your Infrared Sauna
- Where to build it?
- Creating a space for an infrared sauna can be as simple as transforming an existing closet or building two walls in a corner of your basement. Maybe you’d like your sauna to be a free-standing building outdoors in your backyard. It depends on your budget and how ambitious you are.
- How big should it be?
- That’s determined by how many people you want in the space at one time. Keep in mind the larger the room size, the more infrared panels you’ll need. Ideally, you want to keep the room small and the ceiling low. A sauna room measuring 4-ft. x 5-ft. x 6-ft. high can seat two people comfortably.
- Power source
- Locate the closest power source and the amp capacity of the circuit. You may need to hire an electrician to wire a designated circuit.
- Calculating your space
- Calculate your room volume to determine the number of infrared panels and the correct wattage you will need for your sauna to operate efficiently. Start by multiplying the width x depth x height to determine the cubic feet of your sauna. A 4-ft. x 5-ft. x 6-ft. high room = 120 cubic feet.
- In general, you’ll need a minimum of 10 watts per one cubic foot. To determine the total watts needed, multiply the cubic feet x 10. So 120 cubic feet x 10 watts = 1,200 watts.
- A standard infrared panel is 300 watts. Since our 120 cubic foot room requires 1,200 watts, we’ll go with four 300-watt panels.

Build the Floor Base
- Now that you know the size of your sauna, it’s time to start building. Let’s start with the floor base. Cut and assemble four 2x4s for the outer frame.
- Next, measure the inside of the outer frame to determine the dimensions for the inner frame. Then cut and assemble the inner frame, adding support boards evenly spaced as shown below.
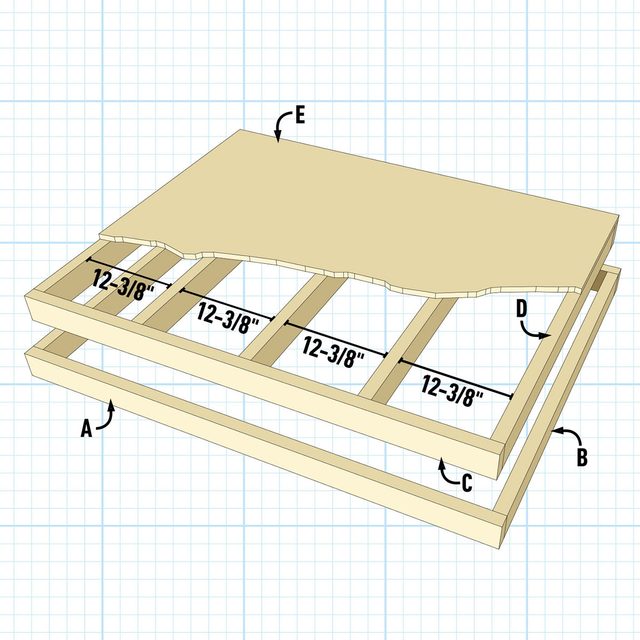
- Insert and attach the inner frame to the inside of the outer frame, letting the inner frame stick up 1-1/2-in. from the top edge of the outer frame.
- Cut a piece of 3/4-in plywood the size of the base inner frame.
- Before attaching the plywood floor to the base, insulate the spaces between each stud with 1-1/2-in. foam insulation.
- Attach the plywood to the floor base using 1-1/2-in. screws.
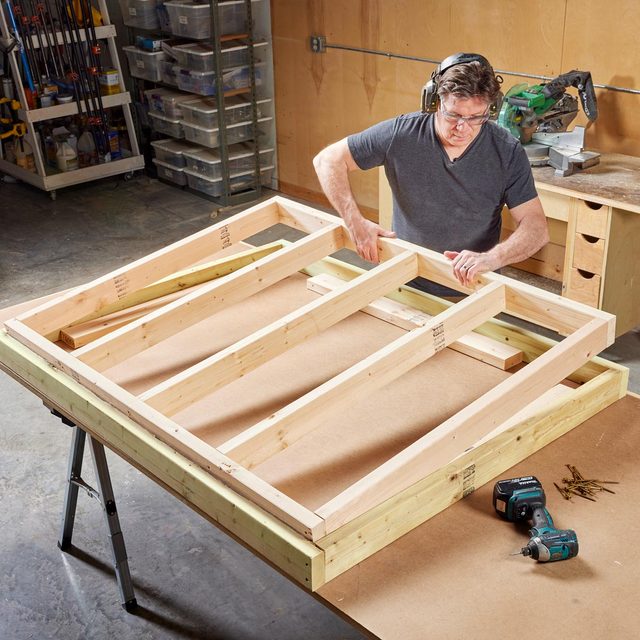
Building Walls
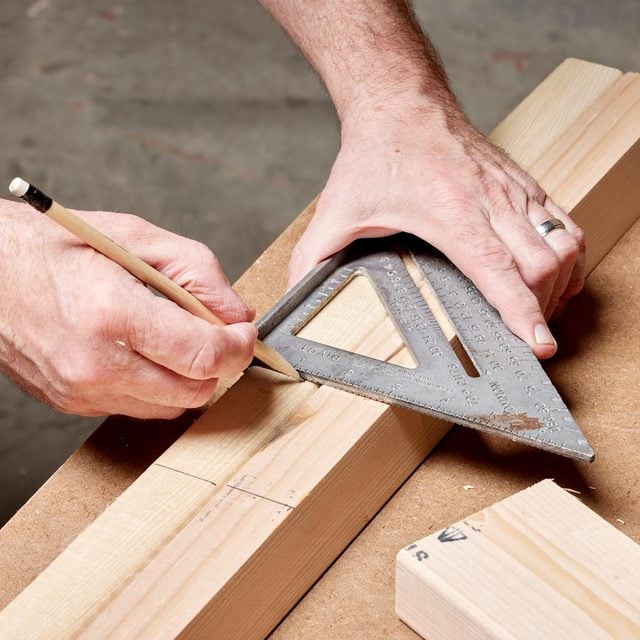
- Refer to the cut list and cut all the 2x4s and 2x2s to length for all the walls.
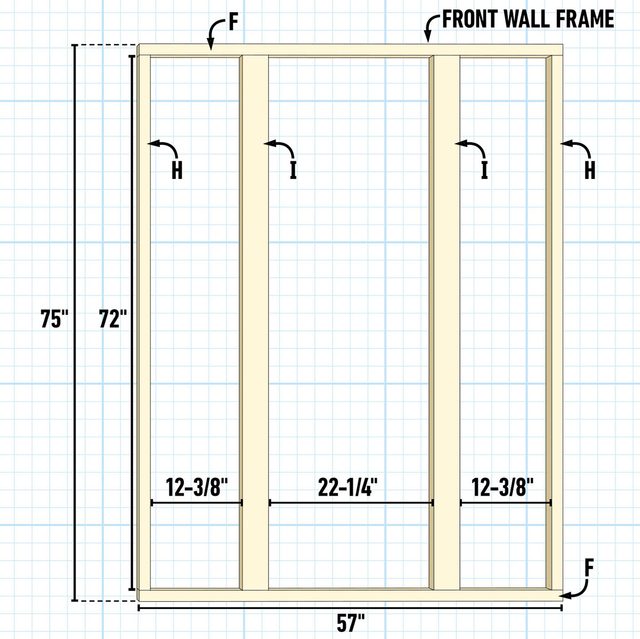
- To lay out the stud placement on the wall, hold the top and bottom boards together and draw lines where each stud will be attached. (See figures below.)
Back wall

Front wall
Side walls

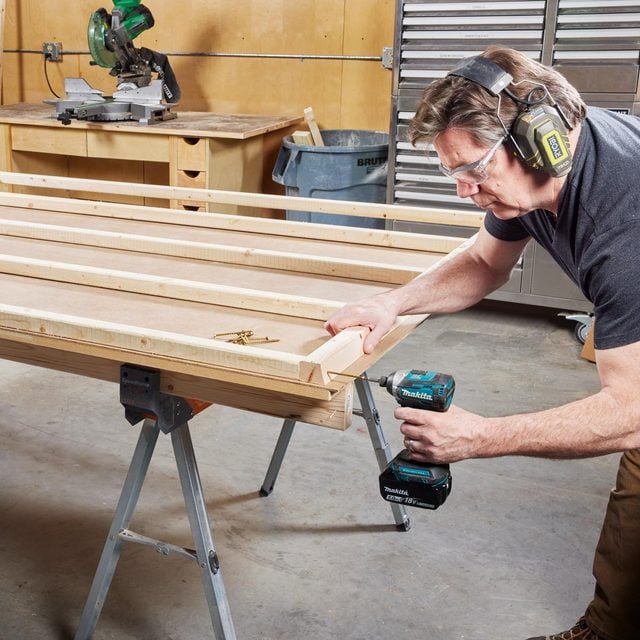
- Lay all the boards on a flat surface. Using 3-in. screws or nails, attach all the studs to the top and bottom board at the lines you made.
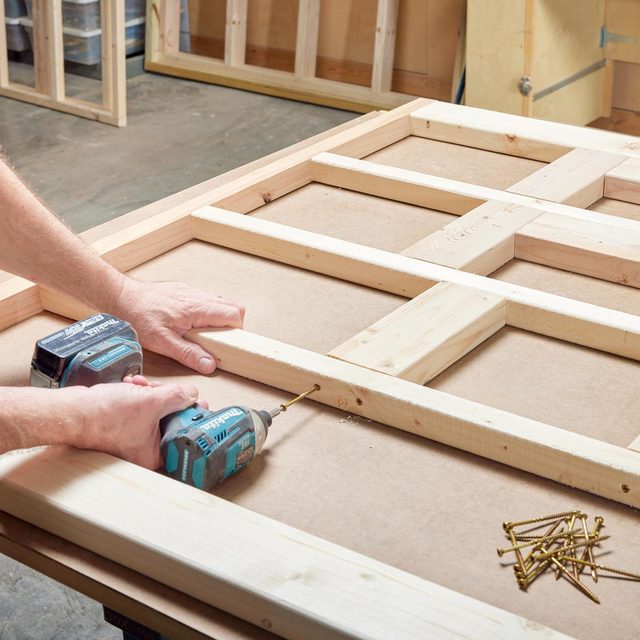
Bracing
- Add bracing between the studs on the back and side wall where the bench and infrared panels will be attached.
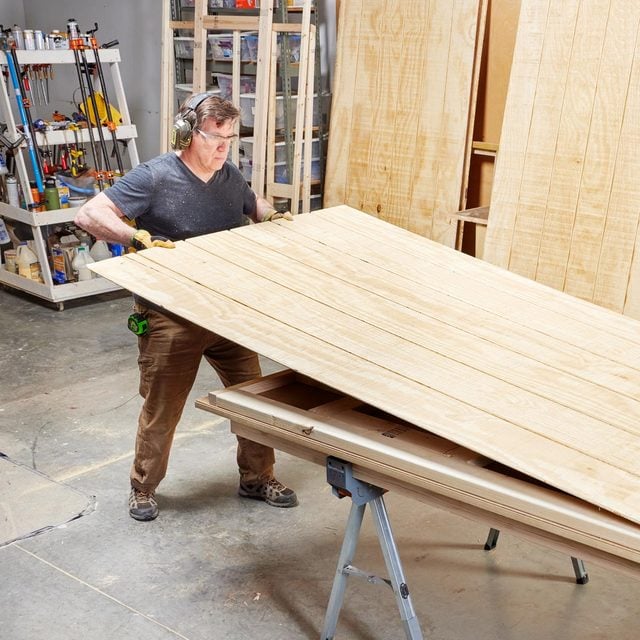
Exterior Wall Covering
- There are many products you can use to cover the exterior of your sauna’s walls. Choose what works for you and your budget. We went with T1-11 plywood siding.
- Start by laying one of your side wall frames flat on your work surface, with the outside of the wall facing up. Place a sheet of siding on top of your wall frame keeping it flush with the bottom of the frame. Hold it in place with a few clamps or drive a few nails along the bottom edge.
- Once the wall frame is square with the long edge of the siding, finish nailing it to all the studs using galvanized siding nails. Repeat this procedure on the other side wall.
- When attaching the siding to the front and back walls, let it hang over 2-1/4-in. on both sides of the wall frame. Since the front and back walls are five feet wide, fill in the remainder of the siding, being sure to let it hang over 2-1/4-in. off the other edge.
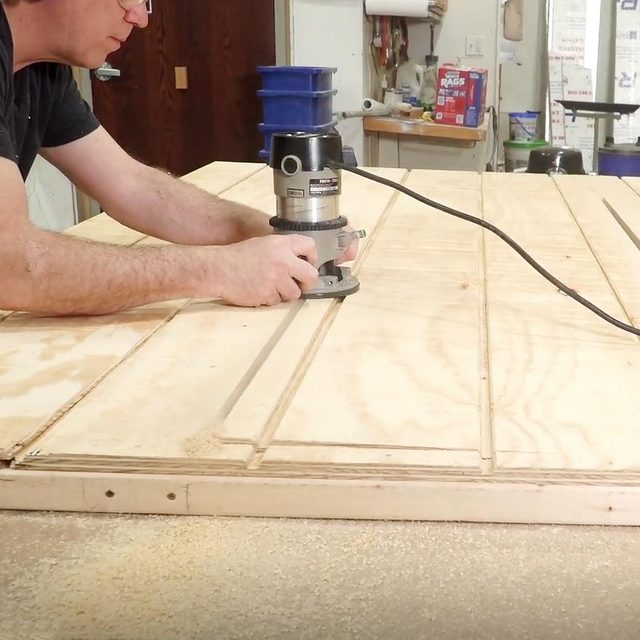
- When the siding is securely fastened to the frame, cut out the door opening on the front wall using a router with a flush trim bit.
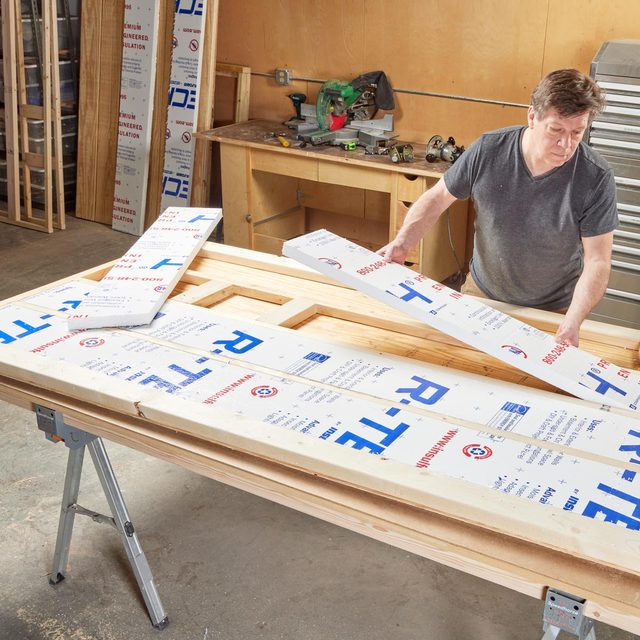
Insulating
- At this point, before you insulate, you can install the electrical wiring inside the walls for the infrared panels. You can also run the wires on the outside of the walls after the sauna is assembled.
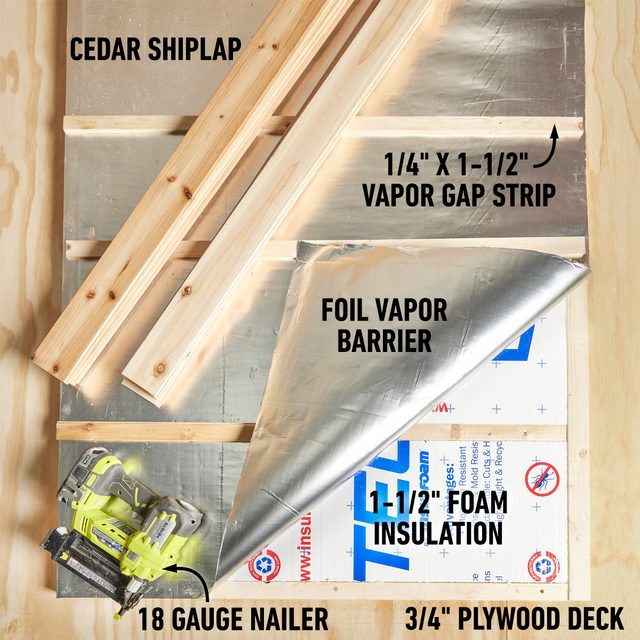
- Now on to insulating the walls. Start by measuring the spaces between studs. Cut pieces of 1-1/2-in. foam insulation for each stud space with a table saw or long blade utility knife. The foam insulation friction fits into each stud space.
Vapor barrier
- Using a staple gun, cut and attach foil vapor barrier to the interior of all four walls.
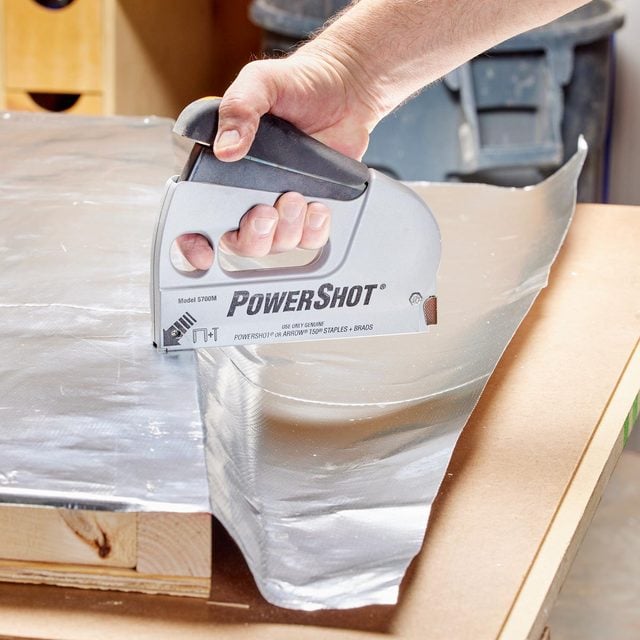
- Seal the edges and any seams with foil tape.

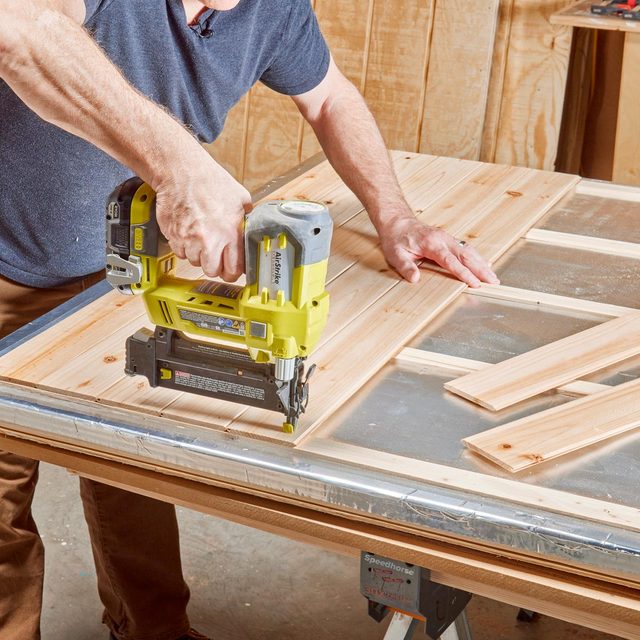
Cedar Shiplap
- Before installing the cedar shiplap, you’ll need a 1/4-in. gap between the vapor barrier and the shiplap. This allows moisture to evaporate.
- Cut and attach 1/4-in. x 1-1/2-in. wood strips onto each stud, the full length of all four walls.
- For the side walls shiplap, start your first row 2-1/4-in. from the bottom and 1-1/2-in. from each side. Then attach the shiplap to each stud with 1-1/4-in. nails.
- For the front and back wall shiplap, again start your first row of shiplap 2-1/4-in. from the bottom. But this time, do it only 1/2-in. from each side.
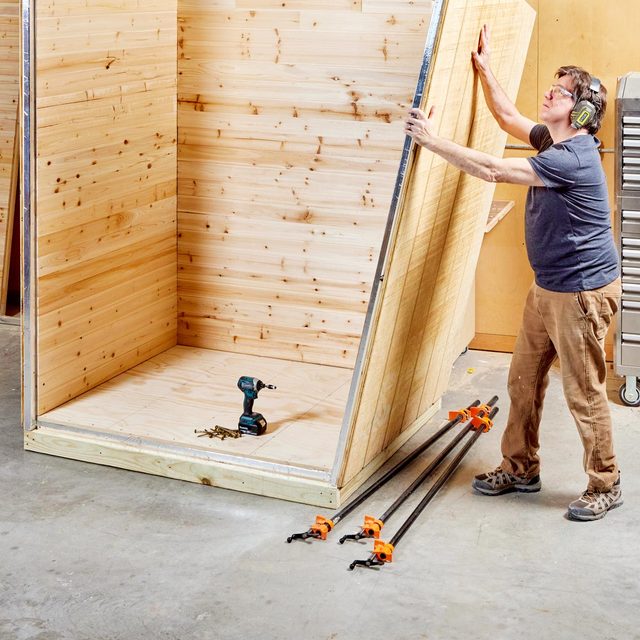
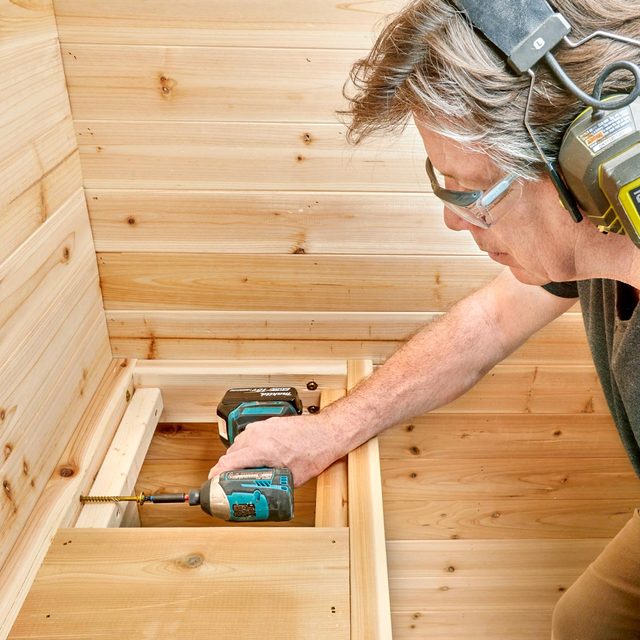
Assemble The Walls
- Time to assemble the walls. Start by setting the back wall on the floor base. Have a helper hold it in place or attach a 2×4 from the edge of the wall to the floor base.
- Set one of the side walls on the floor base and secure it to the back wall with bar clamps.
- Check to see if the tops of the walls line up; this will assure your box is square. Then secure the two walls together using 5/16- x 4-in. structural screws. Attach the other side wall to the back wall in the same manner.
- Set the front wall on the base and clamp all four walls together. Again, check to see if the tops of the walls line up. Then secure both side walls to the front wall with 5/16- x 4-in. structural screws.
Exterior wall
- The plywood siding should be sealed with paint or a polyurethane finish.

The Roof
- Before you build the roof frame, measure the width and depth of the inside of your sauna. Then you can start building the frame to that dimension.
- Attach the studs to the front and back boards using 3-in. screws.
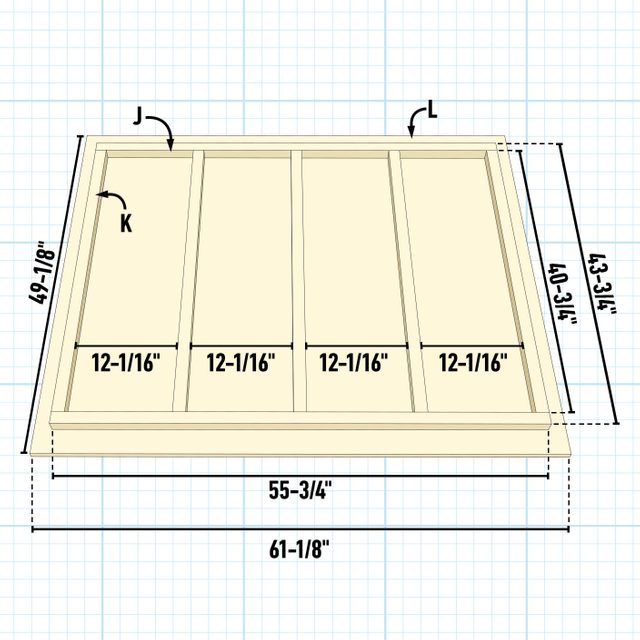
Roof deck
- Cut 3/4-in. plywood for the roof deck. Depending on the size of your roof, you may need to butt two pieces of plywood together or purchase a 5-ft. x 8-ft. sheet of plywood.
Attach the roof frame
- Center the roof frame on the plywood deck and attach it using 1-1/2-in. screws from the underside of the plywood.
Insulation, vapor barrier and cedar shiplap
- Insulate each stud space and attach a foil vapor barrier to the frame as you did the walls.
- Cut and attach 1/4-in. wood strips to each stud as before.
- Cut and attach cedar shiplap to the frame, keeping it flush on all four edges of the frame.
Install the roof
- With a helper, lift the roof assembly on top of the sauna walls and set it into place. Secure it with 3-in. lag screws along the top rim of the walls.
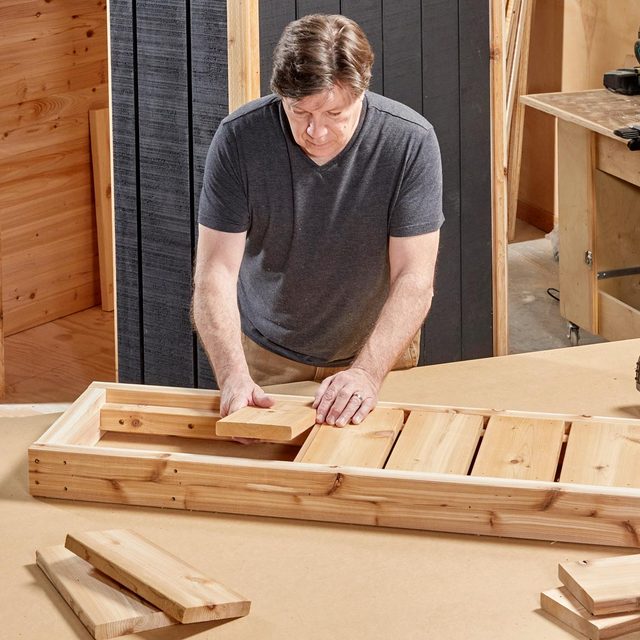
Bench
- Infrared saunas typically have one bench about 24 inches deep and 18 to 24 inches from the floor.
- This bench is a 2×4 cedar frame with 1×6 cedar decking attached to nailing cleats set inside the frames.
- Start by measuring the width of the inside of your sauna, then make yourself a cut list. Cut all the boards on your list to length, assemble the frames and attach the nailing cleats.
Bench cutting list
Bench dimensions: 3-1/2-in. H x 56-in. W x 26-in. D.
| KEY | QTY. | PART | DIMENSIONS |
| A | 2 | Front & Back Frame Boards | 1-1/2″ x 3-1/2″ x 56″ |
| C | 3 | Nailing Cleats | 1-1/2″ x 1-1/2″ x 53″ |
| D | 2 | Bench Frame Sides | 1-1/2″ x 3-1/2″ x 23″ |
| F | 9 | Bench Decking | 1″ x 5-1/2″ x 23″ |
- Place the deck boards on the nailing cleats between the front and back boards with a 1/2-in. gap between each board. Attach the deck boards with 2-1/2-in. finishing nails or screws.
Install benches
- Attach the benches (level) to the back and side walls using 3-in. screws through the cedar shiplap into the bracing inside the walls.
The Door
- The door for your sauna could be as simple as a piece of plywood on hinges with a door pull. Some indoor saunas have large 1/2-in. thick glass doors. Here’s the most important thing: For safety, your sauna door should always open out and never have a lock.
- We decided to make our glass panel door with 1-1/2-in. cedar boards and, to save money, tempered glass cutting boards instead of regular tempered glass.
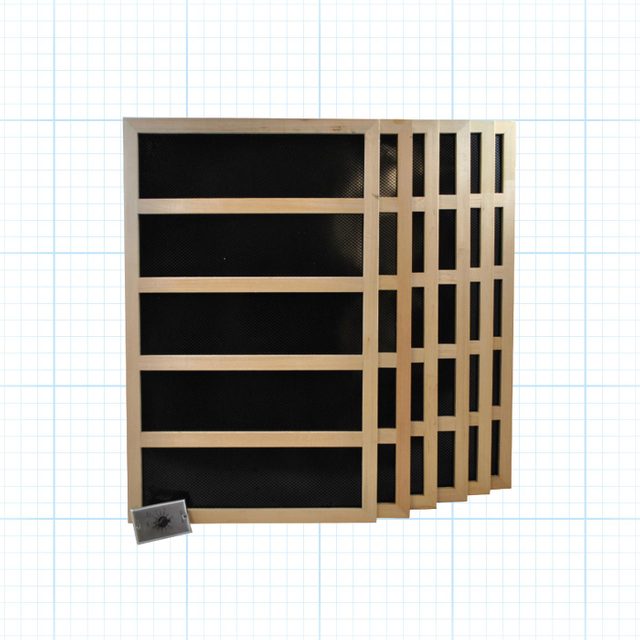
Infrared Panels and Controls
- Infrared panels
- Infrared panels come in many sizes and wattage outputs, enabling you to custom fit panels to the size of your sauna room. A common 300-watt infrared panel measures 30-in. x 20-in. The easily installed panels come with protective wooden heat guards. Contact an infrared panel manufacturer/distributor for a sauna room infrared heater package including panels, digital controller and sauna light.
- Control panels
- The control panel is the brain of your sauna. There are several types available in a range of prices. The most affordable is a simple on and off mechanical timer switch. The more expensive digital control panels monitor the temperature, time and light; some even include a remote control.
- Lighting
- Mood lighting is a must in your sauna. LED strip light can be installed around the perimeter of the ceiling or under the bench and can be connected to the control panel.
- Audio
- You may want to consider installing an audio system in your sauna. Or simply use your phone with a Bluetooth speaker.
Installing and Wiring Infrared Panels
- Mounting infrared panels
- The infrared panel should not make direct contact with the wall. It is recommended to have a foil barrier and a 1/4-inch gap between the wall and the infrared panel.
- Attach the infrared panels with finish screws through the panel frame into the walls of your sauna.
- Wiring panels
- Depending on the manufacturer, some infrared panels plug into a power box that distributes power to each panel. The control panel, thermostat and lights also connect to the power box. Other infrared panels are hard-wired in series directly to a control panel.
- We always recommend hiring a licensed plumber or electrician to install any gas or electric appliance.
